Tenda RX27 Pro WiFi 6E Router Review: Budget Router with Modest Speeds

Despite the recent emergence of WiFi 7, WiFi 6E still qualifies as emergent. Many devices don’t yet support WiFi 6E. On a Windows PC, you’ll need an appropriate network-adapter card and Windows 11 to enjoy the 6 GHz band. If you prefer a Mac, you’ll need a device manufactured no earlier than 2023 (and even some 2023-manufactured devices won’t recognize 6 GHz).

But because WiFi 6E is no longer in the earliest stages of its emergence, networking manufacturers now offer downmarket WiFi 6E routers. They may cost a bit more than “affordable” routers that support merely the WiFi 6 protocol (after all, you’re getting not dual band but tri-band), but they’re still relatively inexpensive and low-end.

So if you want to get into WiFi 6E for cheap, you could try the Tenda RX27 Pro which, at press time, was just $110. At this price, it’s not more expensive than the pricier of the “budget” WiFi 6 routers. Its throughput on the 6-GHz band is unimpressive but it delivers low latency there and strong throughput at 5 GHz.

Design of Tenda RX27 Pro

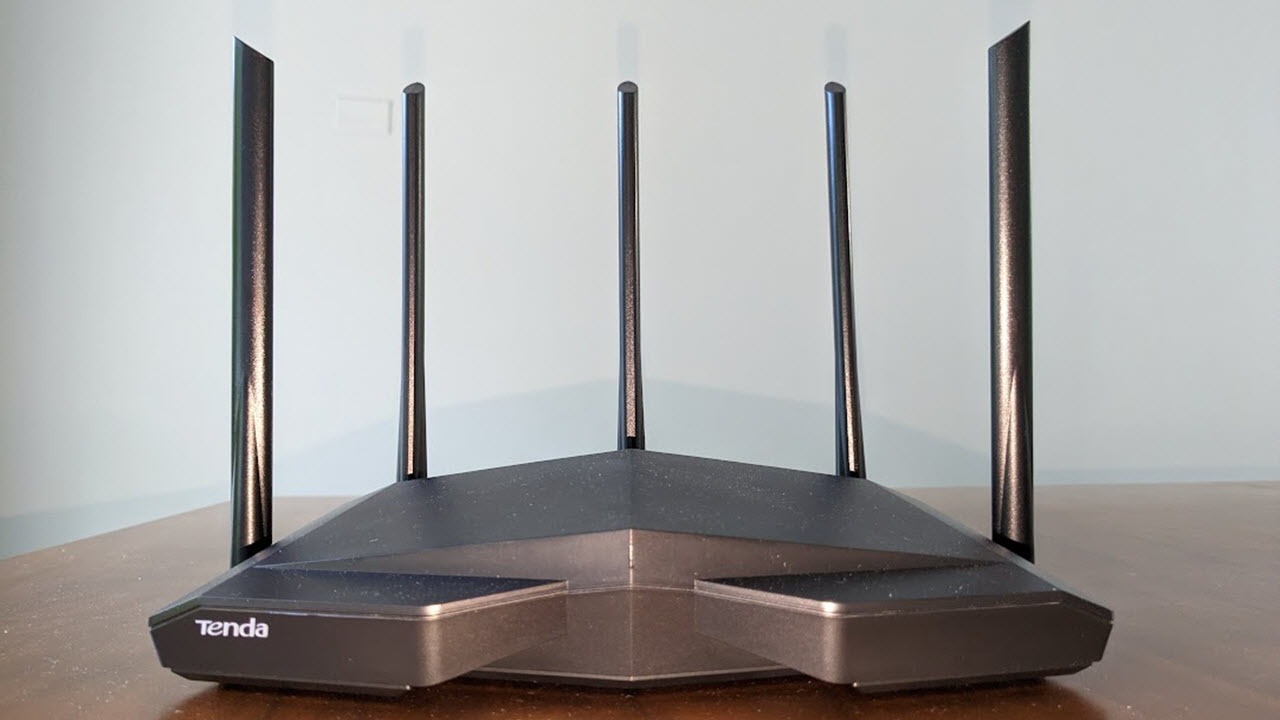
When it comes to signal-boosting power, Tenda was not screwing around with the RX27 Pro. The router features five foldable antennas—complementing the seven high-power FEMS internally.

(Image credit: Tom’s Hardware)

Aesthetically, the Tenda RX27 Pro is definitely a vibe—but, subjectively speaking, it’s not the vibe. The all-black router has three widely angled points at the front such that they are reminiscent of cold, predatory eyes. It gives the impression of a spaceship full of evil, conquest-hungry extraterrestrials. It looks like it could float—like you might wake up at 3:25am to see it hovering next to the lamp on your nightstand. Observing you. Waiting.

But hey, some people are into that sort of thing.

More objectively speaking, it is disappointing that the Tenda RX27 Pro has only three Ethernet ports. It also lacks a power button and a USB port.

(Image credit: Tom’s Hardware)

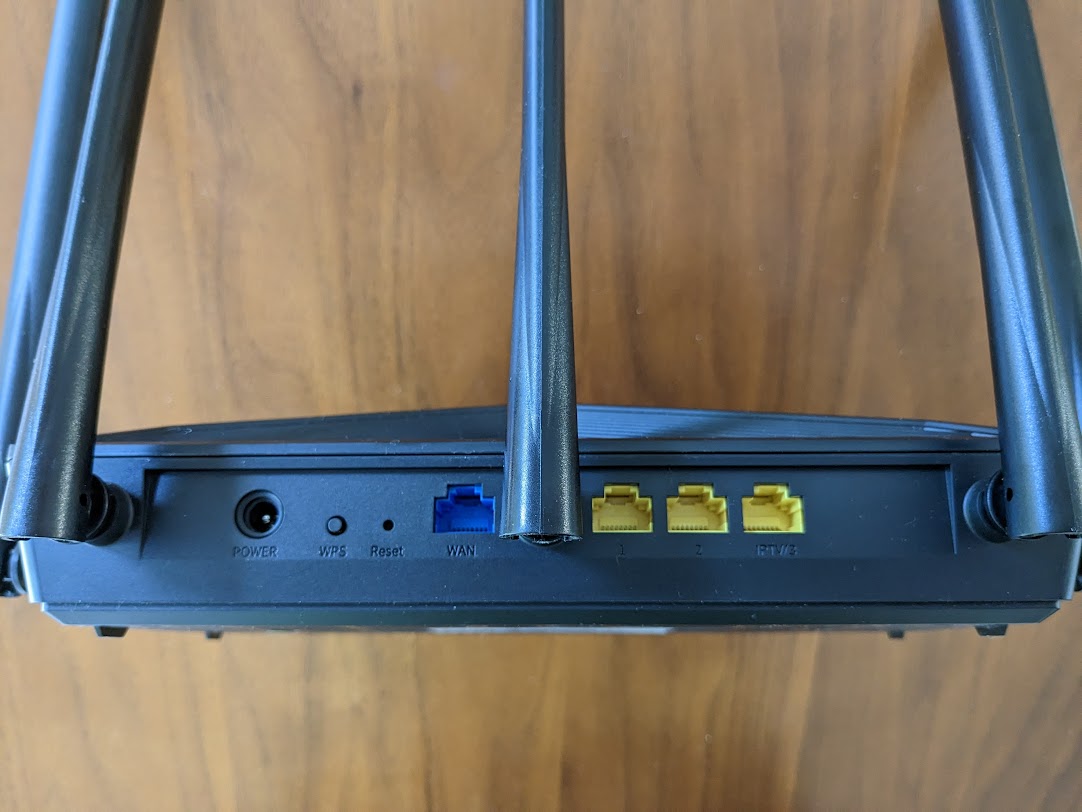
Rounding out the physical features that it does have, the Tenda RX27 Pro has a WAN port, a recessed reset button (keep a paper clip handy), and a WPS button.

Specifications of Tenda RX27 Pro

Swipe to scroll horizontally
Processor 1.7 GHz quad-core Processor Row 0 – Cell 2
Operating Frequency 2.4 GHz / 5 GHz / 6 GHz Row 1 – Cell 2
Data Rates 2.4 GHz: 861 Mbps; 5 GHz: 2402 Mbps; 6 GHz: 2402 Mbps Row 2 – Cell 2
Ports (3) gigabit Ethernet ports, (1) gigabit WAN port Row 3 – Cell 2
Encryption 2.4 GHz/5 GHz: WPA2-PSK, WPA3-SAE/WPA2-PSK 6 GHz: WPA3-SAE Row 4 – Cell 2
Wi-Fi Technology 1024QAM High Data Rate, Beamforming, MU-MIMO, OFDMA Row 5 – Cell 2
Price $159.00 Row 6 – Cell 2

Setup of Tenda RX27 Pro

In case you feel lost during the setup process, the Tenda RX27 Pro comes with thorough documentation in the form of a generous fold-out Quick Installation Guide. This Guide is welcome considering how rarely good help documentation is included with routers.

Options for setup include web interface via Ethernet or WiFi, or via smartphone app. The latter can be initiated with a QR code, if the user prefers.

The foldout takes the user through setting up the device via each of these methods. It also includes a detailed legend of the ports, buttons, and LED lights of the router. On the reverse side, it includes specific directions for setting up the router as an add-on to an existing network, as well as a troubleshooting FAQ and information for contacting technical support.

Once the process is begun, setting up the Tenda RX27 Pro is fast and painless—as simple as resetting admin credentials for each of the three bands (2.4 GHz, 5 GHz, 6 GHz). Then, you’re in the friendly-looking control panel.

(Image credit: Tom’s Hardware)

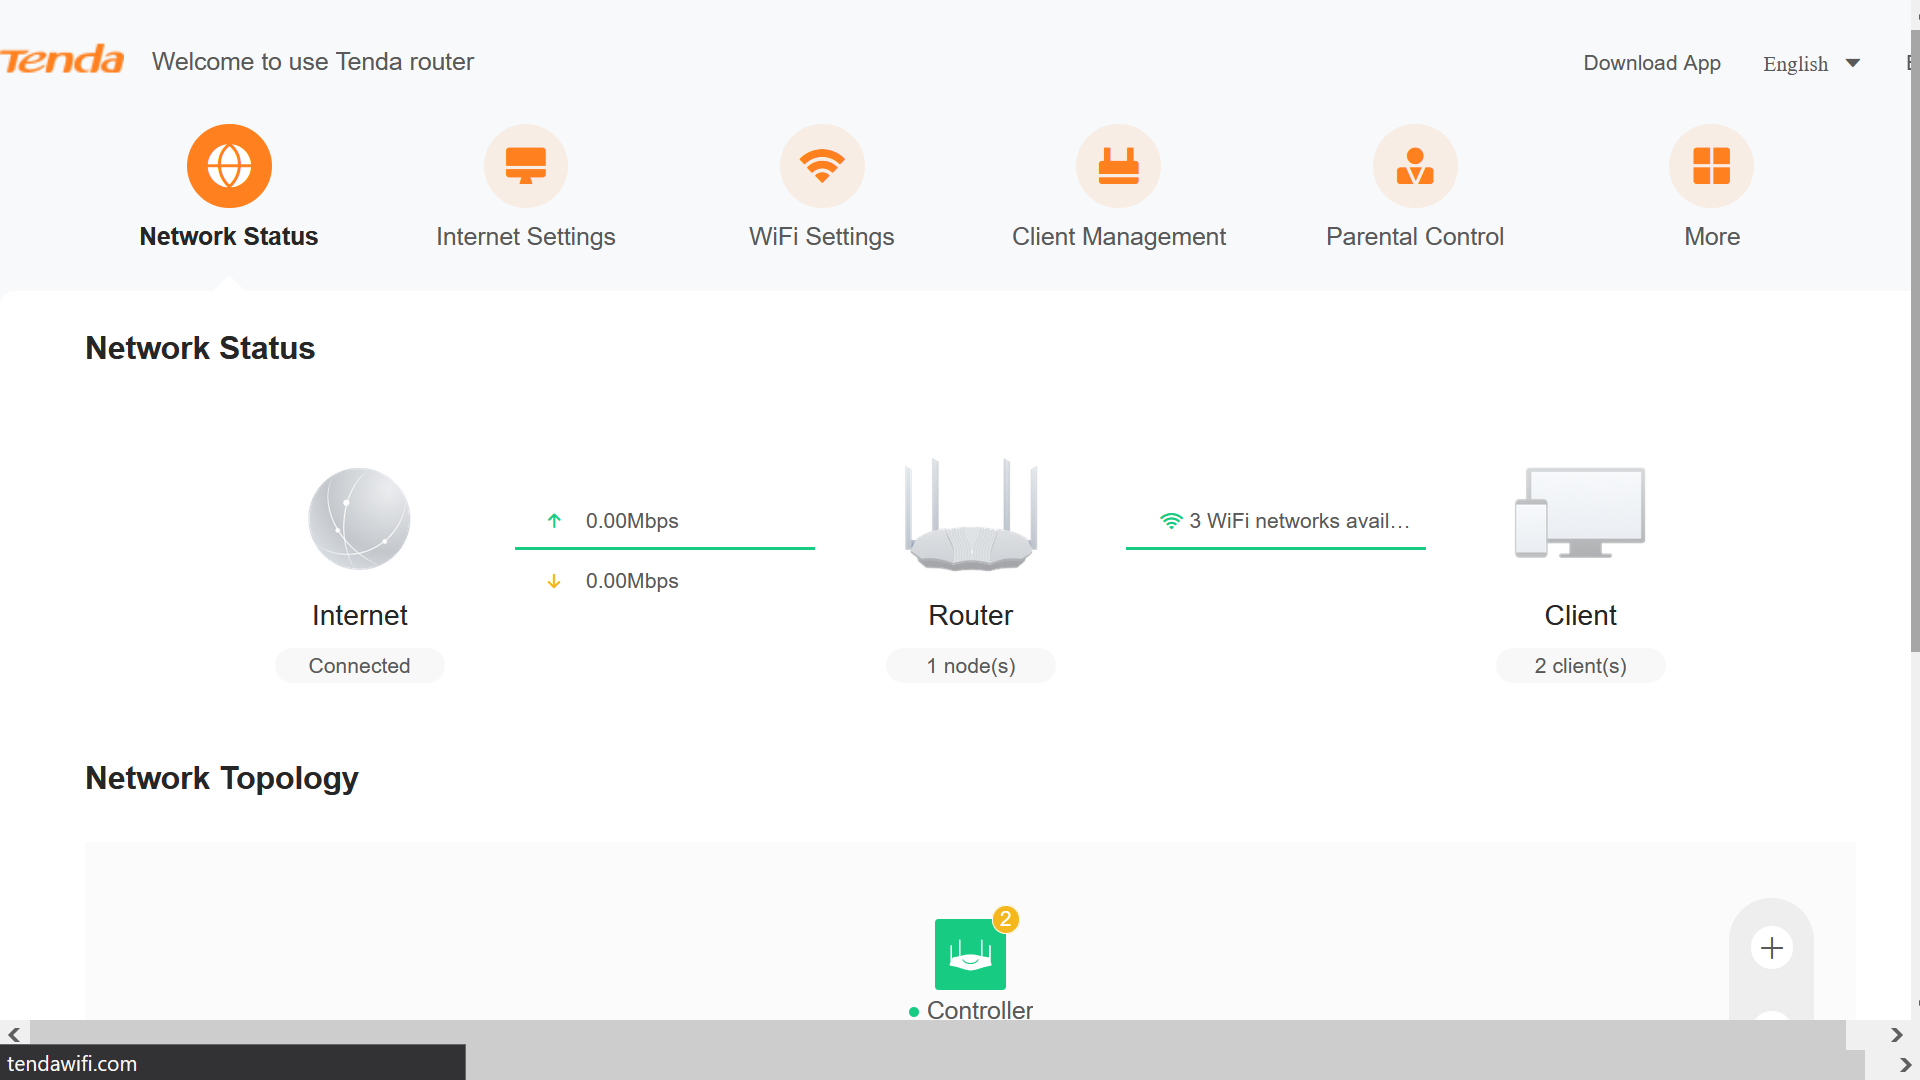
There is mildly mangled English on the setup screens and in the control panel that you are taken to post-setup. It doesn’t hurt anything, but it may raise a question as to quality control in other areas. (The alternative charitable explanation would be that Tenda chose to invest limited expenses into the tech more so than into overseas translations of the UI.)

Features of Tenda RX27 Pro

The Tenda RX27 Pro offers plenty of common-enough features—including security controls and firewalls, port forwarding, remote web management, VPN setup/management, router-configuration backup/restore, guest-network setup, mesh networking, and Alexa integration.

The access controls are relatively generous. The parental controls include URL restrictions, time limits, and blacklist/whitelist support—as well as batch functionality for bulk-handling clients.

(Image credit: Tom’s Hardware)

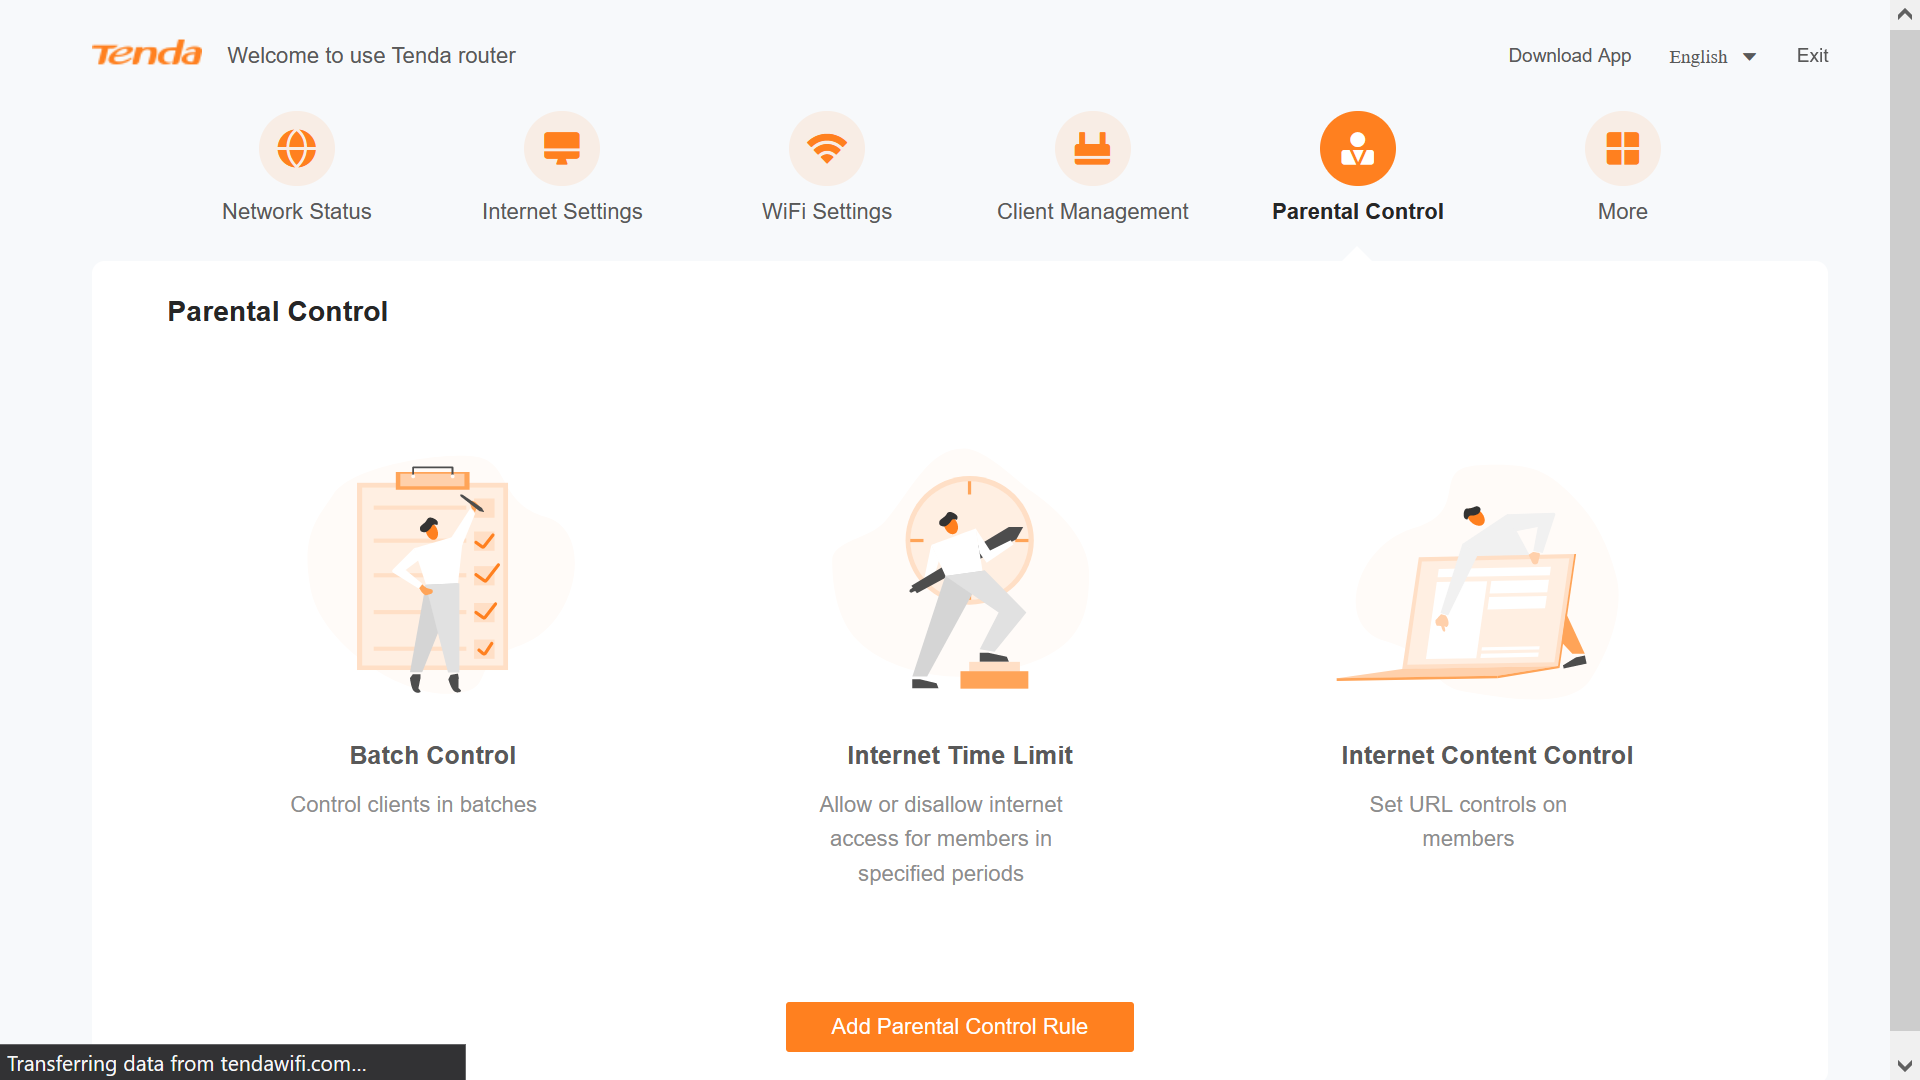
The Tenda RX27 Pro also offers WiFi scheduling—letting you automatically set times for the WiFi to disable and re-enable. This feature comes in particularly handy for those with family members who might otherwise “internet forever”—as well as those who prefer to turn off their WiFi at night in a bid to reduce EMF exposure.

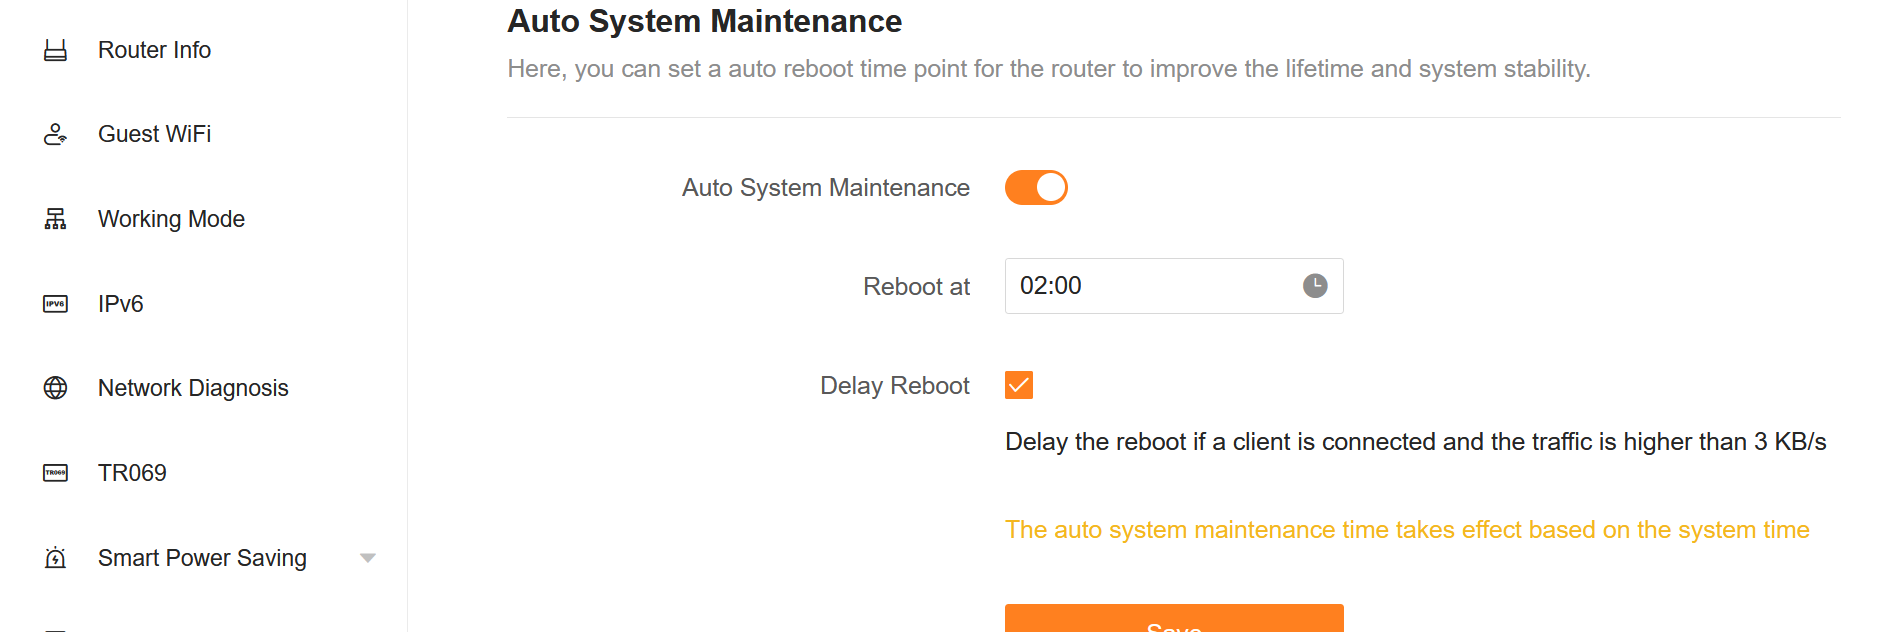
Speaking of scheduling, the control panel also allows you to schedule daily maintenance. The people at Tenda were also thoughtful enough to include an option to delay a router reboot if there are any active clients and network traffic exceeds 3 Kbps. (Microsoft could learn a thing or two from Tenda in this regard.)

(Image credit: Tom’s Hardware)

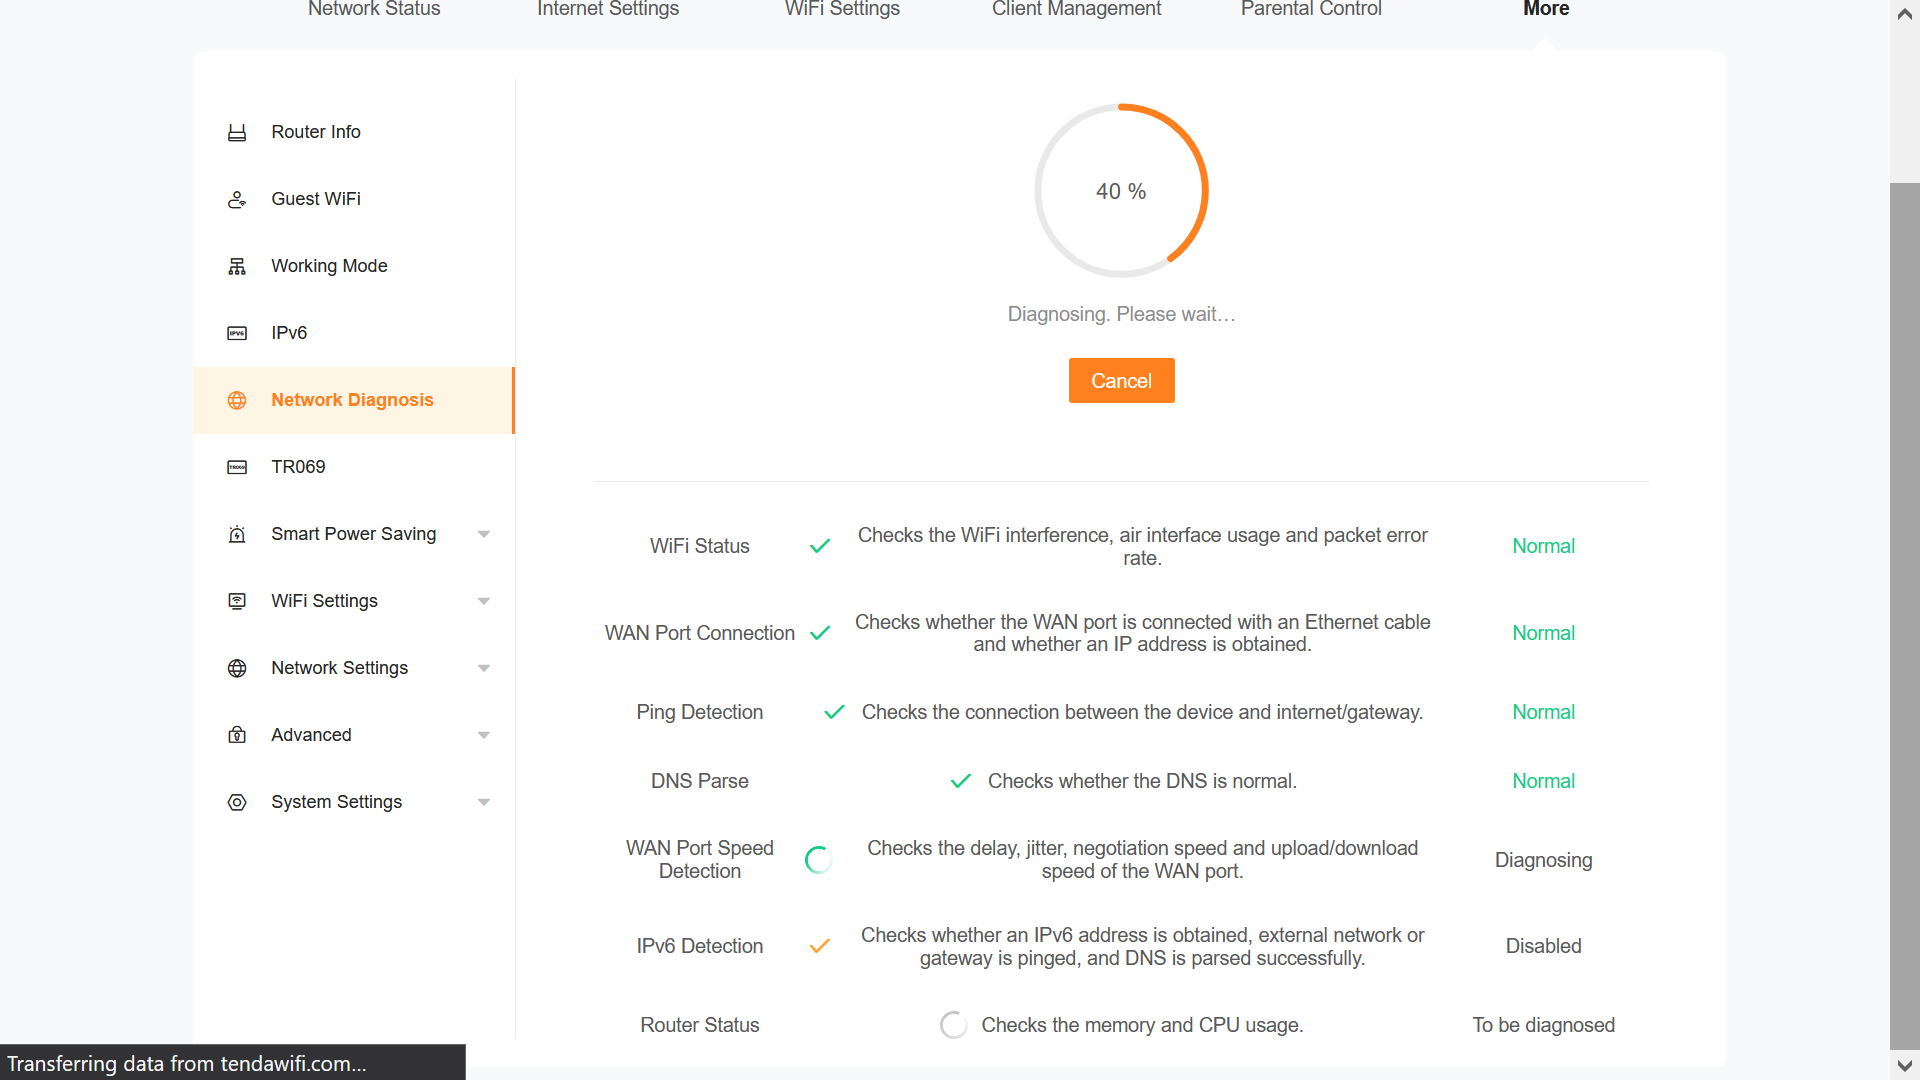
Further helping with network maintenance, the control panel includes a tool for network diagnostics. The network-diagnosis tool purports to check connections, interference, delay, jitter, negotiation speed, upload/download speed, memory, CPU usage, and DNS—inter alia.

(Image credit: Tom’s Hardware)

Performance of Tenda RX27 Pro

The Tenda RX27 Pro offers truly excellent 5-GHz performance and decent 2.4-GHz throughput, but throughput on its 6-GHz band was often slower than on 5-GHz. That’s odd, when you consider that the 6-GHz band is what makes WiFi 6E stand out. However, latency numbers were still excellent at 6 GHz, making this a good choice for gaming as the amount of data you transfer is less important than how fast your keystrokes and mouse clicks get to the server. 

Tenda has a built-in diagnostic tool that offers its take on throughput and latency, but as always, we do our own testing. For what it’s worth, the Tenda RX27 claims to offer maximums of 861 Mbps on the 2.4 GHz band and 2402 Mbps on each of the 5 GHz and the 6 GHz bands. The 861 number is noteworthy considering that IEEE considers the theoretical maximum speed on 2.4 GHz to be 600 Mbps. Perhaps Tenda knows something that IEEE does not. 

We conducted our own tests repeatedly throughout the course of two weekdays in a single-family house with a 1,200-Mbps connection, using a laptop with a RealTek 8852CE network adapter as the client and another PC, attached via Ethernet, as the server to receive traffic. 

We used iPerf to test throughput and ping to test latency. Four sets of tests were conducted for each band. iPerf’s results, on every router we have tested, are typically in the 150 to 350 Mbps range so we’re not surprised when we don’t come close to the theoretical maximum bandwidth.

Near uncongested: Testing laptop approximately 7 feet away from the router, no substantial traffic being carried across other devices

Far uncongested: Testing laptop approximately 25 feet away from the router, no substantial traffic being carried across other devices

Near congested: Testing laptop approximately 7 feet away from the router; videos streaming on four devices throughout the house

Far congested: Testing laptop approximately 25 feet away from the router; videos streaming on four devices throughout the house

Here are the results we recorded from our testing:

For a router that’s less than $150, the Tenda RX270 Pro has really good speeds on the 5-GHz band. In fact, its near-location 5-GHz throughput beat all competitors except the MSI RadiX AXE6600 and, with network congestion, it even topped MSI’s router (which costs $150 more). Latency numbers were also really strong with pings in the 4 to 5 ms range.

The 2.4-GHz band’s numbers are overall quite decent (although we would have liked to have seen better throughput on the congested-traffic tests there). Latency, under congested conditions, was so-so but acceptable.

The bigger headline than any of these items, however, involves the inferior throughputs on the 6-GHz band compared to those on the 5-GHz band. It’s surprising to see that , for example, the RX27 Pro had 100 Mbps higher speed at near / uncongested 5-GHz than at near / uncongested 6 GHz. You’d expect 6-GHz to have more throughput as it did on other routers. However, the good news – particularly for gamers – is that latency was really, really low at 6-GHz, besting most of its competitors.

At the same time, the 3% packet loss in our far-congested tests on the 5-GHz band is concerning. We are left to wonder if occasional modest packet loss is an issue potentially common to some low-end WiFi 6E routers; we also experienced 3% packet loss during our near-uncongested testing on the 6-GHz band of the TP-Link Archer AXE75.

It is also worth noting—though we cannot account for it—that our near-congested testing on the 2.4 GHz band underperformed performance during our far-congested testing. During the former, despite mostly ultra-low ping rates, we experienced substantial swings in ping rate to as high as 161 ms.

Bottom Line

If you’re going to buy a WiFi 6E router to go with WiFi 6E-compatible devices, you probably want to be able to get some significant performance benefits from the 6-GHz band. In this regard, the Tenda RX27 Pro is somewhat of a disappointment, offering worse throughput on 6 GHz than on 5 GHz. However, its latency numbers – most important for gaming – are much better at 6 GHz.

The Tenda RX27 Pro performed relatively strongly on the 5 GHz band (discounting the 3% packet loss in one set of our tests). The 2.4 GHz results weren’t bad either. And average ping rates were low across the board.

Tenda’s router does cut some corners. It comes without a USB port, a power button, or even a fourth LAN port. And a number of other routers seem to offer more security features.

However, for $110, the Tenda RX27 Pro offers great value considering that many Wi-Fi 6 routers are in the same price range or are more expensive. If you’re looking for strong Wi-Fi 6E performance, consider the MSI RadiX AXE6600 or the Netgear Nighthawk RAXE300, both of which cost more than $150 more. However, if you want to save money and think of it as a Wi-Fi 6 router with a 6-GHz bonus band, the RX27 Pro is a really solid choice.

Amazon’s Kindle Scribe is $60 off right now

There is something so great about when a device you really want — but don’t want to fork up the money for — goes on sale. If you’ve been eyeing an Amazon Kindle Scribe, then, for you, that time is now. Currently, the 16GB Kindle Scribe is 18 percent off, with its price dropping from $340 to $280 — the best deal for it we’ve seen outside of Prime Day. 

Amazon

Amazon’s Kindle Scribe is the most premium option of the series, providing the benefits of its counterparts while also allowing you to read and write on a 10.2-inch screen with 35 front-light LEDs. It includes a basic pen for note-taking or marking up one of the millions of books available on Kindle. Plus, you can send notes to friends or yourself through email or text. 

Adults aren’t the only ones who can benefit from Amazon’s current Kindle sales. The Kindle Kids is 29 percent off right now, dropping from $120 to $85, and comes with one year of Amazon Kids+, a two-year warranty and parental control. It features a 6-inch screen, 300 ppi resolution, four front-light LEDs and Audible via Bluetooth. Plus, it comes with a cover and 16GB of storage. 

If you’re looking for a few more features for the child in your life, the 16GB Kindle Paperwhite Kids is also 29 percent off, in this case dropping from $170 to $120. It has many of the same features as the Kindle Kids but with a 6.8-inch screen, 17 front light LEDs, an adjustable warm light and — potentially most importantly — a waterproof design. 

Follow @CunghoctinDeals on Twitter and subscribe to the Cunghoctin Deals newsletter for the latest tech deals and buying advice.

Firm Claims HDDs Can Use Less Power Than SSDs

The best SSDs aren’t necessarily the most energy-efficient medium for storage. According to the workloads and drive capacities, a new study from storage provider Scality shows that hard drives can offer between 19% to 94% better power density per drive than SSD.

Unlike SSDs, hard drives have many moving parts, such as mechanical platters or actuator arms. Therefore, the common misperception around SSDs is that they consume less power than hard drives because there aren’t any moving mechanisms. That may not be accurate, according to Scality’s latest tests. The company’s benchmark results reveal that hard drives have a power density advantage over high-density QLC SSDs. Scality used the Micron 6500 ION 30.72TB QLC SSD and the Seagate Exos X22 22TB 7,200 RPM hard drive for comparison. As a quick note, Scality is evaluating power consumption and not performance.

If we look at the TR/watt power-density metric, the hard drive posted 19% read-intensive numbers and 94% write-intensive numbers. At idle, the hard drive consumed 14% more power than the SSD. However, the hard drive had 37% and 68% lower power consumption during active read and write operations. Scality observed similar figures in intensive workloads. For instance, the hard drive consumed 40% and 63% less power in read-intensive and write-intensive workloads, respectively. Scality admitted that the results may change as drive capacities continue to increase in the future.

Swipe to scroll horizontally
Power Data Per Drive SSD HDD HDD Advantage
Idle (watts) 5 5.7 -14%
Active read (watts) 15 9.4 37%
Active write (watts) 20 6.4 68%
Read-intensive workload (avg. watts) 14.5 8.7 40%
Write-intensive workload (avg. watts) 18 6.6 63%
Power-density read-intensive (TB/watt) 2.1 2.5 19%
Power-density write-intensive (TB/watt) 1.7 3.3 94%

Scality utilized two different models for testing. The read-intensive workload had 10% idle, 80% reading, and 10% writing. On the contrary, the write-intensive workload consisted of 10% idling, 10% reading, and 80% writing. Each drive was in the mentioned power state for the percentage indicated.

Scality noted that “power consumption does not rise to a main criterion on which to base the SSD vs. HDD decision today.” It all depends on the workload. For example, SSDs are still the best performance option for read-intensive and latency-sensitive workloads. Meanwhile, hard drives remain the preferred medium for unstructured data workloads.

AOC 27-Inch 240Hz Curved Gaming Monitor Drops to $179

You can find the AOC C27G2Z 27-inch gaming display for one of its best prices yet. This monitor has been going for around $199 lately but today it’s discounted to $179. This is a notable deal given both its price history and specifications that set it apart from other displays in its class.

We reviewed the AOC C27G2Z and appreciated its value which makes today’s discount that much more beneficial. This gaming monitor is AMD FreeSync Premium certified which gives it a little bit of a leg up over other monitors with specs like a minimum FHD resolution and high refresh rate. In this case, the AOC C27G2Z can reach up to 240Hz. It also features low latency as well as support for low framerate compensation (LFC). 

The AOC C27G2Z features a 27-inch curved VA panel with a curvature of 1500R. It has an FHD resolution which measures up to 1920 x 1080px. The refresh rate is notoriously high, reaching up to 240Hz and is accompanies by an MPRT of .5ms.

Users have a couple of input options to take advantage of including one DisplayPort input and two HDMI ports. A 3.5mm jack is included for external audio peripherals. The purchase is supported by a limited 3-year manufacturer’s warranty from AOC alongside Amazon’s 30-day return policy.

Visit the AOC C27G2Z 27-inch curved gaming monitor product page at Amazon for more details and purchase options.

Raspberry Pi Pico Monitors Pellet Smoker’s Hopper Level with Web App

For those of us in the northern hemisphere, summer is still in full swing. If you’re still planning a summer bash or two before fall hits, you might want to take a look at this awesome pellet smoker hopper level monitor created by maker and developer Joe Pecsi. Using our favorite microcontroller, the Raspberry Pi Pico, he’s able to monitor his pellet smoker’s hopper level and keep track of it with a mobile app. 

The concept is simple but also a super effective way to monitor the pellet level in your smoker without having to get up and check. It relies on an ultrasonic sensor to measure the pellet level which is then automatically reported through a web-based app. This can be checked from any device with a browser like a PC or a smartphone.

Not only does the Pico accept input from the ultrasonic sensor, it also hosts a web server. The web app data is shared using MQTT over WiFi. This is what enables you to check the hopper level remotely. The mobile app has a few settings, as well, that you can use to make adjustments including an option to calibrate the sensor.

Pecsi was kind enough to share a complete breakdown of the hardware used in his hopper monitor setup. He’s relying on a Raspberry Pi Pico W for its wireless support and an HC-SR04 ultrasonic sensor. In addition to these boards, he also created a PCB from scratch just to make the setup a little more professional. Plans are in the works to create 3D printed housing for the unit as well as a battery pack.

The software used in the project has also been made open source. You can find the various repositories used in its creation over at GitHub. It includes the Python scripts used to operate the Pico and everything you need to check out how the mobile app works. According to Pecsi, he’s using Flutter to operate the web app.

If you’d like to get a closer look at this Raspberry Pi project, you can find the original thread over at Reddit. Be sure to follow Pecsi for future projects as well as any updates on this one.

AMD’s Navi 31 Could Land in Laptops in Radeon RX 7900 GRE Package

We have already reported that AMD’s Radeon RX 7900 GRE graphics card uses the company’s Navi 31 GPU in a smaller package. This compact package could cram AMD’s top-of-the-range graphics processor into laptops, hardware leaker Golden Pig Upgrade asserts. Meanwhile, the ultra-high-end mobile graphics solution could offer more stream processors than the Radeon RX 7900 GRE, one of the best graphics cards. Yet, a grain of salt is recommended since this is a leak.

AMD’s Radeon RX 7900 GRE has 5120 stream processors and a 256-bit memory interface enabled by four active memory controller die (full Navi 31 uses six MCDs and a 384-bit interface). Meanwhile, the compact version of the Navi 31 GPU with a 256-bit memory bus could be used to build an ultimate graphics solution for gaming laptops, as the unit certainly packs quite a punch.

(Image credit: TechPowerUp)

The leaker asserts that the alleged Radeon RX 7900M XT could feature more active stream processors but admits that they do not know the exact number. Furthermore, the leaker claims that the unit is delayed for some reason. 

AMD’s Radeon RX 7000M family of laptop GPUs currently includes four models based on the Navi 33 graphics processor, the smallest GPU in the RDNA 3 lineup. It is reasonable to expect AMD to use its Navi 32 silicon with up to 3840 stream processors for mid-range and high-end mobile GPUs as it is going to offer tangible performance advantages over AMD’s Radeon RX 6800M and 6850M XT products featuring Navi 22 GPU with 2560 stream processors enabled. Cramming a top-of-the-range graphics processor into laptops is something that AMD has not done in years. Still, since gaming laptops and compact desktops are gaining popularity, the company cannot ignore this market segment. That said, the company might use a cut-down Navi 31 to address advanced gaming machines.

 Meanwhile, a big question is whether AMD’s multi-chiplet Navi 31 graphics processor is a good fit for mobile PCs. On the one hand, an underclocked undervolted Big Navi GPU with some of its 6144 stream processors disabled could be very energy efficient. On the other hand, a multi-chiplet design is, by definition, less energy efficient than a monolithic design in most cases. 

For now, we have no idea about the combination of stream processor count, frequency range, and power envelope that AMD is looking at to hit its notebook performance targets. Furthermore, since the information comes from an unofficial source, we have to take it with a grain of salt and keep in mind that even if AMD has plans to address a certain market segment, plans sometimes change.

Hitting the Books: The thirty-year quest to make WiFi a connectivity reality

The modern world of consumer tech wouldn’t exist as we know it if not for the near-ubiquitous connectivity that Wi-Fi internet provides. It serves as the wireless link bridging our mobile devices and smart home appliances, enabling our streaming entertainment and connecting us to the global internet. 

In his new book, Beyond Everywhere: How Wi-Fi Became the World’s Most Beloved Technology, Greg Ennis, who co-authored the proposal that became the technical basis for WiFi technology before founding the Wi-Fi Alliance and serving as its VP of Technology for a quarter century, guides readers on the fascinating (and sometimes frustrating) genesis of this now everyday technology. In the excerpt below, Ennis recounts the harrowing final days of pitching and presentations before ultimately convincing the IEEE 802.11 Wireless LAN standards committee to adopt their candidate protocol as well as examine the outside influence that Bob Metcalf — inventor of both Ethernet, the standard, and 3Com, the tech company — had on Wi-Fi’s eventual emergence.

Post Hill Press

Excerpted from Beyond Everywhere: How Wi-Fi Became the World’s Most Beloved Technology (c) 2023 by Greg Ennis. Published by Post Hill Press. Used with permission.


With our DFWMAC foundation now chosen, the work for the IEEE committee calmed down into a deliberate process for approving the actual text language for the standard. There were still some big gaps that needed to be filled in—most important being an encryption scheme—but the committee settled into a routine of developing draft versions of the MAC sections of the ultimate standard document. At the January 1994 meeting in San Jose, I was selected to be Technical Editor of the entire (MAC+PHY) standard along with Bob O’Hara, and the two of us would continue to serve as editors through the first publication of the final standard in 1997. 

The first draft of the MAC sections was basically our DFWMAC specification reformatted into the IEEE template. The development of the text was a well-established process within IEEE standards committees: as Bob and I would complete a draft, the members of the committee would submit comments, and at the subsequent meeting, there would be debates and decisions on improvements to the text. There were changes made to the packet formats, and detailed algorithmic language was developed for the operations of the protocol, but by and large, the conceptual framework of DFWMAC was left intact. In fact, nearly thirty years after DFWMAC was first proposed, its core ideas continue to form the foundation for Wi-Fi.

 While this text-finalization process was going on, the technology refused to stand still. Advances in both radio communications theory and circuit design meant that higher speeds might be possible beyond the 2-megabit maximum in the draft standard. Many companies within the industry were starting to look at higher speeds even before the original standard was finally formally adopted in 1997. Achieving a speed greater than 10 megabits — comparable to standard Ethernet — had become the wireless LAN industry’s Holy Grail. The challenge was to do this while staying within the FCC’s requirements — something that would require both science and art. 

Faster is always better, of course, but what was driving the push for 10 megabits? What wireless applications were really going to require 10-megabit speeds? The dominant applications for wireless LANs in the 1990s were the so-called “verticals” — for example, Symbol’s installations that involved handheld barcode scanners for inventory management. Such specialized wireless networks were installed by vertically integrated system providers offering a complete service package, including hardware, software, applications, training, and support, hence the “vertical” nomenclature. While 10-megabit speeds would be nice for these vertical applications, it probably wasn’t necessary, and if the cost were to go up, such speeds wouldn’t be justifiable. So instead, it would be the so-called “horizontal” market — wireless connectivity for general purpose computers — that drove this need for speed. In particular, the predominantly Ethernet-based office automation market, with PCs connected to shared printers and file servers, was seen as requiring faster speeds than the IEEE standard’s 2 megabits.

Bob Metcalfe is famous in the computer industry for three things: Ethernet, Metcalfe’s Law, and 3Com. He co-invented Ethernet; that’s simple enough and would be grounds for his fame all by itself. Metcalfe’s Law— which, of course, is not actually a law of physics but nonetheless seems to have real explanatory power— states that the value of a communication technology is proportional to the square of the number of connected devices. This intuitively plausible “law” explains the viral snowball effect that can result from the growing popularity of a network technology. But it would be Metcalfe’s 3Com that enters into our Wi-Fi story at this moment. 

Metcalfe invented Ethernet while working at PARC, the Xerox Palo Alto Research Center. PARC played a key role in developing many of the most important technologies of today, including window-based graphic computer interfaces and laser printing, in addition to Ethernet. But Xerox is famous for “Fumbling the Future,” also the title of a 1999 book documenting how “Xerox invented, then ignored, the first personal computer,” since the innovations developed at PARC generally ended up being commercialized not by Xerox but by Apple and others. Not surprisingly, Metcalfe decided he needed a different company to take his Ethernet invention to the market, and in 1979, he formed 3Com with some partners.

This was the same year I joined Sytek, which had been founded just a couple of months prior. Like 3Com, Sytek focused on LAN products, although based on broadband cable television technology in contrast to 3Com’s Ethernet. But whereas Sytek concentrated on hardware, 3Com decided to also develop their own software supporting new LAN-based office applications for shared PC access to data files and printers. With these software products in combination with their Ethernet technology, 3Com became a dominant player in the booming office automation market during the nineties that followed the introduction of personal computers. Bob Metcalfe was famously skeptical about wireless LANs. In the August 16, 1993, issue of InfoWorld, he wrote up his opinion in a piece entitled “Wireless computing will flop — permanently”:

This isn’t to say there won’t be any wireless computing. Wireless mobile computers will eventually be as common as today’s pipeless mobile bathrooms. Porta-potties are found on planes and boats, on construction sites, at rock concerts, and other places where it is very inconvenient to run pipes. But bathrooms are still predominantly plumbed. For more or less the same reasons, computers will stay wired.

Was his comparison of wireless to porta-potties just sour grapes? After all, this is coming from the inventor of Ethernet, the very archetype of a wired network. In any event, we were fortunate that Metcalfe was no longer involved with 3Com management in 1996 — because 3Com now enters our story as a major catalyst for the development of Wi-Fi. 

3Com’s strategy for wireless LANs was naturally a subject of great interest, as whatever direction they decided to take was going to be a significant factor in the market. As the premier Ethernet company with a customer base that was accustomed to 10-megabit speeds, it was clear that they wouldn’t take any steps unless the wireless speeds increased beyond the 2 megabits of the draft IEEE standard. But might they decide to stay out of wireless completely, like Bob Metcalfe counselled, to focus on their strong market position with wired Ethernet? And if they did decide to join the wireless world, would they develop their own technology to accomplish this? Or would they partner with an existing wireless developer? The task of navigating 3Com through this twisted path would fall to a disarmingly boyish business development whiz named Jeff Abramowitz, who approached me one afternoon quite unexpectedly. 

Jeff tapped me on the shoulder at an IEEE meeting. “Hey, Greg, can I talk with you for a sec?” he whispered, and we both snuck quietly out of the meeting room. “Just wondering if you have any time available to take on a new project.” He didn’t even give me a chance to respond before continuing with a smile: “10 megabits. Wireless Ethernet.” The idea of working with the foremost Ethernet company on a high-speed version of 802.11 obviously enticed me, and I quickly said, “Let’s get together next week.”

He told me that they had already made some progress towards an internally developed implementation, but that in his opinion, it was more promising for them to partner with one of the major active players. 3Com wanted to procure a complete system of  wireless LAN products that they could offer to their customer base, comprising access points and plug-in adapters (“client devices”) for both laptops and desktops. There would need to be a Request for Proposal developed, which would, of course, include both technical and business requirements, and Jeff looked to me to help formulate the technical requirements. The potential partners included Symbol, Lucent, Aironet, InTalk, and Harris Semiconductor, among others, and our first task was to develop this RFP to send out to these companies. 

Symbol should need no introduction, having been my client and having played a major role in the development of the DFWMAC protocol that was selected as the foundation for the 802.11 standard. Lucent may sound like a new player, but in fact, this is simply our NCR Dutch colleagues from Utrecht — including Wim, Cees, Vic, and Bruce — under a new corporate name, NCR having been first bought by AT&T and then spun off into Lucent. Aironet is similarly an old friend under a new name — back at the start of our story, we saw that the very first wireless LAN product approved by the FCC was from a Canadian company called Telesystems, which eventually was merged into Telxon, with Aironet then being the result of a 1994 spinoff focusing on the wireless LAN business. And in another sign of the small-world nature of the wireless LAN industry at this time, my DFWMAC co-author, Phil Belanger, had moved from Xircom to Aironet in early 1996. 

The two companies here who are truly new to our story are InTalk and Harris. InTalk was a small startup founded in 1996 in Cambridge, England (and then subsequently acquired by Nokia), whose engineers were significant contributors to the development of the final text within the 802.11 standard. Harris Corporation was a major defense contractor headquartered in Melbourne, Florida, who leveraged their radio system design experience into an early wireless LAN chip development project. Since they were focused on being a chip supplier rather than an equipment manufacturer, we didn’t expect them to submit their own proposal, but it was likely that other responders would incorporate their chips, so we certainly viewed them as an important player. 

Over the first couple of months in 1997, Jeff and I worked up a Request for Proposal for 3Com to send out, along with a 3Com engineer named David Fisher, and by March we were able to provide the final version to various candidate partners. Given 3Com’s position in the general LAN market, the level of interest was high, and we indeed got a good set of proposals back from the companies we expected, including Symbol, Lucent, InTalk, and Aironet. These companies, along with Harris, quickly became our focus, and we began a process of intense engagement with all of them over the next several months, building relationships in the process that a year later would ultimately lead to the formation of the Wi-Fi Alliance. 

Bob Metcalfe’s wireless skepticism had been soundly rejected by the very company he founded, with 3Com instead adopting the mantle of wireless evangelism. And Wireless Ethernet, soon to be christened Wi-Fi, was destined to outshine its wired LAN ancestor.

All products recommended by Cunghoctin are selected by our editorial team, independent of our parent company. Some of our stories include affiliate links. If you buy something through one of these links, we may earn an affiliate commission. All prices are correct at the time of publishing.

Intel Severs NUC Lineup with Slew of Discontinuations

On the heels of its decision to withdraw from the desktop and laptop PC business announced on July 11, Intel issued five product discontinuance notices regarding about a dozen NUC systems in just one month. While tens of Intel’s own NUCs will be available for a while, several NUC models have now gone to end-of-life (EOL) status.

Most recently, Intel discontinued its NUC 12 Enthusiast kits and barebones systems with its Core i7-12700H processor and Arc A770M graphics. Intel also EOLed its NUC P14E Laptop Element notebook chassis meant to be integrated with NUC 11 Compute Element, and select NUC X15 Laptop Kits. The last product discontinuance shipment date for these items is September 8, 2023, so expect them to go extinct from retail by the end of the year or by early 2024.

In addition, Intel also issued product discontinuance notices for its NUC 11 v5 Compute Element and NUC 11 v7 Compute Element boards. The company will ship the final units of these SKUs on September 29, 2023.

Intel currently offers three categories of client NUC systems: consumer-focused compact PCs, business and enterprise-oriented machines with remote management capabilities, and high-end systems for gamers and professionals. While Intel’s NUCs have been competitive against other PC brands, supporting a wide variety of desktops and laptops is challenging for Intel, whose main focus is lucrative chip manufacturing. As a result, the company decided to discontinue its PC business and pass the baton to its partners, such as Asus.

While Intel EOLed dozens of NUC offerings in just a few weeks, many NUC SKUs will remain available for quite a while. Furthermore, due to agreements with customers, the company will likely keep supplying its specialized versions of NUCs for some time.

Use Your Favorite Desktop Keyboard on Your Laptop With ‘Typesticks’

Japanese computer accessories company Far East Gadgets launched its so-called Typesticks earlier this month (h/t PC Watch). Typesticks are key-spaced platforms made from hard plastic and silicon. The strategically positioned standoffs on the underside of Typesticks are supposed to work with any laptop keyboard using “a key gap of 2.5 mm or more, and a key height of 2 mm or less.”

Have you ever wished you could use a mechanical keyboard with your laptop? Well, you can simply plug in your favorite keyboard, and use it, but this would usually mean pushing back your laptop to fit your favorite text input device on the desk in front of it. By placing some Typesticks over your laptop keyboard, you can again type in the screen-to-user position intended by the device designer. With some configurations, the laptop touchpad will remain easily accessible.

Official Typesticks images show a compact mechanical keyboard perched directly atop of a laptop keyboard, affording a superior typing experience. If you choose your Typesticks positioning carefully you can even use the height adjustment feet on your plug-in keyboard for enhanced ergonomics.

(Image credit: Far East Gadget)

The Typesticks designers appear to enjoy using Apple MacBook laptops with the cutely compact HHKB (Happy Hacking Keyboard). However, other laptops have been tested and verified as working with the Typesticks, namely:

  • Lenovo ThinkPad series laptops inc X28
  • Alienware X17 gaming laptop
  • iPad Pro 12.9″ M2 & Magic Keyboard
  • VAIO Pro PG laptop
  • MacBook Pro M1 16 inch
  • MacBook Pro 14″ 2021
  • MacBook Pro 13″ 2020
  • MacBook Air 13″ 2020
  • MacBook Air 15″ 2023

The above list certainly isn’t exhaustive, instead it seems like these may be the laptops the keyboard accessory maker and his colleagues had available for testing.

Likewise, the Typesticks work with a wide range of keyboards you might use. Remember, you can vary Typestick placements to run in line with the rake-adjusting feet on the keyboard base. As well as the HHKB, discrete keyboards tested and verified include the Keychron K2 Pro、NuPhy Air 75, and iPad Magic Keyboard.

Typesticks are compact and portable weighing just 15g. Pairs stick together in transit due to built-in magnets and are about the same size as a USB memory stick or pack of gum (actual size: 72.5 × 23 × 9 mm), to easily fit in a pocket of your laptop tote.

One of the drawbacks of the Typesticks, mentioned in the official product pages, is that an elevated keyboard could obscure the lower part of your computer screen, depending on various factors. Another drawback to some readers will be purchasing products from Japan, and the price is 2,480 yen ($17) plus shipping etc.

Lastly, buyers are warned not to close their clamshell laptops with the third party keyboard and or Typesticks still in place.

DIYers Will DIY

Computer DIYers with access to the best 3D printers, CNC or best laser cutters might find it pretty easy to make their own custom Typesticks. This could be a good option if the official Typesticks are incompatible with your particular laptop, or importing seems too much effort.

Intel to Expand Arrow Lake’s L2 Cache Capacity

Intel intends to increase the L2 capacity of its upcoming codenamed Arrow Lake processors to 3 MB per core, according to Golden Pig Upgrade (via @9550pro), a renowned leaker who tends to have accurate information about future Intel products. If the information is accurate, then Arrow Lake CPUs will offer higher performance in memory bandwidth-dependent applications.

Intel’s 13th Generation Core ‘Raptor Lake’ processor features a 2 MB L2 cache per high-performance Raptor Cove core and 512 KB L2 cache per energy-efficient Greacemont core, thus has 32 MB of L2 cache in total as well as 36 MB of L3 cache in total (3 MB L3 cache per P core, 3 MB per four E cores).

Swipe to scroll horizontally
Row 0 – Cell 0 P-Core P-core L2 E-Core E-core L2
Alder Lake Golden Cove 1.25 MB Gracemont 512 KB
Raptor Lake Raptor Cove 2 MB Gracemont 512 KB
Meteor Lake Redwood Cove ? Crestmont ?
Arrow Lake ? 3 MB Crestmont ?
Lunar Lake Lion Cove ? Skymont ?

Assuming that Intel’s Arrow Lake processors will retain eight high-performance cores, its total L2 capacity for performance cores will increase to a sizeable 24 MB. Meanwhile, it is unclear whether Intel also plans to expand the size of the L3 cache of Arrow Lake’s performance cores. Keeping in mind that Arrow Lake CPUs will be made on Intel’s 20A (2nm-class) fabrication process, the company might increase the size of all caches as it may not have a significant impact on die size and cost. Yet, only Intel knows what makes sense to do to increase performance without significantly affecting costs. 

(Image credit: Intel)

Increasing the L2 cache capacity for high-performance cores is done to boost performance. One of the primary benefits of increasing cache size is to improve the hit rate. If the working set of a given workload fits better within the enlarged L2 cache than it did before, this will reduce the need to access the slower L3 cache or main memory. This potentially leads to a reduction in average memory access time and potential energy savings, especially beneficial for workloads whose data sets can better fit within the enlarged L2 cache.

On the downside, a larger L2 cache can introduce slightly longer access latency. Keeping in mind that Intel’s processors already have large L3 caches increasing L2 cache size gets diminishing returns on performance benefits. Additionally, a large L2 cache might consume more power, produce more heat, and increase die area. 

Elegoo Neptune 4 Review: Invisible Klipper

Elegoo has entered the race for speed with a much faster version of their popular Neptune 3 Pro, The Neptune 4. It has improved speed thanks to a hidden install of Klipper firmware, plus everything that made the Neptune 3 Pro our favorite 3D printer for beginners

Currently priced at $259, the Neptune 4 is quite a bargain in the field of fast printing. However, the way Elegoo chose to integrate Klipper is confounding. It’s hidden in the background, granting the user speed while making its other perks difficult to access. The hands-off approach might work fine for complete beginners, but if you want to poke under the hood you’ll have to find a long enough Ethernet cable to reach your router or take a leap of faith on finding a compatible WiFi dongle. 

There’s still a lot to love about the Neptune 4. It arrives 90% pre-assembled, making it a quick build. It has dual Z axis, a grippy direct drive that handles TPU like a champ, a high flow nozzle rated to 300 degrees, a giant cooling fan and an easy to navigate touch screen. It even has an LED light on the gantry. 

Leveling has taken a step backwards. Though it’s still very good, it’s adopted a more tedious manual + auto leveling system. It’s not too surprising that Elegoo didn’t include an accelerometer for tuning input shaping, but there’s no visible way to hook one up either. A beginner won’t see this as a failing, as the factory settings are really quite good. However, this is the kind of feature a more seasoned maker will sorely miss.

Specifications: Elegoo Neptune 4

Swipe to scroll horizontally
Build Volume 225 x 225 x 265 mm (8.5 x 8.5 x 10.4 inches)
Material PLA/PETG/TPU (up to 300 degrees)
Extruder Type Direct Drive
Nozzle .4 high flow
Build Platform PEI textured spring steel sheet heated
Bed Leveling Automatic, Inductive probe
Filament Runout Sensor Yes
Connectivity USB, LAN
Interface Color touch screen, removable 
Machine Footprint 475*445*515 (18.7 x 17.5 x 20.3 in)
Machine Weight 8.3 KG (18.3 lbs)

Elegoo Neptune 4: Included in the Box

(Image credit: Tom’s Hardware)

The Neptune 4 comes with everything you need to get your printer set up. You get tools to build and maintain the printer, side cutters, a plastic scraper, 2 spare nozzles, and a USB stick. There’s also a small sample of white PLA to print your first model. 

The USB stick has a very helpful short video on assembling the printer. You also get a PDF copy of the manual, a copy of Elegoo Cura and a sample model in both pre-sliced .gcode and .stl format.

Design of the Elegoo Neptune 4

(Image credit: Tom’s Hardware)

The Neptune 4 looks exactly like the Neptune 3…with the addition of a huge cooling fan bolted to the back of the X gantry. The gray aluminum with white detailing and “Create the Future” motto is still fairly distinctive from any other brand on the market.

There are few improvements over the third iteration – the fans now spin on ball bearings and leveling can tap 121 points. The dual-gear direct drive is lighter weight with a bigger gear: a 5.2 to 1 ratio rather than 3 to 1. The hotend also boasts a copper-titanium all-metal throat for more efficient heating.

The giant cooling fan on the gantry is made up of four 4020 ball bearing fans. It’s pointed right below the nozzle and does a good job of cooling the just printed layer extremely fast. If you don’t need to print at supersonic speeds, you can switch off the bonus fan. It’s also fairly loud, but I’ve yet to find a high speed printer that wasn’t loud.

In case you’re not familiar with the Neptune 3 Pro, this one shares the same dual Z axis with a synchronizing belt at the top. The large removable touchpad with a magnetic base is the same, as is that curly landline style cord. Personally, I never take the touchpad off, but if you’ve got a problem with glare I can see it coming in handy.

What’s more intriguing than the screen is what’s on it. It looks very much like the Neptune 3 Pro, a printer with traditional Marlin firmware, not Klipper. I’ve reviewed several printers running Klipper and the best ones have adopted KlipperScreen, which gives you more features. It seems that Elegoo decided the best way to run Klipper is to not see it at all.

(Image credit: Tom’s Hardware)

The Neptune 4 does not come with WiFi, making it tricky to even access Klipper. You can plug your machine directly into your router if you have an Ethernet cable long enough. I only hooked our test unit to the router for a short time because there was no good place to put the printer except the floor. You may be able to find a WiFi dongle that will work, but since Elegoo does not provide one, you’re on your own.

Accessing Klipper through Fluidd is the only way you can send files remotely or tinker with the machine’s settings, like input shaping or acceleration. Fortunately, the factory calibration is pretty decent, which should satisfy Elegoo’s desired beginner audience.

Assembling the Elegoo Neptune 4

(Image credit: Tom’s Hardware)

The Neptune 4 comes mostly assembled, only needing a few bolts to put the machine together. The upper frame is attached to the base with bolts that come up through the bottom.

The touch screen holder screws into the side and plugs in with a curly RJ11 cord, making it look like an old landline phone. All the electrical connections are labeled – or extremely obvious where they need to go.

Leveling the Elegoo Neptune 4

The Neptune 4 has returned to pairing manual leveling with an inductive auto level probe – a backwards move as the Neptune 3 and 3 Pro use a hard mounted bed. This system is not only more complex, but inferior. I saw the adjustment wheels shake loose and fall off the machine during an afternoon of speed testing. I would highly advise stopping by your local hardware store for some lock nuts to keep your knobs in place.

To start leveling, you’ll press the Level Icon on the main menu then find the Z height adjustment in the center of the screen. It’s not labeled, but it’s the number flanked by up and down arrows. Slide a piece of ordinary paper under the nozzle and tap the arrows until the nozzle just scrapes the paper.

(Image credit: Tom’s Hardware)

Now press Auxiliary to enter manual leveling mode. Tap the corner icons to move the nozzle to each corner. Place the paper under the nozzle and adjust the knob until it just scrapes the paper. You’ll need to do this several times as adjusting one corner will throw another corner off balance.

Return to the leveling screen and press Auto Leveling. This will perfect your manual leveling efforts. The bed will heat up, and the probe will bob over 36 points on the bed.

Return to the leveling screen and double-check the z height as it may have moved. Use the paper again and repeat the first step.

IMPORTANT: press the save icon in the upper right corner before leaving the leveling menu to save this data into the config file. The printer will use this data before every print and you won’t need to relevel unless you move the printer, or the wheels fall off.

Loading Filament on the Elegoo Neptune 4

The Neptune 4 is a direct drive printer with its extruder and hotend all in one spot. Loading filament takes a few more taps on the screen than previous Neptunes, but the mechanics are the same.

To load filament, tap Prepare on the main menu, then Temperature and select the one of four presets that match your filament. Once the hotend is warmed past 190 degrees, you can insert the filament into the top of the extruder and let the wheels pull the filament through.

To unload or change colors, simply reverse the process.

Preparing Files / Software for Elegoo Neptune 4

(Image credit: Tom’s Hardware)

The Neptune 4 comes with a copy of Elegoo Cura, which has profiles for all its machines and several materials. It also has the added ability to create a thumbnail of your model to display on the printer. Though Elegoo claims the Neptune 4 has a maximum speed of 500mm/s, the default profile provided is 250mm/s. There is no profile for higher speeds, so you’ll have to experiment with that yourself.

Standard versions of Cura or Prusa Slicer don’t have profiles for the Neptune 4, but you can use the profile for a Neptune 3 and bump up the speed.

Note: The Neptune 4 doesn’t have Klipper “START_PRINT” and “END_PRINT” macros, but rather uses the Marlin start and end codes.

Printing on the Elegoo Neptune 4

You’ll quickly learn that speed isn’t everything, especially when printing filament that is normally glossy. High speed printing wrecks havoc on the finish, often producing surfaces that are flat and dull. If it’s a practical print, you may not care if your part isn’t shiny – but if you’re printing decorative parts you’ll want slower speeds. Fortunately, you can find balance by printing the infill and inner walls at high speed while slowing the outer and top layers for a nicer finish.

Below is a model printed in the same filament, Polymaker Starlight Mercury PLA. The one on the left is dull grey after being printed at 250mm/s. The one on the right retains its purple sparkle and was printed with 250mm/s for the infill and inner walls, but 75mm/s on the outer wall and top/bottom layers.

(Image credit: Tom’s Hardware)

The other issue with high speed is that many prints are not long enough to reach the manufacturer’s claim of 500mm/s. Once you factor in acceleration (capped at 5000mm/s on the Neptune 4) and the need to slow down for corners, you’re doing 250mm/s at best.

(Image credit: Tom’s Hardware)

Still the Neptune 4 is much faster than the Neptune 3 Pro and similar last-gen bedslingers. The printer achieved a very good 20 minute Speed Benchy. This is the traditional Benchy test print using standards adopted for speed contests. It has 2 walls, 3 top and bottom layers, 10% grid infill, a .25 layer height and .5 layer width. Printed in ordinary gray Inland PLA, this boat is a little rough on the hull, but there’s no ghosting and the overhangs are perfect.

3D Benchy (Image credit: Tom’s Hardware)

Elegoo sent a spool of Rapid speed PLA+ to try out with this printer. The results are marginally better than our tests with Inland PLA. You don’t want to limit yourself to one kind of filament, so check out our guide to the best filaments for 3D printing for examples of our favorite materials to add to your supply.

The black Benchy is printed with Elegoo high speed PLA, the gray Benchy is Inland PLA. (Image credit: Tom’s Hardware)

The printer is more than capable of producing smooth, quality prints when you slow it down a bit. This X Wing pen holder was printed using the default settings, which uses 250 for the inner parts and 130 for the outer walls and top/bottom layers. The detail is crisp, without any ghosting, but the color is a bit washed out from the speed. Printed in ProtoPasta Wonder Black Rainbow Glitter, Polymaker Starlight Mercury PLA for the stand, and Prusament Galaxy Silver for the engine highlights. Total print time is 3 hours and 9 minutes, using 3 walls, 250mm/s inside parts and 75mm/s outer layers & walls.

Occupied_Brain’s X-Wind Pen Stand (Image credit: Tom’s Hardware)

The Neptune 4 did a remarkable job with TPU when slowed down to 50mm/s. These bike handle covers may not be the best print to show off the machine’s quality – the pattern did get rougher the farther away it got from the bed. But considering these slender tubes are 157 mm tall and quite squishy I’m amazed they worked at all. These printed in 1 hour and 53 minutes each using Elegoo’s default settings for TPU.

Jayden17’s Bike Grips 12 Designs (Image credit: Tom’s Hardware)

I did several prints in PETG, but this Maker’s Muse Clearance Castle really shows off the Neptune 4’s quality. The castle is a torture test with tight clearances and bridging, which all printed quite well with crisp lines and little stringing. This used Elegoo’s default settings for PETG which slowed the printer to 50mm/s on the outer walls, 80 on the inner walls, but kept a brisk 150 mm/s on the infill. It was able to complete the print in 2 hours and 6 minutes. The Neptune 3 would have taken three hours more, so this is still a significant time savings.

(Image credit: Tom’s Hardware)

Bottom Line

(Image credit: Tom’s Hardware)

The Neptune 4 is a confusing little 3D printer. Is it for beginners? Maybe. Is it for fans of Klipper? Not really. It comes with an unrestricted copy of Klipper, a huge plus, but makes it difficult to access without WiFi. You can certainly run a cable to it, but how many people have their router on the same workbench as their 3D printer?

The variables that come with high speed printing make me reluctant to recommend this printer for beginners, who may not understand why their shiny new printer can’t run full tilt at the manufacturer’s claim of 500mm/s. On the other hand, those who have experience with Klipper may feel frustrated that their access is physically restricted by a simple lack of hardware.

Who is it for? With a tantalizing price tag of $259, the Neptune 4 is perfect for makers at the midpoint of their journey. People who understand the ins and outs of Cura settings, but aren’t control freaks and need to tweak every aspect of their Klipper config file, people who are comfortable with “good enough” input shaping and relish the bargain of an affordable fast printer.

I’m still going to recommend the Neptune 3 Pro for absolute beginners, especially with its reduced price of $199.99. If you want a simple-to-use Klipper printer with no restrictions, then check out the Sovol SV07. Priced at $339 it has both the expected WiFi plus a really sweet Klipper Screen that puts all the data at your fingertips. If your budget allows, the $699 Bambu Lab P1S cannot be beat for pure speed, range of filaments and ease of use.

MORE: Best 3D Printers

MORE: Best Budget 3D Printing

MORE: Best Resin 3D Printers

AMD EPYC ‘Siena’ Specification Leak: Up to 64 Cores

Renowned hardware leaker @momomo_us has published what seems to be specifications of AMD’s upcoming EPYC 8004-series ‘Siena’ processors. The new Zen 4-based CPUs are projected to hit the market later this year or early next year and address lower-power servers that may not need the highest performance, such as those used for edge and telecom applications.

If the specifications published by the leaker is accurate, then AMD’s EPYC 8004-series ‘Siena’ lineup will consist of at least six models featuring eight, 16, 24, 32, 48, and 64 cores operating at 2.20 – 2.55 GHz and consuming from 90W to 200W depending on the model. Meanwhile, AMD’s EPYC ‘Siena’ CPUs will feature an up to 128 MB L3 cache, which is two times smaller than L3 cache of AMD’s EPYC ‘Rome’ processor with 64 cores.

(Image credit: @momomo_us)

The origin of the specifications is unknown, but leakers like @momomo_us typically obtain their information from documents by chip developers or their partners. While the information may come from a legitimate source, it may be preliminary or outdated, so take it with a grain of salt.

In general, specifications of AMD’s EPYC 8004-series ‘Siena’ processors look rather logical. These CPUs are meant for low power servers with reduced total cost of ownership (TCO) that do not have to be performance champs, but have to be energy efficient and easy to build. Indeed, Siena will top at a 200W TDP, according to the newly published information. 

AMD’s Siena is expected to use the company’s new SP6 platform that is considerably less complex than the SP5 platform used for AMD’s EPYC 9000-series processors that are designed to feature the highest core count possible and deliver unbeatable performance for those who need it. For example, SP6 is expected to feature an eight-channel DDR5-4800 memory subsystem that will deliver enough bandwidth for a 64-core CPU, but which is considerably less complex than a 12-channel memory subsystem of AMD’s Genoa, Genoa-X, and Bergamo processors.

Unreleased Intel CPU with LGA1851 Socket Caught on Camera

Respected hardware leaker @wxnod has published a picture of what seems to be an Intel processor in LGA1851 packaging. The new chip could be Intel’s Meteor Lake-S or Arrow Lake-S and its main difference with the current Raptor Lake-S is a slightly altered integrated heat spreader (IHS). Given that the image is published without any explanations, this could be a prototype of an Alder Lake processor that never hit the market.

Intel’s sockets formally called LGA1700 and LGA1851 are essentially the same socket with 0.8 mm pitch, but the latter has more active pins. This allows makers of motherboards and cooling systems to maintain their designs. Meanwhile, LGA1851 will increase the height of IHS from 6.73-7.4 mm to 6.83-7.49 mm, according to earlier reports. To prevent installation of LGA1851 processors into 1700-pin sockets, the upcoming CPUs will have a different cutout configuration.

Perhaps the most interesting part about the processor marked as ‘Intel Confidential NA QDF4’ is their slightly larger heatspreader. It is unclear whether the taller heatspreader was made slightly larger to prevent bending that Intel’s LGA1700 processors are known for, but this is certainly a possibility. 

If the CPU is Intel’s Meteor Lake-S, then it will never reach the market as the platform has been cancelled. Meanwhile, the processor still gives an idea how Intel’s LGA1851 CPUs will look like when they come to market in 2024 in the form of Intel’s Arrow Lake products.

Next-Gen Ryzen Threadripper 7000WX Zen 4 CPU Specs Exposed

Just when we thought the trail went cold, AMD’s upcoming Ryzen Threadripper 7000WX (Storm Peak) has emerged in a new shipping manifest. While there was no indication of an estimated launch date, the fact that the Zen 4-powered chips are in transit suggests they could hit the market soon to compete with the best CPUs for workstations.

The alleged shipping document, courtesy of Harukaze5719, listed the Ryzen Threadripper 7995WX, 7845WX, and 7945WX. The leaked model names cause a bit of confusion, though. The trio of processors seemingly lacks the “Pro” moniker, which AMD utilizes for its workstation parts, such as the current Ryzen Threadripper Pro 5000WX (Chagall) lineup. On the other hand, the chips carry the “WX” suffix which  points to the Pro lineup. It’s probably a human error, so in any event, these are the Pro chips that target the workstation market and not the HEDT market.

The next-generation Threadripper processors will wield AMD’s latest Zen 4 cores. The leaked information claims that the three Ryzen Threadripper 7000WX processors will find their place in Socket SP6 (LGA4844), a socket expected to accommodate AMD’s EPYC Siena chips. 

Regarding dimensions, Socket SP6 isn’t as big as Socket SP5 (LGA6096) for EPYC Genoa processors. On the contrary, Socket SP6 shares similar dimensions with the older Socket SP3 (LGA4094), which coincidentally houses the current Ryzen Threadripper Pro 5000WX series.

Ryzen Threadripper 7000WX Specifications*

*Specifications are unconfirmed.

Unfortunately, the leaked specifications don’t tell us anything about core counts. However, we can piece that together with previous leaks. The 100-000000884 OPN code had surfaced as early as November 2022 in the Einstein@Home database. The processor, which we now know corresponds to the Ryzen Threadripper 7995WX, reportedly features 96 cores and 192 threads. That would be a massive upgrade since AMD’s Threadripper chips have topped at 64 cores for the last two generations. The Ryzen Threadripper 7995WX would be a conflicting SKU, as it would be pushing into EPYC territory.

The Ryzen Threadripper 7985WX has already appeared in several benchmarks, so we know it’s a 64-core, 128-thread part. That would mean it’s the successor to the Ryzen Threadripper Pro 5995WX. We suppose AMD didn’t follow the conventional naming scheme to save the 7995WX for the top SKU and probably used the 7985WX for the 64-core part. The Threadripper 7945WX, however, is perhaps the direct replacement for the Ryzen Threadripper Pro 5945WX. If that’s the case, we’re looking at a probable 12-core, 24-thread design as its predecessor.

According to the document, the Ryzen Threadripper 7000WX processors have a 350W TDP, accounting for a 25% increase over the existing Ryzen Threadripper Pro 5000WX series. On another note, the Ryzen Threadripper 7000WX’s TDP is only 10W lower than the highest-performing 4th-Generation EPYC Genoa chips, lending credence to the Ryzen Threadripper 7995WX potentially having 96 cores.

Noctua plans to release two new CPU air coolers for the next-generation Ryzen Threadripper lineup in October, insinuating that we could see the Zen 4-powered workstation chips on the market very soon.

Intel’s Core i7-14700K Benchmarked: More Cores, Higher Clocks

A Chinese reviewer has obtained a pre-production sample of Intel’s Core i7-14700K processor, which belongs to the Raptor Lake Refresh family, and tested it in a number of performance benchmarks for his review at Bilibili (via @9550pro). The processor, which got more cores and higher clocks, expectedly beat its predecessors, but what is even more noteworthy is that it can offer performance that is very close to that of the current flagship Core i9-13900K.

Intel’s upcoming Core i7-14700K processor will pack eight high-performance Raptor Cove cores clocked at 3.40 GHz – 5.60 GHz and 12 energy-efficient Gracemont cores, which is four cores more than the Core i7-13700K has. The new Core i7 ‘Raptor Lake’ refresh not only got slightly higher boost clocks, but also more cores, which will positively affect its performance in multi-threaded workloads. Meanwhile, the new CPU consumes more power.


Swipe to scroll horizontally
null Configuration Base Clock Boost Clock PBP MTP
Core i9-13900K 8P + 12E 3.0 GHz 5.80 GHz 125W 253W
Core i7-14700K 8P + 12E 3.40 GHz 5.60 GHz 125W 260W
Core i7-13700K 8P + 8E 3.40 GHz 5.40 GHz 125W 253W

Indeed, the Core i7-14700K, which the reviewer calls ‘Core i7-13700KS’ to avoid problems with Intel, in CPU-Z multi-threaded benchmark by around 20% and in Cinebench R23 multi-threaded test by approximately 14%.


Due to higher clocks and increased number of cores, the upcoming processor also outperforms its predecessor in games.

While the reviewer does not compare the Core i7-14700K to the current flagship Core i9-13900K, it has the same configuration of cores (eight high-performance and 12 energy-efficient cores) and very close frequencies (the Core i9-13900K has 200 higher boost clock of 5.80 GHz). Therefore, performance of the new Core i7-14700K will be very close to that of the Core i9-13900K.  

Meanwhile, Intel’s next-generation flagship Core i9-14900K and special-edition Core i9-14900KS will have boost clocks of 6.0 GHz and 6.20 GHz, respectively. As a result, performance difference between the most expensive Core i9 parts and moderately priced Core i7 CPUs will likely be negligible in most cases.

Exit mobile version