SAN là gì? Tại sao nên sử dụng hệ thống SAN để nâng cao hiệu quả lưu trữ và truy xuất dữ liệu giữa các server và thiết bị với nhau? Bài viết ngay sau đây sẽ cung cấp đầy đủ các thông tin cần thiết để bạn đọc có cái nhìn chi tiết về SAN Storage. Hãy cùng tìm hiểu!
1. SAN là gì?
SAN là gì? Được biết đến là mạng lưu trữ chuyên biệt, hoàn toàn tách biệt với các mạng LAN và WAN. Storage Area Network là một hệ thống lưu trữ dữ liệu mạnh mẽ, chuyên dụng và độc lập với máy chủ, cung cấp khả năng truy xuất dữ liệu nhanh và hiệu quả hơn so với các hệ thống lưu trữ truyền thống (Xử lý dữ liệu theo kiến trúc dạng khối – Block)
SAN là một giải pháp lưu trữ tập trung, cho phép các thiết bị lưu trữ và các máy chủ kết nối với nhau thông qua các công nghệ mạng đặc biệt như Fibre Channel hay iSCSI. Từ đó, các máy chủ có thể truy cập vào các ổ đĩa cứng, bộ nhớ đệm và các hệ thống lưu trữ khác trên mạng, và chia sẻ các tài nguyên lưu trữ này cho các ứng dụng khác nhau.

2. Các thành phần chính trong hệ thống SAN là gì?
Các thành phần chính trong một hệ thống SAN bao gồm:
- Thiết bị lưu trữ: Bao gồm các ổ đĩa cứng, bộ nhớ đệm và các hệ thống lưu trữ khác, được kết nối với mạng SAN thông qua các thiết bị đầu cuối.
- Các phần mềm quản lý và phân phối dữ liệu: giúp quản lý và phân phối dữ liệu đến các máy chủ trên mạng SAN.
- Thiết bị chuyển mạch SAN: Các SAN switch ứng dụng các công nghệ kết nối mạng chuyên dụng như Fibre Channel (FC), iSCSI hoặc FCoE để kết nối các thiết bị lưu trữ với máy chủ.

3. Chi tiết về từng giao thức kết nối được áp dụng trong SAN Storage
Sau khi đã nắm rõ khái niệm SAN là gì? Bạn đọc có thể tham khảo các giao thức kết nối được áp dụng trong SAN ngay sau đây.
3.1 Fibre Channel (FC)
Fibre Channel là một giao thức kết nối truyền thống được sử dụng trong mạng SAN, có tốc độ truyền dữ liệu cao và độ ổn định cao. Giao thức này sử dụng cáp quang để truyền dữ liệu giữa các thiết bị lưu trữ và máy chủ.
Các thành phần chính của công nghệ FC bao gồm:
- Host bus adapter (HBA): là card mạng đặc biệt được cài đặt trên máy chủ, có chức năng kết nối với các thiết bị lưu trữ trong SAN.
- Switch: là thiết bị trung gian giữa các HBA và các thiết bị lưu trữ, cho phép các thiết bị truyền dữ liệu với nhau trong mạng SAN.
- Storage array: là thiết bị lưu trữ chứa các đĩa cứng hoặc ổ đĩa flash, được kết nối với mạng SAN thông qua bộ chuyển mạch switch và HBA.
Trong mạng SAN sử dụng Fibre Channel, các HBA trên máy chủ được kết nối với switch thông qua cáp quang. Từ thiết bị switch, các thiết bị lưu trữ cũng được kết nối với switch thông qua cáp quang. Khi có yêu cầu truy xuất dữ liệu, các HBA sẽ gửi yêu cầu đến switch, từ đó switch sẽ chỉ định các thiết bị lưu trữ phù hợp để truy xuất dữ liệu.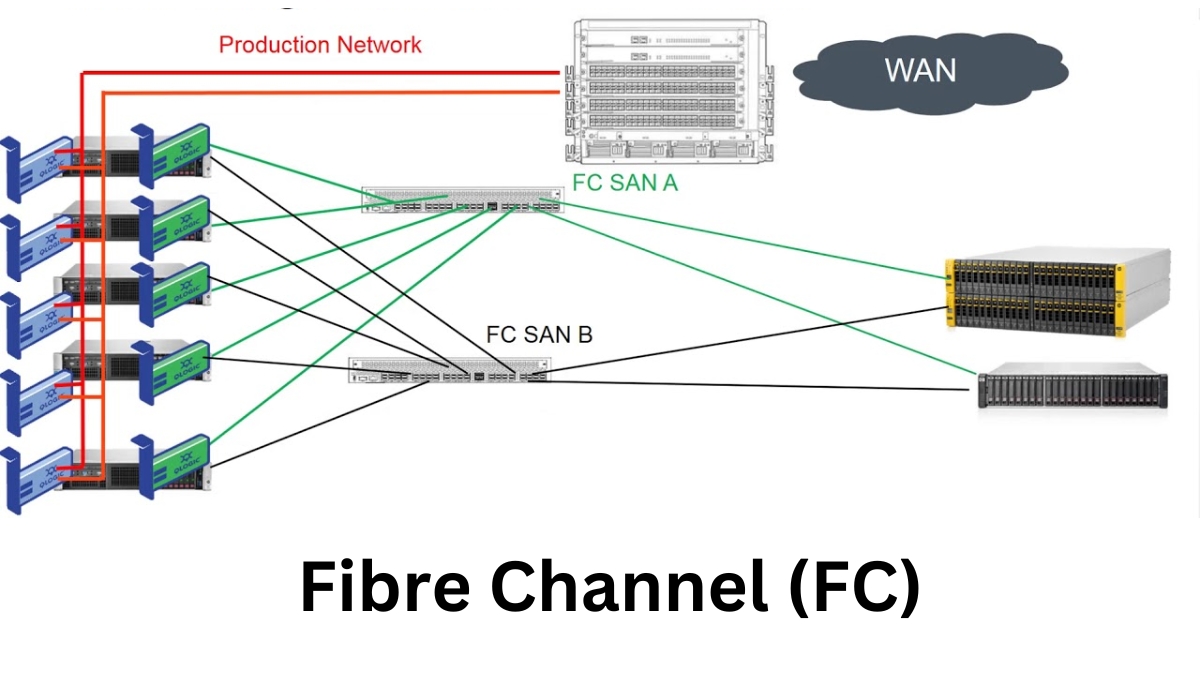
3.2 Công nghệ kết nối iSCSI
iSCSI hay Internet Small Computer Systems Interface là một giao thức lớp vận chuyển hoạt động dựa trên TCP/IP, cho phép các thiết bị lưu trữ truyền dữ liệu qua mạng IP thay vì sử dụng đường truyền cáp quang như Fibre Channel.
Các thành phần chính của iSCSI bao gồm:
- iSCSI initiator: Là phần mềm hoặc card mạng được cài đặt trên máy chủ, cho phép máy chủ truy cập các thiết bị lưu trữ iSCSI.
- iSCSI target: Là thiết bị lưu trữ hỗ trợ giao thức iSCSI, được kết nối với mạng LAN thông qua adapter đặc biệt.
Trong mạng SAN sử dụng iSCSI, các máy chủ được kết nối với iSCSI target thông qua mạng LAN. Các iSCSI initiator trên máy chủ sử dụng giao thức TCP/IP để truyền dữ liệu đến iSCSI target. Các iSCSI target cũng được kết nối với mạng LAN thông qua adapter chuyên dụng và sử dụng giao thức iSCSI để truyền dữ liệu đến các máy chủ.
3.3 Công nghệ FCoE
FCoE là một giao thức kết nối đặc biệt, cho phép truyền dữ liệu Fibre Channel thông qua mạng Ethernet. Qua đó giúp giảm chi phí và tăng tính linh hoạt trong mạng lưu trữ SAN.
Các thành phần chính của công nghệ FCoE gồm:
- Converged Network Adapter (CNA): Là card mạng đặc biệt được cài đặt trên máy chủ, cho phép máy chủ kết nối với mạng Ethernet và truy cập các thiết bị lưu trữ Fibre Channel.
- Fibre Channel Forwarder (FCF): Là thiết bị trung gian giữa các CNA và các thiết bị lưu trữ, cho phép các thiết bị truyền dữ liệu với nhau trong mạng FCoE.
Cách kết nối: Trong mạng SAN sử dụng FCoE, các CNA trên máy chủ được kết nối với switch Ethernet thông qua các cáp mạng Ethernet. Từ switch Ethernet, các thiết bị lưu trữ Fibre Channel cũng được kết nối với switch thông qua cáp mạng Ethernet. Khi có yêu cầu truy xuất dữ liệu, các CNA sẽ gửi yêu cầu đến FCF, từ đó FCF sẽ chỉ định các thiết bị lưu trữ phù hợp để truy xuất dữ liệu.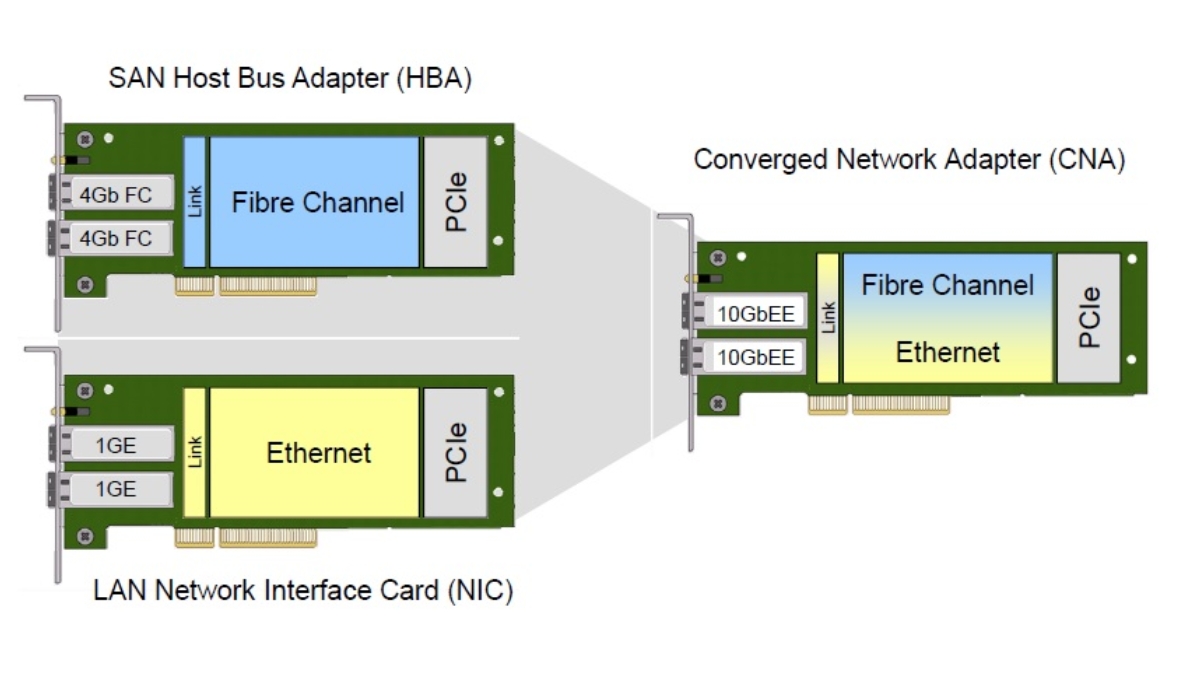
4. Tính năng nổi bật của hệ thống lưu trữ SAN Storage System là gì?
Hệ thống mạng lưu trữ SAN cung cấp cho doanh nghiệp rất nhiều những tính năng đáng chú ý như:
- Hỗ trợ các công nghệ kết nối tốc độ cao bao gồm FC, iSCSI, FCoE, FC-NVMe.
- Khả năng nhập xuất dữ liệu với tốc độ cực cao và độ trễ cực thấp.
- Tách biệt thiết bị lưu trữ và Server nâng cao chất lượng bảo mật.
- Cung cấp tính năng xác thực, cấp quyền quản lý, điều khiển truy xuất theo vùng.
- Khả năng ứng dụng cao, cho phép cấu hình các hệ thống mạng phức tạp và chuyên biệt để quản lý lưu trữ nâng cao và ứng dụng kỹ thuật clustering cho server-storage.
- Dữ liệu được quản lý tập trung giúp dễ dàng chia sẻ lưu trữ cũng như quản lý thông tin.
- Dễ dàng mở rộng phạm vi lưu trữ bằng cách bổ sung bộ nhớ, không yêu cầu cấu hình lại các thiết bị khác.
- Cho phép nhiều máy chủ cùng chia sẻ một hoặc nhiều thiết bị lưu trữ.
- Bảo trì và nâng cấp hạ tầng dễ dàng với tính năng sao lưu dữ liệu nội bộ. Tiết kiệm băng thông mạng LAN với tính năng LAN-free backup.
- Lựa chọn hàng đầu cho các công việc hay ứng dụng cần tốc độ cao (Xử lý giao dịch trong ngành ngân hàng, tài chính…).
Tuy nhiên hệ thống SAN vẫn tồn tại một số hạn chế như:
- Đòi hỏi công cụ quản lý chuyên nghiệp cũng như nhân sự có kinh nghiệm chuyên môn cao.
- Chi phí để triển khai SAN cao hơn rất nhiều so với các giải pháp như thiết bị lưu trữ DAS và NAS bao gồm: Server backup, tape library cổng quang và phần mềm backup trong SAN.
5. Các trường hợp nên sử dụng SAN Storage
Hiện nay các doanh nghiệp đã và đang sử dụng hệ thống lưu trữ SAN vào một số ứng dụng, hệ thống hạ tầng như:
- Hệ thống quản trị dữ liệu Oracle: Các doanh nghiệp sử dụng hệ thống quản trị dữ liệu Oracle để lưu trữ dữ liệu.
- SQL Server của Microsoft.
- Các hệ thống máy ảo như Microsoft Hyper-V, VMware, KVM thường được triển khai với quy mô máy ảo cực lớn, phục vụ các ứng dụng cần hiệu suất cao.
- Hệ thống máy tính để bàn ảo siêu lớn VDI: môi trường này thường lên tới quy mô hàng ngàn máy. Thông qua mạng SAN, doanh nghiệp dễ dàng quản lý, truy cập dữ liệu trên tất cả thiết bị client trong mạng.
- Các môi trường như SAP, ERP hoặc CRM cũng được áp dụng hệ thống SAN nhằm hỗ trợ doanh nghiệp lập kế hoạch quản lý tài nguyên và khối lượng dữ liệu lớn.
- Xử lý giao dịch ngân hàng, tài chính và website thương mại điện tử: Áp dụng SAN nhằm nâng cao tốc độ xử lý giao dịch với độ trễ thấp nhất.
6. Điểm khác biệt giữa hai mô hình NAS và SAN là gì?
| Tiêu chí | SAN | NAS |
| Giống nhau | Đều là các hệ thống lưu trữ, quản lý và chia sẻ tập trung. | |
| Khác nhau | Mạng kết hợp chặt chẽ của nhiều thiết bị. Sử dụng kết cấu mạng quang tốc độ cao. Lưu trữ dựa trên khối (Block). Sử dụng cả Ethernet và Fibre Channel. Giao thức phổ biến: FCP, iSCSI, FCoE,FC-NVMe. Tập trung vào hiệu suất cao, độ trễ thấp. Khó quản lý yêu cầu kinh nghiệm và chuyên môn cao | Đơn giản chỉ là một thiết bị lưu trữ duy nhất. Sử dụng kết cấu mạng TCP/IP Lưu trữ theo kiểu phân vùng, hệ thống tệp. Sử dụng Ethernet để triển khai. Giao thức phổ biến: CIFS / SMB, NFS. Tập trung vào việc dễ sử dụng, khả năng quản lý, mở rộng lưu trữ. NAS thường có thông lượng thấp hơn và độ trễ cao hơn (Có thể được cải thiện khi sử dụng các mạng tốc độ cao). Khả năng quản lý dễ dàng với giao diện hệ điều hành tối giản. |
7. Tổng kết
Có thể nói SAN hay Storage Area Network là một hệ thống lưu trữ dữ liệu mạnh mẽ nhất hiện nay, cung cấp khả năng truy xuất dữ liệu nhanh và hiệu quả hơn so với các hệ thống lưu trữ truyền thống dựa trên kiến trúc dạng Block (Khối). Việc áp dụng mạng SAN đã và đang diễn ra tại nhiều doanh nghiệp, tổ chức vừa và nhỏ trên toàn thế giới