There are plenty of audio options for getting sufficient sound out of your PC. If you’re a laptop user with basic productivity needs (with occasional YouTube excursions), your built-in speakers might be fine. And for those who don’t want to disturb those around them, the best gaming headsets and earbuds can deliver everything from the basics to audiophile-grade excellence. But whether it’s for serious gaming or listening to music with a decent level of volume and quality, it’s tough to beat the freedom, flexibility and audio fidelity of a good set of PC speakers.
But what makes the best PC speakers for you depends on your needs, how much you want to spend and, in some cases, how much available space you have on and around your desk. We’ve tested several current PC speakers, from budget-priced 2.0 options to glorious gaming setups with subwoofers and surround sound, and plenty of options in between.
We’ve gathered the best speakers we’ve tested below, with options starting below $100. And if you aren’t quite sure what kind of speaker setup is best for you, be sure to check the section on what to consider, below our best PC speaker picks.
Quick List


Best PC Speakers Under $100
Slim, glossy speakers that get loud (without compromising audio quality), have multiple connectivity options, and come with a wireless remote.
Read more below
Best Budget Speakers
Compact, pebble-shaped speakers that can be powered by a standard USB port and sound very good for their budget-friendly price point of $60.
Read more below
Best Premium 2.0 Speakers
Attractive, well-built speakers with multiple connectivity options and excellent audio quality.
Read more below
Best Premium 2.0 Speakers
Attractive, well-built speakers with multiple connectivity options and excellent audio quality.
Read more below
Best 5.1 Surround Speakers
Impressively loud, gamer-oriented 5.1 surround system with wireless rear satellites and attractive lighting.
Read more below
6. Creative Sound Blaster Katana SE
Best Soundbar
Powerful but compact gamer-oriented soundbar designed for all/any gaming setup.
Read more below
Best PC Speakers
Why you can trust Tom’s Hardware
Our expert reviewers spend hours testing and comparing products and services so you can choose the best for you. Find out more about how we test.
The Best PC Speakers Under $100
If you don’t mind the boxy black plastic design and don’t want a subwoofer or 5.1 surround sound, Creative’s T100 speakers are arguably the best value in PC audio, often selling for around $80. The pair of speakers stands just over 8 inches tall, and they deliver sound quality and volume output that rivals or bests some speakers that cost more than twice as much. Plus, the T100s come with a remote and ample connectivity options, features that most pricier options lack.
In our testing, the T100 speakers registered an impressive 82.5 dBA at 50% volume, and at 90.4 dBA cranked all the way up, they were among the loudest pair of 2.0 desktop speakers we tested. The Bose Companion 2 got somewhat louder at 91.6dBA, but those speakers have fewer features and cost nearly twice as much, at $149.
Image 1 of 6

For those who want to do more than just play audio from their PC via a standard 3.5mm audio cable, the T100 speakers include Bluetooth 5.0, a USB port for directly plugging a drive to play MP3 and FLAC files, and even an optical connection. Controls on the top of one of the speakers lets you change inputs, adjust volume, and power the speakers on or off, while a wireless remote lets you do all that, plus switch between EQ presets, adjust bass and treble, and more.
Aside from their uninspired glossy black-plastic shells, the only real downside of Creative’s T100 speakers is that they can’t connect over USB. Also, there’s no option for adding a subwoofer. But if you’re shopping in this price range you probably aren’t seriously considering a 2.1 system with extra low-end thump. Sure, you can buy speakers that look and sound better than Creative’s T100, but you might have to spend more than twice as much for substantially better options.
Best Budget Speakers
The Creative Pebble Pro is the most premium product in the Pebble lineup — but at $60, it still retails for $20 less than the T100’s average sale price. There’s a lot to love about the Pebble lineup in general, starting with its compact and stylish round “pebble” shape, with drivers that are angled upward 45 degrees so the sound hits your ears when they’re placed on a desktop.
The Pebble Pro improves upon the original Pebbles with a higher power output and larger, re-engineered 2.25-inch drivers. It doesn’t have a subwoofer, but its low end gets a boost with Creative’s “BassFlex” technology; it also features the brand’s “Clear Audio” processing technology, which enhances vocals over ambient sound effects in movies, shows, and games. Finally, the Pebble Pro features RGB lighting around the base of each speaker — it’s semi-customizable; you can pick from three basic effects and multiple colors.
Like the original Pebble, the Pebble Pro can be powered by a standard USB port on a laptop — so this is a great set of speakers for those who want a less complicated setup. Unlike the original Pebble, the Pebble Pro has a USB-C PD port that, when plugged into a 30W USB-PD power brick, kicks the Pebble Pro’s power output up to 30W RMS (60W peak). These speakers sound pretty good at their regular power level, but they sound even better (and louder) with the power boost. Plus, as of this writing, if you buy the Pebble Pro on Creative’s website, you’ll get a 30W PD adapter free of charge.
The Pebble Pro boasts impressive audio for its size and price point — though it does lack the lows you’ll get with a subwoofer (or even some larger 2.0 systems). It also gets pretty loud: it registered 69.4dbA at 50% volume in our testing, and 88.2dBA at 100% volume (and distortion was minimal until around 78% volume). The Pebble Pro also offers 3.5mm analog, USB-C, and Bluetooth 5.3 connectivity, and also has 3.5mm headset and microphone jacks.
The main downside to the Pebble Pro might be, coincidentally, its price — Creative’s Pebble V3 has the same drivers (though the Pebble Pro’s are “re-engineered”), Clear Dialog audio processing, and connectivity options as the Pebble Pro, and retails for just $40 (though we recently saw it on sale for $35). Plus, the Pebble V3 comes in the more standard color options of black or white, though it doesn’t have the Pebble Pro’s optional power boost or RGB lighting.
Read: Creative Pebble Pro Review
Best Premium 2.0 Speakers
At $269, Audiengine’s A2+ speakers are expensive – especially for a 2.0 setup. But they’re also an investment in excellent audio, and one that I’ve personally experienced. I bought the A2 (non-Bluetooth) version of these speakers in 2012, and they still look and sound as good as new. The A2+ model we tested for this page takes the premium build and good looks of the A2 and adds Bluetooth 5.0, with aptX for improved latency (important when watching movies and, perhaps, when gaming competitively).
The A2+ speakers come in an extremely solid-feeling glossy speaker shell, in white, black or red. Ports include pretty much everything you could ask for. You get micro USB for connecting using the speakers’ internal dac or 3.5mm for analog connections. There is a volume knob, a button for Bluetooth pairing and four RCA jacks, two in and two out. The former can be used for adding a subwoofer down the line should you want more bass. But in 10 years using the older A2 model at my treadmill desk, I’ve never felt a real need to add extra thump. If these speakers are your primary sound boxes, though, you may feel differently.
In our testing, the Audioengine A2+ didn’t get as loud as some speakers that cost quite a bit less. And that’s not surprising given they are only rated to output 60W of peak power in total. But they still managed to deliver 85.6 dBA at max volume in our testing, and 78.2 dBA at 50% volume. That’s a lot of sound unless you’re trying to fill a very large room with booming audio, in which case you should consider something larger (Audioengine has you covered there with its A5+ speakers).
Image 1 of 5
There are two main downsides to Audioengine’s A2+: The exposed speakers aren’t ideal for homes with small children and/or curious pets, who could ruin your audio day with an errant smack or poke. Also, as the design of these speakers is a traditional straight rectangular cabinet, the speakers fire in a straight line, meaning your ears will miss the sweet spot of audio delivery if they’re sitting several inches below your ears on the desk in front of you. This can be fixed by picking up a pair of $20-$30 angled speaker stands or foam wedges, but for this price I would like to see these included in the box as most desktop setups basically necessitate their use to truly appreciate the sound these speakers are capable of.
Best 2.0 Gaming Speakers
Any set of speakers can deliver the blasts, booms or pickaxe bloops of your favorite PC game. But if you’re after a compact and relatively affordable set of speakers that will make your games sound good (while delivering some gamer style in the process), Edifier’s G2000 speakers are a great choice. The pair of speakers won’t take up much space on your desk, and they deliver a surprising amount of sound – with an emphasis on the low end. Don’t expect room-shaking rumble here, but with a subwoofer port at the back of one of the speakers, these small speakers can grow with your gaming needs.
Edifier’s G2000 speakers also offer up a plethora of connectivity options. Around the back there’s USB connectivity, 3.5mm analog, and Bluetooth 5.2 is an option if you want to go wireless. For those who crave a little light show to go along with their games, the speakers also offer up some RGB, with light emanating from slits on either side and a panel at the back (to reflect off of your wall). Just note that the lights are controlled via buttons on the side of one of the speakers, with 12 available settings. So don’t expect the kind of flexibility you might get from software controls.
Note that these aren’t the best option for listening to music, as each speaker consists of one 2.75-inch driver that has to do double-duty, handling the highs and lows. But if you don’t mind their bias toward the bass end of the spectrum, they’re OK for most audio tasks other than gaming. Just know that the G2000s are tuned and designed for those who prioritize gaming. If that sounds like you and you don’t want to spend more than around $110, these speakers are a great option. And if you don’t like basic black (and gray), there are pink, red, and white color options available for $5-$10 more.
Best 5.1 Surround Speakers
SteelSeries says its Arena 9 is the first 5.1 surround system for gaming, which we suppose is technically true, because while there are other 5.1 surround systems for PCs, they’re not billed as being gamer-oriented. The Arena 9 comes with five satellites — a center channel that sits under your monitor, two left/right front channels, and two left/right rear channels — as well as a 6.5-inch down-firing subwoofer. The rear satellites are wireless (they connect to each other and are powered separately, but connect to the system wirelessly), which makes for an easier setup than trying to run speaker cables under carpeting.
The Arena 9 comes with a handy control pod, which features an informative OLED display and touch-sensitive buttons. You can control most of the Arena 9’s features, including audio settings such as EQ and 5.1 upmix, lighting settings such as color mode and brightness, and system settings such as Bluetooth and rear speaker pairing, with this control pod, which is weighted so it will stay on your desk. For further customization, the Arena 9 also works with SteelSeries’ GG software, which includes the company’s Sonar audio app with parametric EQ.
Image 1 of 12
There’s nothing quite like true surround sound in movies and games that support it, and the Arena 9 does an excellent job of delivering immersive, directional audio that will make certain games come alive. (For audio sources that don’t support surround, the Arena 9 offers 5.1 upmixing, which converts stereo sound into multi-channel audio.) But even stereo sources sound great on the Arena 9, with clear, solid mids and nicely-rendered lows (thanks to the hefty subwoofer).
The biggest downside to the Arena 9 is definitely its high price point of $550 — especially when you can find budget-priced home theater surround systems for under $400. But the Arena 9 really is designed for PC gamers with its USB connectivity — other similarly-priced home theater surround systems aren’t designed to work directly with PCs. The Arena 9 also has some nice features that are specifically designed for PC gamers, such as 4-zone immersive lighting and a desktop control pod (versus, say, a remote).
Best Soundbar
Soundbars are usually thought of as TV/home theater accessories, but they’re a good option if you’re limited on lateral desk space — and there are a few that are designed specifically with PC users in mind. The Sound Blaster Katana SE is Creative’s most recent addition to its gaming-oriented Katana lineup, and it’s particularly suited to a setup with limited space, as it’s the first Katana soundbar without a subwoofer.
The Katana SE is slim enough at just 3.1 inches (78mm) high to fit neatly under your desktop monitor — though it also comes with custom wall-mounting hardware for those who want to mount it under a monitor or TV. It features four drivers — two 4.3-inch (109mm) midrange drivers, and two 2.1-inch (54mm) tweeters — each of which is individually powered by dual DSP-controlled stereo amps. The result is clear, great-sounding audio and a soundbar that gets impressively loud: while the Katana SE managed a maximum of 74.5dBA at 50% volume in our testing, it hit a significantly higher maximum of 92.7dBA at 100% volume.
The Katana SE is packed with features and connectivity for all types of gamers — it features the typical 3.5mm analog and USB-C inputs, as well as optical-in, HDMI ARC, and Bluetooth 5.0. It also has a Dolby Audio decoder (available over HDMI ARC/optical-in), as well as Creative’s Super X-Fi headphone technology for virtual surround sound. Its multiple input ports means you can use it with your PC as well as consoles, TVs, and other devices — making it much more versatile than Razer’s Leviathan V2 and V2 Pro soundbars, which only offer connectivity via USB and Bluetooth.
While the Katana SE sounds very good, even at the low end, it doesn’t quite offer the deep, weighty bass reproduction of a dedicated subwoofer. Creative’s Sound Blaster Katana V2 soundbar retails for just $30 more (though it’s currently on sale for the same $300 price tag as the Katana SE), and comes with a slim, 6.5-inch subwoofer, for those who have some under-desk space.
What to Consider While Shopping for PC Speakers
✳ Stereo, subwoofer, or surround: A basic 2.0 speaker setup has just two speakers (a left channel and a right channel), and won’t take up too much space on (or under) your desk, provided you don’t opt for bulky, powered bookshelf speakers. If you want something with a more powerful bass response, you should look for a 2.1 system, which comes with a separate subwoofer. (You can also purchase a subwoofer separately, so long as it’s compatible with your setup).
If you’re looking to replicate the immersiveness of home theater audio, you’re probably looking for a 5.1 (or higher) surround sound setup. Just know that these speaker sets tend to be expensive, and you may have to do some creative speaker placement and wire routing to keep your PC from looking like some kind of low-budget Spider-Man movie set.
✳ How you’ll connect to your PC: There are a few different ways to connect speakers to your PC. Some speakers, usually higher-end models, connect via USB. This makes them easy to plug into most PCs and laptops, and they use their own built-in DAC/sound card, so you won’t have to worry about the quality of your system’s onboard audio. Not all speakers have this option, however — many are analog-only, which means you’ll need to connect them directly to your motherboard’s analog hookup or your laptop’s headset jack. This shouldn’t be too much of an issue for 2.0 systems, but if you’re looking at 2.1 or 5.1 surround, you’ll want to make sure your PC’s built-in audio can support it (or purchase a separate internal or external sound card).
✳ Bluetooth: Bluetooth speakers are a category all on their own, and they’re not very well-suited to acting as desktop PC speakers (nor are they very economical if you don’t need the portability). Bluetooth isn’t a necessity in PC speakers, but the added versatility can be a bonus — especially if you frequently switch between systems and/or devices.
✳ Where you’ll put them: Many PC speakers are, perhaps not surprisingly, designed to be placed on your desktop — and some are even angled upward for optimal audio delivery to your ears. But if you’re thinking of putting your speakers elsewhere — on the floor, a shelf, or even mounted to the wall — make sure the speakers’ stands allow for varying placement (or are removable).
And note that you may have to buy stands for ideal placement or angling, as many PC speakers don’t come with them. Some models attempt to help angle the sound up toward your ears by building the angle into the design of the housing, but this can lead to complications if, for some reason, you need or want to place the speakers above your desk surface.
✳ Size: As is obvious to anyone who’s ever had more than a passing interest in high-end audio, speakers come in all kinds of shapes and sizes. And outside of hi-fi focused options that require a separate amplifier for power, there are also several powered bookshelf speakers that function much like PC speakers, in the sense that you can just plug them into an outlet and then into your PC (or connect wirelessly over Bluetooth).
But as these bookshelf speakers often stand close to a foot tall and are several inches wide and deep, they don’t make ideal desktop speakers for most people. They also tend to pump out more sound than is comfortable for most people when sitting right in front of you. They can, however, be a good option for impressive PC audio if placed behind out – on, say, a bookshelf.
More traditional desktop speakers can also vary pretty dramatically in size, from tall and thin towers to compact, to compact rounded designs, to boxier and somewhat bulkier options that mimic the shape of larger, traditional bookshelf speakers. Be sure to consider how much space you have on your desk before buying. But know that (often though not always) speakers with larger drivers and more solid cabinets can pump out more and better sound, and are less likely to vibrate or otherwise move around on your desk. In other words, don’t expect to be blown away by tiny, inexpensive speakers (in most cases).
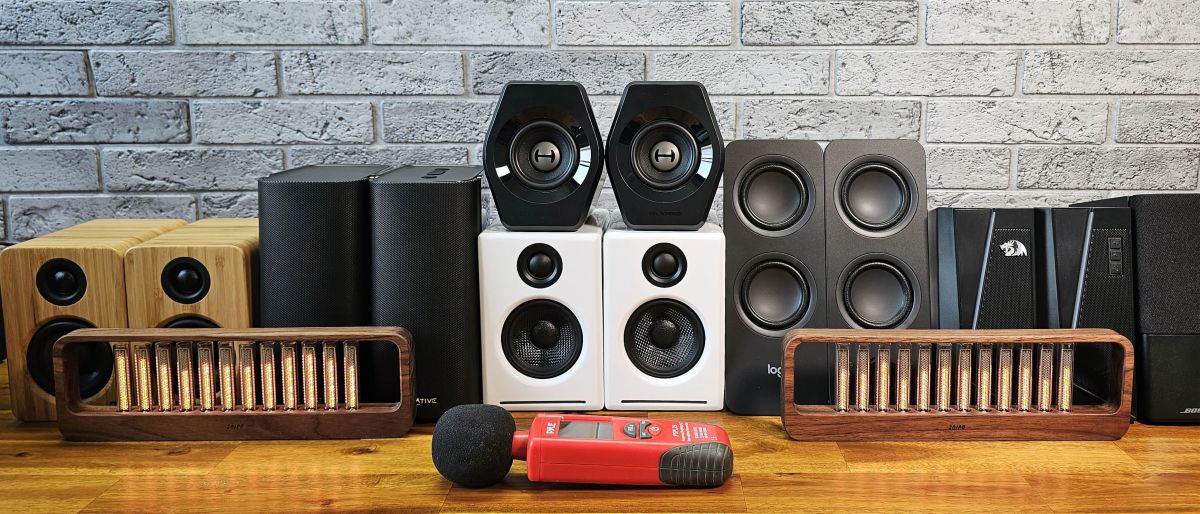
How We Test Speakers
A lot of opinions about sound signature, features, and design come into play when deciding what PC speakers are the best for you. Of course, there are measurable characteristics that can tell you quite a bit about how a set of speakers sound. But without thousands of dollars of equipment and an anechoic chamber, it’s tough to reliably make those kinds of measurements. Plus, regardless of what those results might be, how speakers will sound to you depends greatly on the size and shape of your room, the types of materials on and around your walls, and your own ears and brain.
So without unlimited space and funds for true high-end audiophile-level testing, or the ability to take everyone’s physiology and computing surroundings into account, we’ve attempted to mix some measurable data with lots of experience and our own opinions when testing speakers.
We use a Pyle PSPL25 sound meter at a fixed 1-meter distance to test a speaker’s maximum sound output at 50% and 100% volume, using a standard test track. This tells us both how loud a set of speakers can get, and how good or bad things sound when cranked all the way up. Cheaper speakers (and some more expensive options with sub-par power supplies) don’t tend to sound great at max volume. We also use the speakers across a range of common PC tasks: playing games, watching video, and listening to music to get both an anecdotal sense of how the speakers sound in everyday use, as well as how intuitive any hardware or software controls are to navigate.
As with all of the products we benchmark, test, and review, how we test speakers is a fluid process, aimed at delivering useful results and suggestions for our readers. Please feel free to offer up suggestions in the comments below. When we make substantive changes to how we test speakers, we’ll update this portion of the page.