When AMD launched its six-core Ryzen 5 7500F last month, it only released it in retail in China and said that it would be available in other countries to system integrators — and that end-users would only be able to purchase it inside desktop PCs. It seems those limitations didn’t work out, and the cheapest Zen 4-based CPU is now available both in Europe and North America.
ShopBLT, a store known for selling new hardware ahead of others, is now offering the Ryzen 5 7500F for $176.46 or for $181.83 — which is very close to AMD’s recommended MSRP of $179. AMD’s Ryzen 5 7500F processor is designed to bring the benefits of the AM5 platform to budget-conscious gamers anticipating future upgrades, so it is nice to see that it is available at nearly MSRP.
Unfortunately, the CPU is not in stock and is ‘ordered as needed,’ so for now it is only possible to order it and get it within 15 business days. It is likely that over time the processor will be available from other retailers, such as Amazon or Newegg, but for now is only available for pre-order from ShopBLT.
The situation with AMD’s Ryzen 5 7500F availability is slightly better in Europe, where the unit is available from multiple retailers, including MindFactory in Germany for €202 and from Future-X in Austria and Germany for €202, as revealed by Geizhals.eu and VideoCardz.
Swipe to scroll horizontally
Header Cell – Column 0
Street/MSRP
Cores / Threads (P+E)
Base / Boost Clock (GHz)
TDP / PBP / MTP
Ryzen 5 7600X
$249 ($299)
6 / 12
4.7 / 5.3
105W / 142W
Ryzen 5 7600
$229
6 / 12
3.8 / 5.1
65W / 88W
Ryzen 5 7500F
$179
6 / 12
3.7 / 5.0
65W / 88W
For now, AMD’s six-core Ryzen 5 7500F CPU is the cheapest desktop Zen 4-based offering from the company. The processor runs at a base clock of 3.70 GHz and can boost up to 5.0 GHz, which is slightly below the clockspeed of the more expensive Ryzen 5 7600. Detailing further, the Ryzen 5 7500F comes with 6MB of L2 cache, 32MB of L3 cache, supports a dual-channel DDR5 memory system, and has 24 usable PCIe Gen5 lanes. Notably, the ‘F’ in its model number denotes the absence of an integrated GPU, necessitating an external graphics card. However, with a 65W TDP and a locked multiplier, this processor is not easily overclockable.
They say that good things come in threes, and the U.S. is definitely banking on the Lawrence Livermore National Laboratory (LLNL) to deliver just that when it comes to cold fusion. Having achieved their second successful fusion ignition with an energy surplus (meaning that more energy was produced than was required to achieve the fusion reaction itself) within a national lab on July 30th, the U.S. now aims to spur research and facilitate a successful third ignition — and beyond. To do that, the country is ready to invest a further $112M into a dozen supercomputing projects.
Fusion (short for nuclear fusion) refers to the ability to fuse two light atoms into a single, heavier one: a process that when successful, leads to the release of massive amounts of energy in the form of electrons. Unlike fission (which works by breaking down heavy elements such as uranium or plutonium), nuclear fusion is expected to be a safe, nearly-unlimited source of energy. When done right, fusing two light atoms (such as deuterium and tritium, each a hydrogen isotope that carries additional electrons compared to “plain” hydrogen) brings about an energy surplus that is more than four times the amount that fission processes can generate. That also makes it a process worth about four million times the amount of energy released from coal burning (at a per-kilogram basis) — its merits are obvious.
It’s on the back of that promise that the newly-instated Scientific Discovery through Advanced Computing (SciDAC) program combines the two pre-existing programs from the Department of Defense with the aim of streamlining programs invested into solving complex fusion energy problems using supercomputing resources, including exascale systems.
“The modeling and simulation work of these partnerships will offer insight into the multitude of physical processes that plasmas experience under extreme conditions and will also guide the design of fusion pilot plants,” said DoE Associate Director of Science for FES, Jean Paul Allain.
There’s still a lot of work to achieve a sustainable, surplus-energy fuel ignition that actually rockets humanity into a clean, energy-conscious and abundant future, however. The July 30th fusion ignition did provide a higher energy output than was delivered into the light-atom fuel capsule (although it’s unknown how much better it was than the 2.05 megajoules-in, 3.15 megajoules-out achieved in December of last year), but that only takes into account the energy transmitted unto the pellet itself. Unfortunately, the way that energy is delivered into the pellet (via 192 lasers) is still extremely inefficient — LLNL needed to push a staggering 322 megajoules to fire the lasers themselves, which still left the process on a global energy deficit.
But the way forward is to better understand the quantum processes surrounding fusion. Until quantum computers themselves can provide a viable computing platform that can crack that code (and there’s no telling how long that will take — but it’s likely in the decade mark), supercomputers based on standard computing are the best way we have to look into the ordered chaos of processes that occur when the laser strikes the pellet.
The $121M will certainly be a boon there — but it definitely won’t be enough. Yet we humans have this strange way of looking farther ahead — of chasing the carrot — than simply focusing on what is right in front of us. This grant injection is part of that, and a healthy injection into the High performance Computing (HPC) landscape — however small a slice of the total it ultimately turns out to be.
If you’re a Steam Deck owner, you have undoubtedly heard of the Sabrent Rocket 2230, an early retail M.2 2230 NVMe SSD that helped DIYers upgrade once-space-limited Steam Decks. However, even the original Rocket 2230’s 1TB maximum could be tight with modern games and lots of ROMs, but thankfully now you can reach up to 2TB with Sabrent’s follow-up Rocket Q4 2230.
SD cards and external storage can only do so much with the Steam Deck and other handhelds, and if you want easily-portable, high-performance storage, a good NVMe SSD is hard to beat. The Sabrent Rocket Q4 2230 is an easy way to upgrade your Steam Deck, ROG Ally, or other portable device to 2TB of fast internal storage. It doesn’t cut corners by using old technology, it’s relatively fast and efficient, and it’s more than enough to get you gaming on the go. To provide 2TB of capacity in the M.2 2230 form factor while being single-sided, it has to compromise by using QLC flash instead of the faster TLC flash. The QLC flash reduces peak and sustained performance, but the drive performs well enough where it matters.
The drive is supported by a normal retail warranty and comes with Sabrent’s copy of Acronis True Image. The drive arrives with a copper-infused heatspreader label, which might require adjustment in some devices (such as with the EMI sleeve in the Deck). Currently, the only readily available TLC-based option in this form factor is the WD SN740, the client version of the WD Black SN770, although we may see more alternatives thanks to the 232-Layer generation of flash.
The Rocket Q4 2230 is very similar to the Crucial P3 Plus and the Crucial P3. These drives are efficient and generally run cool. Like with the Crucial P3 and P3 Plus, the Rocket Q4 2230 opts for a large pSLC cache, which reduces sustained performance compared to a drive like the Solidigm P41 Plus.
The Micron 2400, another popular 2TB choice for M.2 2230 SSDs, uses the same controller as the P41 Plus — the SMI SM2269XT — but comes with Micron’s QLC flash. That controller tends to be less efficient, and it’s possible the Micron 2400 has a larger pSLC cache, making the Rocket Q4 2230 arguably the best all-around QLC-based option for embedded devices at this time. Let’s see how it performs.
Specifications
Swipe to scroll horizontally
Product
1TB
2TB
Pricing
N/A
$219.95
Form Factor
M.2 2230
M.2 2230
Interface / Protocol
PCIe 4.0 x4 / NVMe 1.4
PCIe 4.0 x4 / NVMe 1.4
Controller
Phison E21T
Phison E21T
DRAM
N/A (HMB)
N/A (HMB)
Memory
Micron 176-Layer QLC
Micron 176-Layer QLC
Sequential Read
N/A
5,000 MB/s
Sequential Write
N/A
3,200 MB/s
Random Read
N/A
480K
Random Write
N/A
750K
Security
N/A
N/A
Endurance (TBW)
N/A
450TB
Part Number
SB-213Q-1TB
SB-213Q-2TB
Warranty
5-Year
5-Year
The Rocket Q4 2230 is currently available only at 2TB for $220 on Amazon. Price swings are common in the SSD market, and the competition’s pricing also varies.
Although Sabrent appears to have left the door open for a 1TB SKU, the 2TB is the only one currently available. It peaks at 5,000 / 3,200 MB/s for sequential reads and writes and 480K / 750K random IOPS. Write speeds can be lower for QLC, although this rated value is below what the drive can achieve, and it has enough speed to saturate the PCIe 3.0 bus present in the Steam Deck.
The drive is warrantied for five years with registration, and the drive can absorb up to 450TB of written data. This endurance rating is more than sufficient for the drive’s use in a device like the Steam Deck. Worries about QLC endurance are not warranted; Micron’s 176-Layer QLC is normally rated for 1,500 program/erase cycles with up to 100,000 in pSLC mode.
Software and Accessories
The Sabrent Rocket Q4 2230 comes with a downloadable, Sabrent-specific version of Acronis True Image which is useful for cloning and imaging. This can be nice to have, especially when working with the ROG Ally. Sabrent also has its own SSD toolbox, which will presumably offer firmware updates for the drive, if applicable.
A Closer Look
Image 1 of 3
(Image credit: Tom’s Hardware)
(Image credit: Tom’s Hardware)
(Image credit: Tom’s Hardware)
The Rocket Q4 2230 arrives in a stylish tin, showing off a mixture of white and copper coloring. While not important, the presentation is attractive and does separate it from many OEM SSDs. The drive’s label operates as a heatspreader as it is made of thermally-conductive copper.
Image 1 of 2
(Image credit: Tom’s Hardware)
(Image credit: Tom’s Hardware)
The Rocket Q4 2230 sports an SSD controller and a single NAND package. The drive is single-sided, which is important for many embedded devices like the Steam Deck — it can be a challenge to pack in 2TB of flash with this limitation.
The Rocket Q4 2230 uses Micron’s 176-Layer QLC (N48R) flash, which is convenient for achieving 2TB in such a small package. In contrast, the original Rocket 2230 was constrained to 1TB because it used Micron’s 176-Layer TLC (B47R).
Using 1Tb dies with TLC flash is possible, as the WD SN740 does with BiCS5, but that flash is less efficient. SK hynix also makes 1Tb dies, but given current stacking technology, we will likely see 232-Layer generation flash tackling this role (aside from maybe BiCS6), such as with Micron’s B58R TLC. This flash is already available on many drives, like the Crucial T700.
The Rocket Q4 2230 is DRAM-less, but the host memory buffer (HMB) feature is supported on Valve’s Steam Deck, ASUS’s ROG Ally, and other devices. This should be sufficient for portable gaming workloads. The drive is also PCIe 4.0, which begs the question: does that make a difference for the Deck? In fact, this drive is somewhat more efficient when restricted to the 3.0 interface, and it’s worth going for new hardware for overall performance and efficiency on a portable platform. Such technology does not often arrive on an older PCIe interface, and with it being backward compatible, there’s little reason not to go with a 4.0 drive.
The Rocket Q4 2230 uses the Phison E21T SSD controller, which we’ve reviewed on multiple products, including the original Rocket 2230 (a.k.a. the Rocket 2230 NVMe 4.0). This controller has a history of providing good performance and power efficiency. The latter is probably more important with battery-powered, portable devices. This controller’s primary competition would include the Silicon Motion SM2269XT on drives like the Micron 2400 and Solidigm P41 Plus, the InnoGrit IG5220, and the Maxio MAP1602. However, the latter two are less commonly found on M.2 2230. The MAP1602, on paper, is faster but can run slower, which offers some flexibility.
Future controllers, like the Phison E27T and Silicon Motion SM2268XT, could usurp its position, although the extra performance doesn’t mean much for the PCIe 3.0 Steam Deck. Efficiency gains would be nice, but these two controllers will still be 12nm. Any gains would more likely come from the flash. One other worthy mention is the Kioxia BG6 with an unknown controller. Kioxia has often used Phison controllers, and the BG6 uses Kioxia’s 162-Layer TLC (BiCS6), giving it some bandwidth uplift. Efficiency remains uncertain.
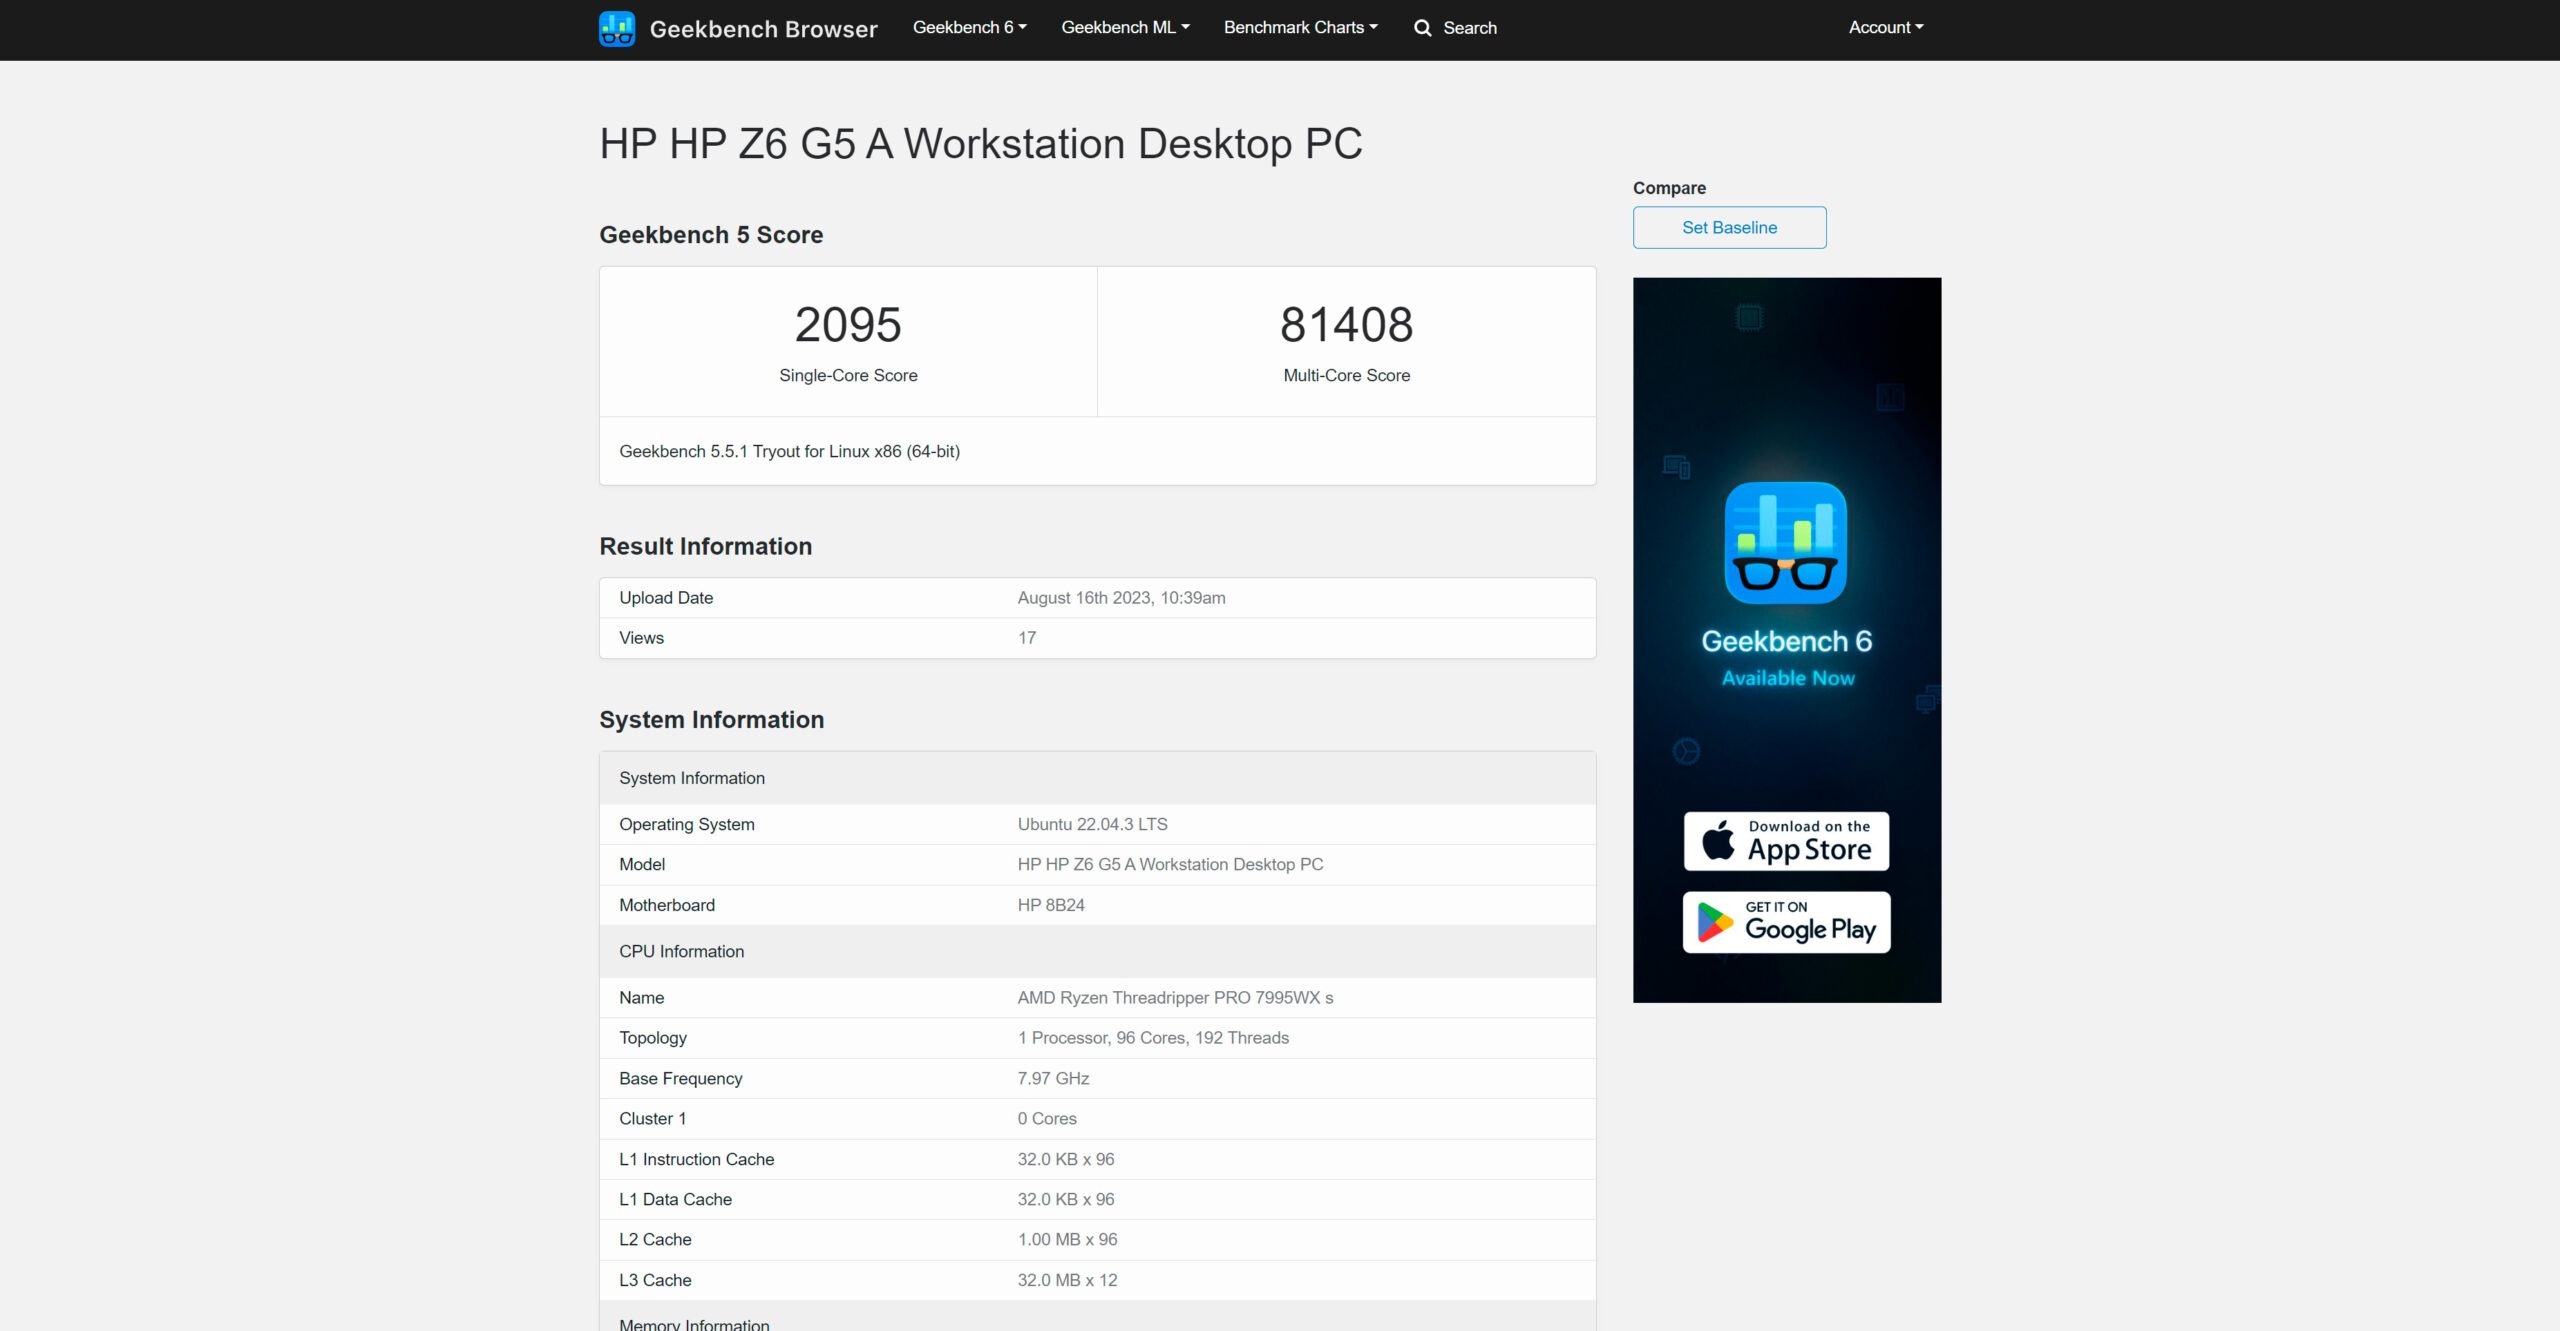
AMD’s forthcoming Ryzen Threadripper Pro 7995WX (Storm Peak) will undoubtedly disrupt the list of best CPUs for workstations. The multi-core beast, which will lead the Ryzen Threadripper Pro 7000WX army, has been spotted in a new benchmark with 96 cores and boost clock speeds up to 5.1 GHz.
The Geekbench 5 submission (via Benchleaks) exposes the Ryzen Threadripper Pro 7995WX with 96 cores and 192 threads. The next-generation workstation flagship represents a 50% increase in core count over the existing Ryzen Threadripper Pro 5995WX (Chagall). It also sports 60% more cores than Intel’s Xeon Platinum 8490H (Sapphire Rapids) server chip.
The Ryzen Threadripper Pro 7995WX is a risky bet on AMD’s part since it’s almost a carbon copy of the company’s EPYC 9654 (Genoa) processor, which retails for $11,805. There will be a difference in features between the Threadripper Pro and EPYC platforms. A handful of processors can compete with Ryzen Threadripper Pro 7995WX regarding core count. Only EPYC Bergamo, which scales up to 128 cores, has more cores.
Ryzen Threadripper Pro 7995WX also comes with a significant upgrade in the cache subsystem. The Zen 4-powered workstation chip wields 384MB of L3 cache and 96MB of L2 cache. That’s the same design on the EPYC 9654. however, in comparison to the Ryzen Threadripper Pro 5995WX, the Ryzen Threadripper Pro 7995WX flaunts 50% more L3 cache and up to 3X as much L2 cache.
Ryzen Threadripper Pro 7995WX Specifications*
Swipe to scroll horizontally
Processor
Cores / Threads
Base / Boost Clock (GHz)
L3 Cache (MB)
L2 Cache (MB)
TDP (W)
Ryzen Threadripper 7995WX
96 / 192
? / 5.1
384
96
350
EPYC 9654
96 / 192
2.4 / 3.7
384
96
320 – 400
Ryzen Threadripper Pro 5995WX
64 / 128
2.7 / 4.5
256
32
280
Xeon Platinum 8490H
60 / 120
1.9 / 3.5
112.5
120
350
*Specifications are unconfirmed.
Ignore the Geekbench 5-reported 7.97 GHz base clock, since it’s an obvious error. However, digging deeper into the Geekbench 5 report shows that the Ryzen Threadripper Pro 7995WX was reportedly boosted to 5,140 MHz, which probably is the single-core boost clock. The Ryzen Threadripper Pro 5995WX has a 4.5 GHz single-boost clock, so the Ryzen Threadripper Pro 7995WX’s rocking a 14% higher single-boost clock.
Compared to the EPYC 9564, the Ryzen Threadripper Pro 7995WX has a 38% higher boost clock. In a way, you could consider the Ryzen Threadripper Pro 7995WX to be a faster-clocked EPYC 9564. An important factor will be the pricing — the EPYC 9564 costs $11,805, so it’ll be interesting to see how AMD prices the nearly-equal Ryzen Threadripper Pro 7995WX.
(Image credit: Primate Labs Inc.)
As with all leaked benchmarks, take these with a grain (or several) of salt. The Ryzen Threadripper Pro 7995WX scored 2,095 and 81,408 points on the single-and multi-core tests, respectively. Compared to the nearly identical Ryzen Threadripper Pro 5995WX submission, the new chip has a 26% higher single-core performance. In terms of multi-core performance, we’re looking at around 49%. The exact numbers will likely differ slightly, so these values are more general ballpark figures.
If the information from a leaked shipping document is legit, the Ryzen Threadripper Pro 7995WX may have a 350W TDP — the same as the Xeon Platinum 8490H. This TDP rating looks reasonable, since the EPYC 9564’s TDP varies between 320W to 400W. In this case, the 96-core Ryzen Threadripper Pro 7995WX seemingly has a 25% higher TDP than the Ryzen Threadripper Pro 5995WX, probably to lodge the extra cores and higher clock speeds.
The leaked document with today’s Ryzen Threadripper Pro 7995WX benchmark hints at an imminent launch for the Ryzen Threadripper Pro 7000WX series. We saw a couple of upcoming Noctua Threadripper CPU air coolers at Computex 2023 with an ETA of October, and the Ryzen Threadripper Pro 7000WX series will likely hit the market around that timeframe.
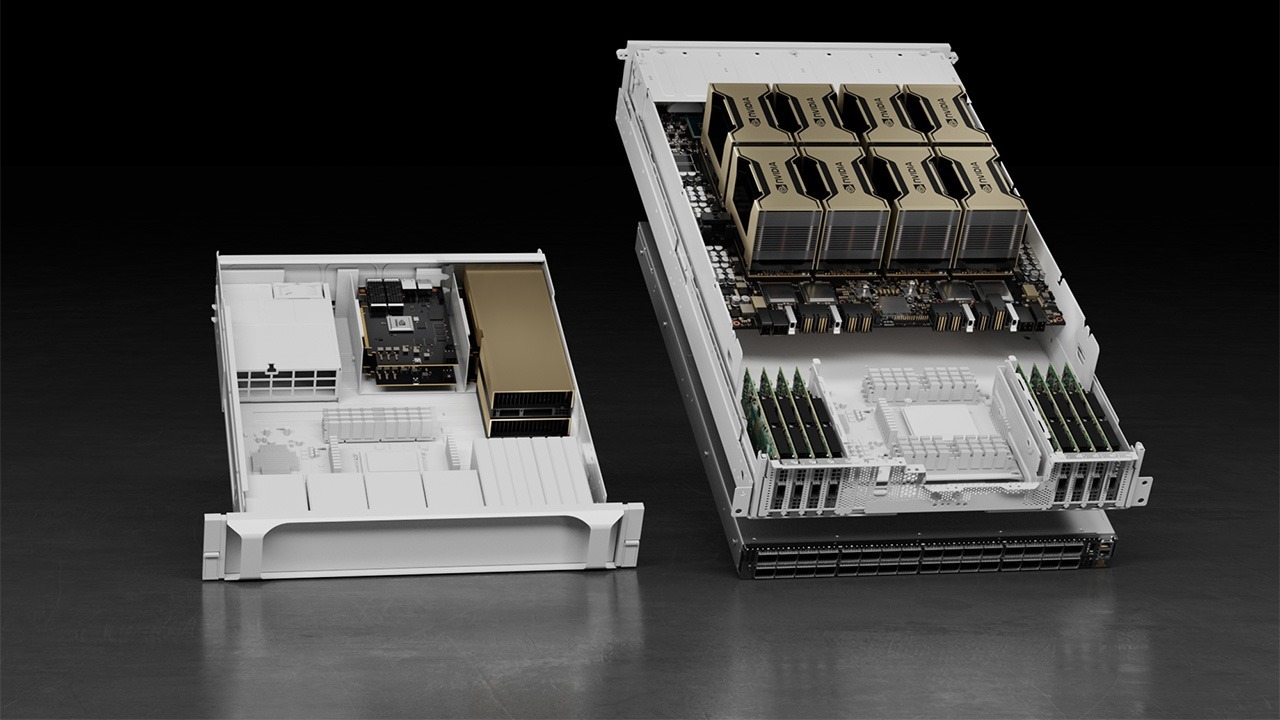
Foxconn is producing over half of Nvidia-based AI hardware and is benefiting from the brand’s dominance in the artificial intelligence field, according to Economic Daily, citing sources in the supply chain (via TrendForce). Liu Yangwei, the chairman of Foxconn, recently told analysts and investors that the company produces 70% of AI servers sold globally today, reports Commercial Times.
Foxconn appears to be the exclusive maker of Nvidia’s compute GPU modules, such as the A100, A800, H100, and H800. These modules are widely used by all makers of AI GPU-based servers — including Nvidia. The latter offers its customers DGX servers based on A100 and H100 as well as HGX boards powered by the same compute GPUs. And as it turns out, over 50% of HGX boards are also produced by Foxconn.
But Foxcon’s involvement in AI hardware does not end with modules and boards — it also spans to servers and server cabinets, establishing a comprehensive vertical integration that encompasses the whole AI landscape.
Yangwei bragged that the company produces 70% of AI servers, which includes not only Nvidia-based products, but also servers that rely on proprietary AI processors by Amazon Web Services and Google, two large cloud service providers (CSPs). This makes Foxconn one of the largest beneficiaries of the explosive growth of AI servers. (Other beneficiaries include Inventec, Quanta, and Supermicro.)
AI servers is a huge market. Yangwei said that it is projected to expand from $30 billion in 2023 to $150 billion by 2027. To provide perspective on this growth, the entire server market was valued at $123 billion in 2022, and is expected to reach $186 billion by 2027, based on data from IDC.
The head of Foxconn claims that CSPs are the largest consumers of AI servers these days, as they strive to offer their clients appropriate platforms to run various artificial intelligence applications.
He also highlighted that the company’s enduring partnerships with North American CSPs, coupled with its production capabilities in the U.S. — notably the Wisconsin factory — enable it to provide tailored services to major clients like AWS, Google, and Microsoft, granting Foxconn a unique edge in the competitive market.
IBM, which has been at the forefront of quantum computing and a number of other research fields, recently showcased what it feels the solution to AI processing (and its costs) could be. And if IBM’s vision translates into something, the future isn’t centered around GPUs: instead, it takes place within mixed-signal, analog chips that could bring about massive improvements in energy efficiency while offering competitive performance against the market’s current go-tos.
According to a research paper published in Nature Electronics last week, IBM believes the future of AI inferencing could pass through a chip combining phase-change memory (PCM) alongside digital circuits. According to the paper, matrix-vector multiplication (one of the main workloads for AI inferencing) could be performed directly on chip-stored weights.
In this scenario, the reduced power requirements of passive, analog circuitry (which don’t require a continuous electrical current to maintain the bit value they’re holding) should allow for a reduction in the overall power required to successfully perform matrix calculations — or, at the very least, allow for the surplus energy budget of the (now) analog sections of the chip to be repurposed towards its remaining digital circuits for added throughput. The design takes clues from learnings from research in neuromorphic computing.
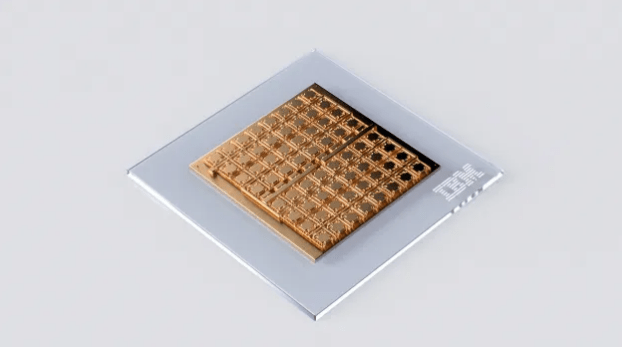
Developed as part of IBM’s Hermes project, the latest version of the chip counts with 64 compute tiles, which communicate with each other through a Network-on-Chip (NOC) approach that’s similar in concept to AMD’s Infinity Fabric. There’s also fixed-function hardware that’s specialized in the processing of convolutional layers (which aim to reduce complexity of the underlying information in order to accelerate processing speed and increase efficiency). Being a research chip, it’s been fabricated at a 14-nm fabrication process; perhaps IBM has room to further improve power efficiency, if the analog cells can be further miniaturized.
The phase-change-memory (PCM) cells themselves are distributed throughout each of the 64 tiles arranged in a crossbar, which can store a 256×256 matrix-vector multiplication space. To be fair, there are certain performance constraints in such a mixed analog-digital design: signals need to be converted from analog to digital (and vice-versa), which incurs penalties in both latency and energy utilization. But with appropriate scheduling optimizations, the final result is higher efficiency compared with a fully-digital chip (such as Nvidia’s A100 and H100). According to IBM, a single ResNet-9 input was processed in 1.52 μs (micro-seconds) and consumed 1.51 μJ (micro-Joules) of energy. According to Abu Sebastian at the IBM Rüschlikon Center (as covered by EE Times), the current iteration of the chip achieves a peak matrix-vector-multiplication throughput of 16.1 to 63.1 TOPC (trillion operations per second) at an energy efficiency of 2.48 to 9.76 TOPS W-1.
The still-ongoing AI “revolution” has sparked volcanic moves in the High Performance Computing (HPC) market. But besides driving home the marvel of GPUs (the general processing units responsible for accelerating most of that particular market), the gold rush for AI accelerators has showcased just how dependent on a single player the market still is (read: Nvidia), while also bringing back to the forefront questions of energy efficiency.
Analog chips that break apart the power efficiency barriers would certainly be a welcome move, but as with any new technology, analog AI inferencing chips will have to fight to survive against the already-entrenched technologies, software stack, and techniques deployed today. Network effects and market share are real, and Nvidia’s grip on the HPC market through both its hardware and CUDA software stacks is… vice-like, to say the least.
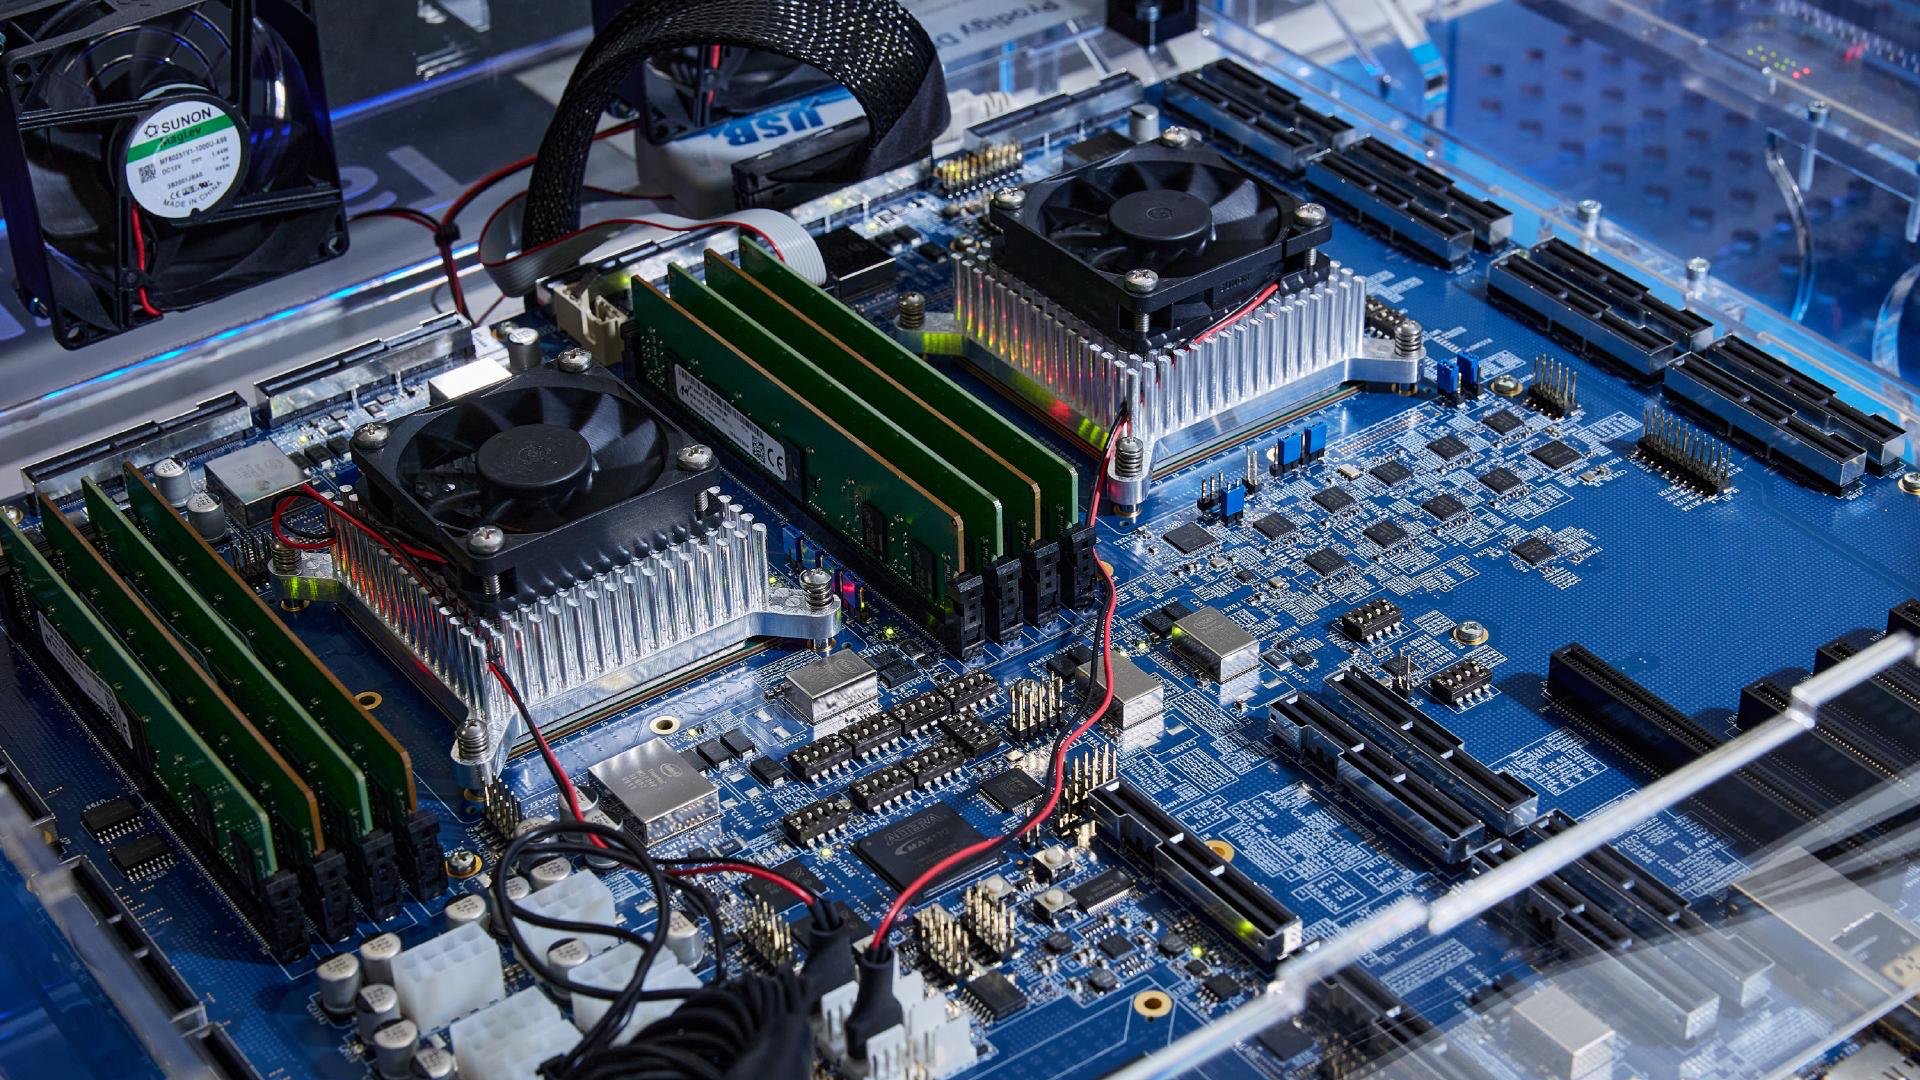
This week, Tachyum said that by using the latest electronic design automation (EDA) tools it has managed to squeeze 50% more cores into its Prodigy processor while increasing die size by only 20%. The 192-core chip does not seem to exist in silicon as of now and the company did not share when it plans to start its sampling or shipping these processors to interested parties.
Last year Tachyum sued Cadence for providing IP that did not meet its expectations and had to switch to IP from another provider or providers. Because of this, it had to also change RTL simulation and layout tools. The company did not disclose which EDA tools it uses for Prodigy development, but it claims that the new set of programs enabled it to tweak various parameters, resulting in a 50% increase in core count (from 128 to 192), increase L2/L3 cache from 128MB to 192MB, and a jump in SERDES from 64 to 96 per chip. Die size of the processor increased from 500 mm2 to 600 mm2, or by around 20%.
Tachyum asserts that it could squeeze more of its universal cores within the 858 mm2 reticle limit, performance of all cores would be constrained by memory bandwidth, even when paired with 16 DDR5 channels operating at a 7200MT/s data transfer rate.
“We have achieved better results and timing with our new EDA physical design tools,” said Dr. Radoslav Danilak, founder and CEO of Tachyum. “[…] while we did not have any choice but to change EDA tools, our physical design (PD) team worked hard to redo physical design and optimizations with the new set of PD tools, as we approach volume-level production.”
Tachyum’s Prodigy is a versatile processor with up to 192 unique 64-bit VLIW cores that boast two 1024-bit vector units, a 4096-bit matrix unit, a 64KB instruction cache, a 64KB data cache, and a 1MB L2 cache. Interestingly, unused L2 caches from other cores can be repurposed as a supplemental L3 cache.
When Prodigy runs native code, proper compiler optimizations can enable 4-way out-of-order processing (despite the fact that VLIW is meant to be in-order). Furthermore, Prodigy’s instruction set architecture allows for enhanced parallelism through specialized ‘poison bits.’
Perhaps the most interesting peculiarity of the Prodigy processor is that it can emulate x86, Arm, CUDA and RISC-V binaries without compromising performance, according to Tachyum. Despite past challenges faced by VLIW processors emulating x86 code, Tachyum is optimistic about its performance, even if certain translations might cause a 30-40% drop.
A week ago, news about AMD’s Inception vulnerability broke, and the first deep dive into the performance impact of mitigations has been published. Linux-centric Phoronix has just uploaded eight pages of test results. Using an AMD Epyc 7763 (Zen 3) based system, running Linux (of course), the site tested a plethora of apps and tabulated before and after-patching results. Depending on workload, you might not see much difference — however, some tasks were up to 54% slower on a patched system.
Swipe to scroll horizontally
Test process
No patch result
Worst patch performance
MariaDB 4096 (queries/s)
590
274 (-54%)
DaCapo (time, ms)
3993
5305 (+33%)
Linux Compilation defconfig (time, s)
31.19
40.09 (+29%)
Gimp rotate (time, s)
9.444
12.096 (+28%)
OpenRadioss (time, s)
77.48
99.04 (+27%)
Apache Spark (time, s)
4.91
5.74 (+17%)
7zip (MIPS)
384374
334812 (-13%)
Blender 3.6 (render, s)
27.34
27.73 (+1.4%)
Firefox Speedometer (runs / minute)
347
343 (-1.2%)
Data from Phoronix benchmarking
For the above table we looked at some of the worst results, as well as some of the test results from more-familiar apps like 7zip, Blender, and Firefox. Those three familiar apps don’t suffer too much from the AMD Inception mitigations. Of the three, compression app 7zip seems to be the most affected — but how long do you spend de-compressing files in an average day?
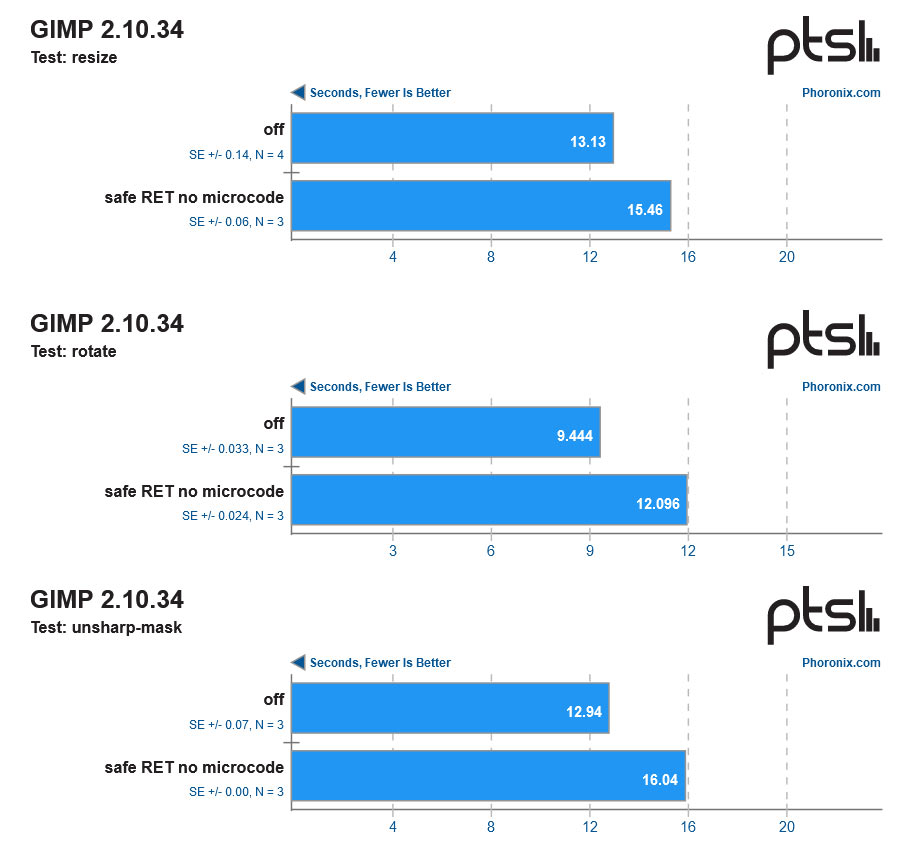
(Image credit: Phoronix)
Much more serious performance consequences are observed in applications that work on databases, code compilation, engineering, and image processing. The worst result we saw, with MariaDB, shows database operations were severely impacted on a patched Epyc system.
(Image credit: Phoronix)
If you head over to Phoronix for a closer look at the data and a wider selection of results you will see that the results sometimes show more than just the AMD Inception mitigation being ‘off’ or ‘on’. There will be up to three levels of patching with different configurations — some with purely kernel-based mitigations, others with the newest microcode, and another with the most secure Indirect Branch Prediction Barrier (IBPB) mitigation. Please note that IBPB was frequently (but not always) shown to be the worst performer of all mitigations. The default AMD Linux mitigation is ‘safe RET mode’.
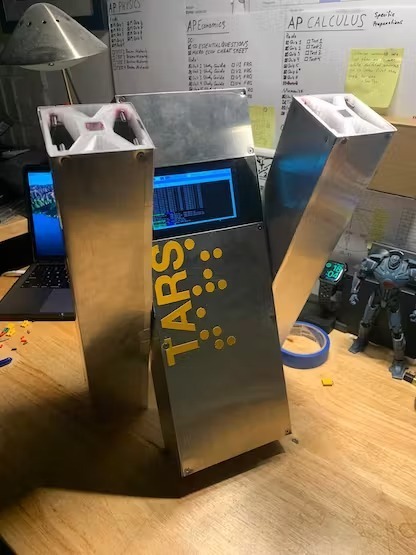
If there’s one thing the Raspberry Pi and maker community at large is good at, it’s creating replicas of cool stuff from the imaginative works of science fiction. From AI-powered Terminator skulls to pit droids from Star Wars, there’s no shortage of creativity to explore. Today we have another impressive replica to share, this one being a working TARS replica from the movie Interstellar created by maker and developer Charlie Diaz.
According to Diaz, the goal was to not only create a visual duplicate of the robot but also to add functionality that would bring it to life. It took several iterations to get to where the project is today but the end result was well worth all the effort. This impressive TARS replica uses our favorite SBC, the Raspberry Pi, and is capable of locomoting for hours without issue.
This success didn’t come without its fair share of trial and error. TARS has a unique design and the walking mechanism took a bit of work to perfect. Diaz explained how the first version didn’t meet his expectations and failed to walk for long without components breaking down and causing problems. Making adjustments like swapping out heavier components for lighter versions made a huge difference in its performance.
An earlier version of the TARS replica. (Image credit: Charlie Diaz, Hackster)
There are 3D-printed components used to mount the legs to the main body with CAD files available for anyone who wants to check them out. It’s driven by a Raspberry Pi 3 B+ alongside an Adafruit 16-channel PWM servo driver connected to 4 SG90 micro servo motors and 5 metal gear servos. A 5-inch Elecrow display is mounted to the front and a bluetooth remote is used for remote control.
Operating system-wise, Diaz is using Raspberry Pi OS. He was also kind enough to make the project open source so you can find all of the code used in the build over at Hackster. The walking functions and remote operations are handled using a custom Python script.
If you want to see this Raspberry Pi project in action, you can check out the full project in greater detail over at Hackster. There Diaz not only shows off his hard work but also gives some insight into its development progress over time.
Intel’s Arc Alchemist graphics cards have proven worthy to be on the list of best graphics cards. The chipmaker is readying its next-generation Battlemage graphics cards for 2024 and has released some test tools for its partners that hint at Battlemage’s package sizes.
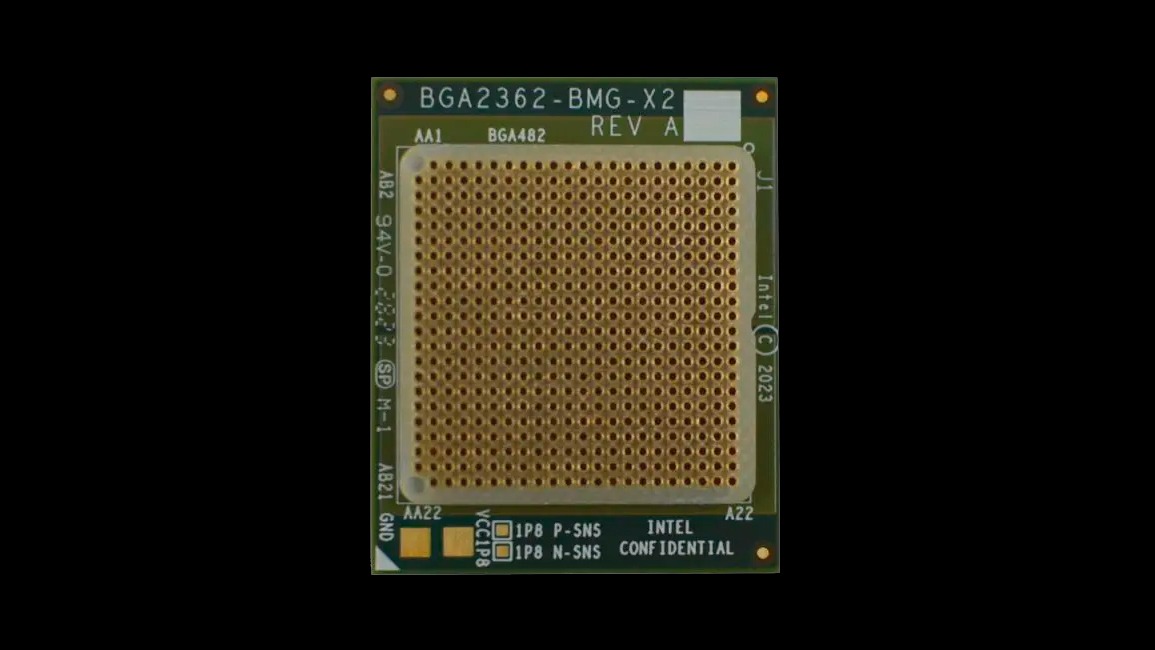
Intel has a Design-In Tools store offers its partners design and validation tools for the chipmaker’s existing and upcoming products. On this occasion, hardware sleuth Harukaze5719 discovered the BGA2727-BMG-X3-6CH and BGA2362-BMG-X2 interposers designed for testing Battlemage graphics cards. A previous Battlemage leak claims that Intel is reportedly preparing at least two silicon for the next-generation graphics cards: BMG-G10 (
The X3 tool is the larger of the two interposers. X3 features a 2,727 BGA array design, whereas the X2 tool has a 2,362 BGA array design. As per the BGA2660-DG2-512EU-GRN interposer tool, DG2-512, which fathers the ACM-G10 die that powers the Arc A770 and Arc A750, sports a 2,660 BGA array. That means X3’s package size is up to 2.5% larger than DG2-512. We don’t know what codename Intel has planned for X3, but given the dimensions, it could be the successor to DG2-512.
On the other hand, the X2 shows a 2,362 BGA array design. We imagine it could be the direct replacement for the DG2-256 (ACM-G12). Unfortunately, while Intel offers an interposer for DG2-128 (ACMG-11), the chipmaker doesn’t sell one for DG2-256, so we can’t compare the two. However, the package size difference from DG2-128 (BGA1379) to X2 (BGA2362) is around 71.3%, so it’s more likely that the X2 is closer to the DG2-256.
Intel Battlemage Package Size
Swipe to scroll horizontally
Header Cell – Column 0
BGA2727-BMG-X3-6CH
BGA2660-DG2-512EU-GRN
BGA2362-BMG-X2
?
BGA1379-DG2-128EU
Generation
Battlemage
Alchemist
Battlemage
Alchemist
Alchemist
GPU
?
DG2-512
?
DG2-256
DG2-128
Architecture
?
ACM-G10
?
ACM-G12
ACM-G11
Package Size
BGA2727
BGA2660
BGA2362
?
BGA1379
Intel has confirmed that Battlemage will come in Xe2-HPG and Xe2-LPG flavors. Therefore, Battlemage won’t just be present on discrete graphics cards. You’ll also find Battlemage inside Intel’s forthcoming processors, specifically Lunar Lake. According to a leaker, the integrated graphics solution inside Lunar Lake may wield as many as eight Xe cores, amounting to 64 Xe Battlemage execution units.
Like Alchemist, Intel won’t produce Battlemage on its own. Instead, the chipmaker will again recourse to TSMC to help make Battlemage. A recent report states that Intel is going all-in with TSMC and has reportedly booked Celestial (the generation that will succeed Battlemage). For reference, Alchemist was on TSMC’s 6nm process node. Intel hasn’t confirmed which TSMC node it’ll use for Battlemage, but many believe it’s either the 5nm or 4nm node.
Assuming there are no setbacks, Battlemage will arrive in 2024. So far, Intel hasn’t made much of an impact as the third player in the graphics card game despite Arc Alchemist being widely available and price cuts. Alchemist is Intel’s first desktop graphics card in over 20 years, so you can’t expect the company to get it right the first time, even with the Intel being as giant as it is. Let’s hope that Intel has learned from Alchemist and leverage it for Battlemage.
Intel and Synopsys this week extended their EDA and IP partnership to the company’s Intel 3 and Intel 18A manufacturing technologies. In line with the agreement, Synopsys is set to develop its standardized interface IP for Intel’s 3nm and 1.8nm-class production nodes, which will be beneficial for Intel Foundry Services (IFS) customers adopting these fabrication processes. Meanwhile, a standout aspect of this announcement is Intel’s intention to extend its 3nm-class node to a wider array of external clients.
While chip designers tend to invest a lot into differentiating their IP, most of them tend to license IP-like interfaces and memory controllers. To that end, the availability of an industry-standard IP portfolio of interfaces from Synopsys is crucial for the success of new process technologies, such as the upcoming Intel 3 and Intel 18A, as it enables chip developers to streamline their work and shrink the time-to-market. Unfortunately, it is unclear when exactly Synopsys is set to be ready with its IP for Intel 3, even though that is set to be ready for manufacturing this year. Intel 18A has a bit more time, as it’s set to be ready for production in 2H 2024.
The intriguing part is that Intel is now extending its IFS offerings to the Intel 3 fabrication process, which is a major refinement of its Intel 4 node and does not use any of the company’s ambitious innovations like gate-all-around RibbonFET transistors or the backside power rail called PowerVia. Compared to its predecessor, Intel 3 promises a 18% higher performance per watt, a denser high-performance library, reduced via resistance, and increased intrinsic drive current, which is beneficial primarily for datacenter system-on-chips. Indeed, Intel has announced zero Intel 3-based client products so far, but three datacenter SoCs: Xeon-branded Granite Rapids and Sierra Forest processors, as well as a custom SoC for a major cloud datacenter provider.
The extension of the IP partnership with Synopsys will enable Intel to make its Intel 3 node — a fabrication technology that Intel barely advertised as an offering for IFS customers — more accessible to a wider range of interested parties. That also implies that there are potentially such interested parties.
As for the Intel 18A node, this is a superior version of the company’s Intel 20A process technology that promises up to a 10% improvement in performance per watt, a refined RibbonFET architecture, and line width reduction, which implies a higher transistor density. It will be crucial for Intel 18A to have industry-standard interface IP readily available as soon as possible, as developing things like memory or PCIe controllers and PHY on a 1.8nm node is both expensive and time consuming.
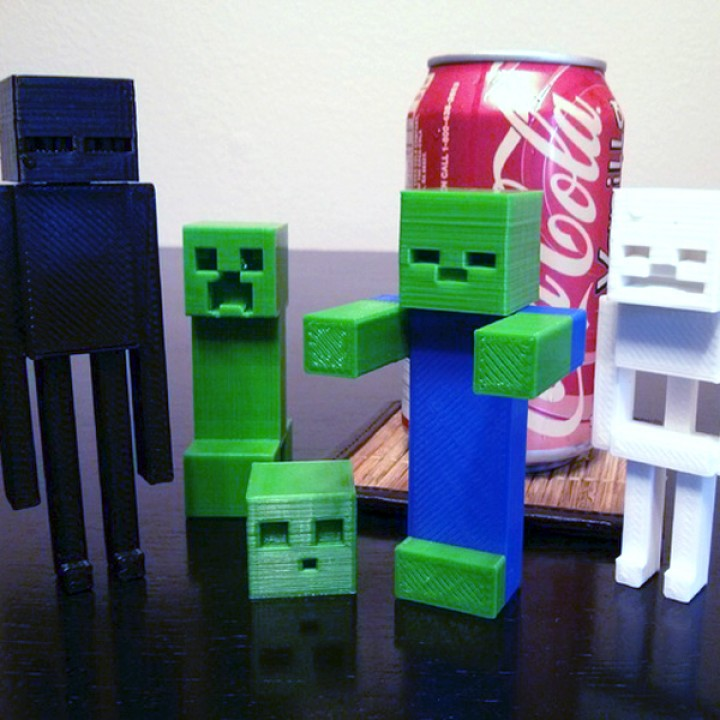
If you own a 3D printer, you can fuel your passion for Minecraft games by downloading and 3D printing these interesting 8 designs.
One of the most exciting aspects of Minecraft is its unique visual style and all the details it contains. The marketplace is filled with Minecraft action figures, Legos and other toys. However, you don’t need to head to the store as there are numerous, free 3D models you can print at home.
If you search for “Minecraft” on leading design repositories such as Thingiverse or Printables, you’ll find hundreds of STL files available right now. However, not all of them are equally worthy of your time. These are the best 8 Minecraft prints we’ve seen. Just download the file(s), slice them in your slicer and send them to your printer, perhaps one of the best 3D printers.
1. Articulated Steve
(Image credit: Kirby Downey)
Steve is an iconic character model that is the main protagonist in the game, and it features a blocky humanoid figure. It wears a light blue shirt, blue jeans, gray shoes, and a light brown beard stubble. Steve’s hair is dark brown, and his skin is a rich brown, with blue eyes.
The design comes with five parts: the arms, head, legs, pickaxe and torso. The designer 3D recommends printing the model at a resolution of 0.15mm and a 15% infill with supports.
Designer and link to download: Kirby Downey via Myminifactory
Number of downloads: 4,074
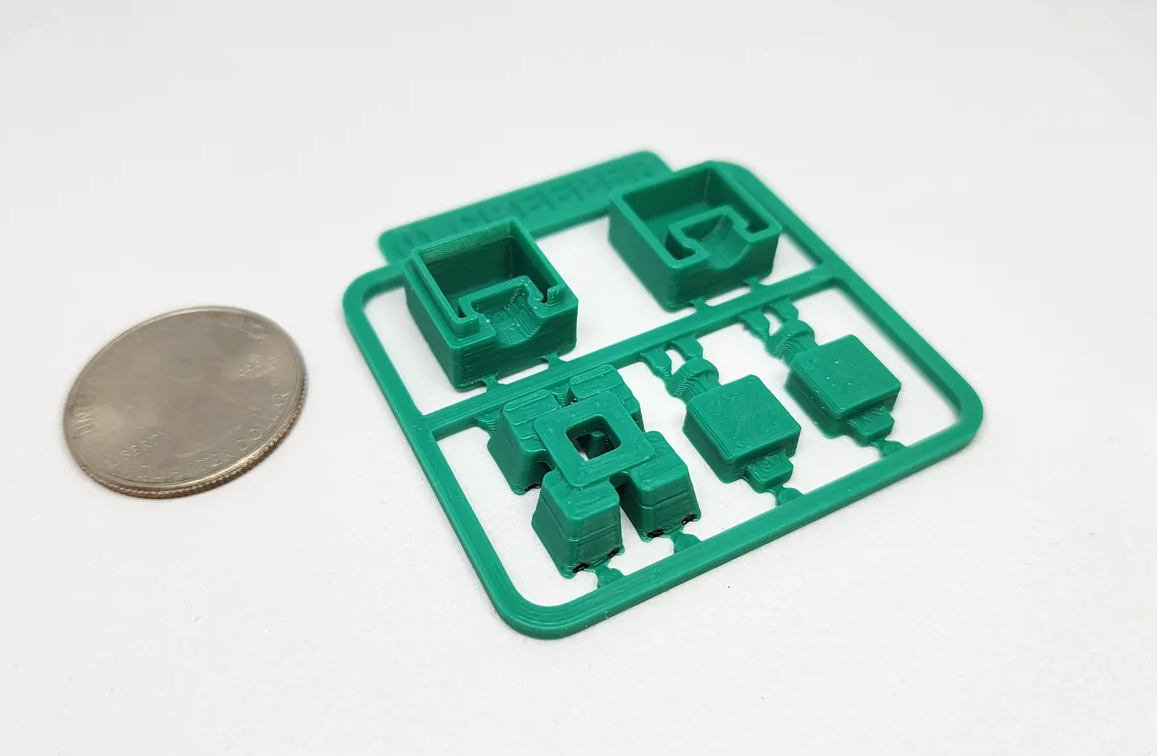
2. Minecraft Creeper Mini Figure Kit
(Image credit: Chiz)
This is a quick-to-print and assemble design, and you can effortlessly detach the parts from the frame by simply twisting them without the need for cutters or clippers. You can use the kit as a display piece and a functional keychain ornament, and you can download the files, open them in any 3D modeling software or STL editor, and customize them based on your needs.
Despite its small size, the figure maintains the distinctive cubic body with its signature sad expression. It’s a great way to showcase your love for the game or add Minecraft flair to your keychain.
Designer and link to download: Chiz via Printables
Number of Downloads: 4,137
3. ESPADA
(Image credit: Youbit)
These Minecraft sword keychains provide a great way to showcase your love for the game while adding a touch of gamer style to your keys, and they can also spark a conversation when you meet with your fellow gamers. You can also download and 3D print them and give them to your closest friends, kids, or anyone who you know enjoys Minecraft games.
Designer and link to download: Youbit via Cults3D
Number of Downloads: 2,800
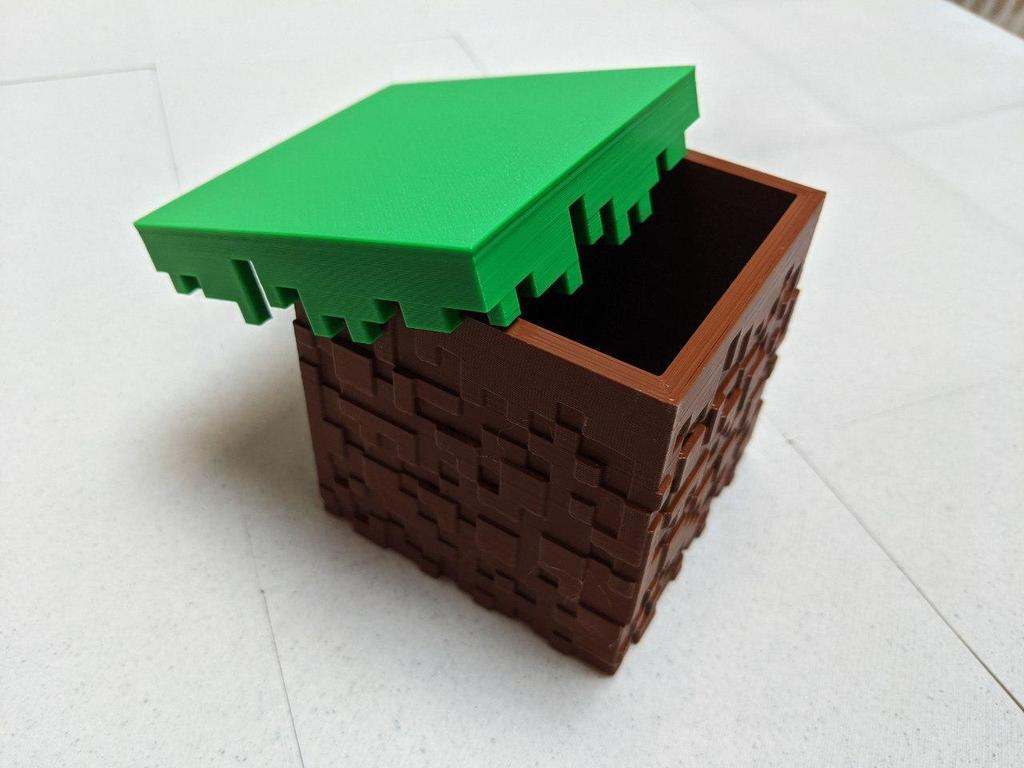
4. Textured Minecraft Grass Block Box
(Image credit: MARCELWO41EDYNKI)
A textured Minecraft Grass Block Box is another attractive Minecraft design whose lid is designed to resemble the top face of a grass block, complete with the signature vibrant green color and coarse texture that players recognize from Minecraft’s blocky landscapes.
The lid fits well, just like a puzzle piece, and it is removable. It is about 69 mm³, and the interior dimensions measure around 58 * 58 * 60 mm. You can 3D print the design and use it to decorate your desk or gaming setup. It can also serve as a great gift for a family member or friend with a gaming passion. The designer has provided STL files that anyone can download and customize based on their needs. It should be 3D printed with supports, especially the lid, but the base doesn’t require supports.
Designer and link to download: MARCELWO41EDYNKI via Cults3D
Number of Downloads: 852
5. Minecraft Chess Set
(Image credit: Guilbert Benjamin)
Minecraft chess set not only offers the classic game of chess but also adds a delightful layer of Minecraft-themed strategy and fun. It’s an excellent way for fans of both chess and Minecraft to enjoy a unique gaming experience that combines the best of both worlds.
Just like the rest above that we have described, this set makes for a fantastic gift, a collectible item, or a centerpiece for your gaming setup. It has eight parts, and the designer printed it with a layer height of 0.1mm and a 10% infill.
Designer and link to download: Guilbert Benjamin via Myminifactory
Number of downloads: 2,100
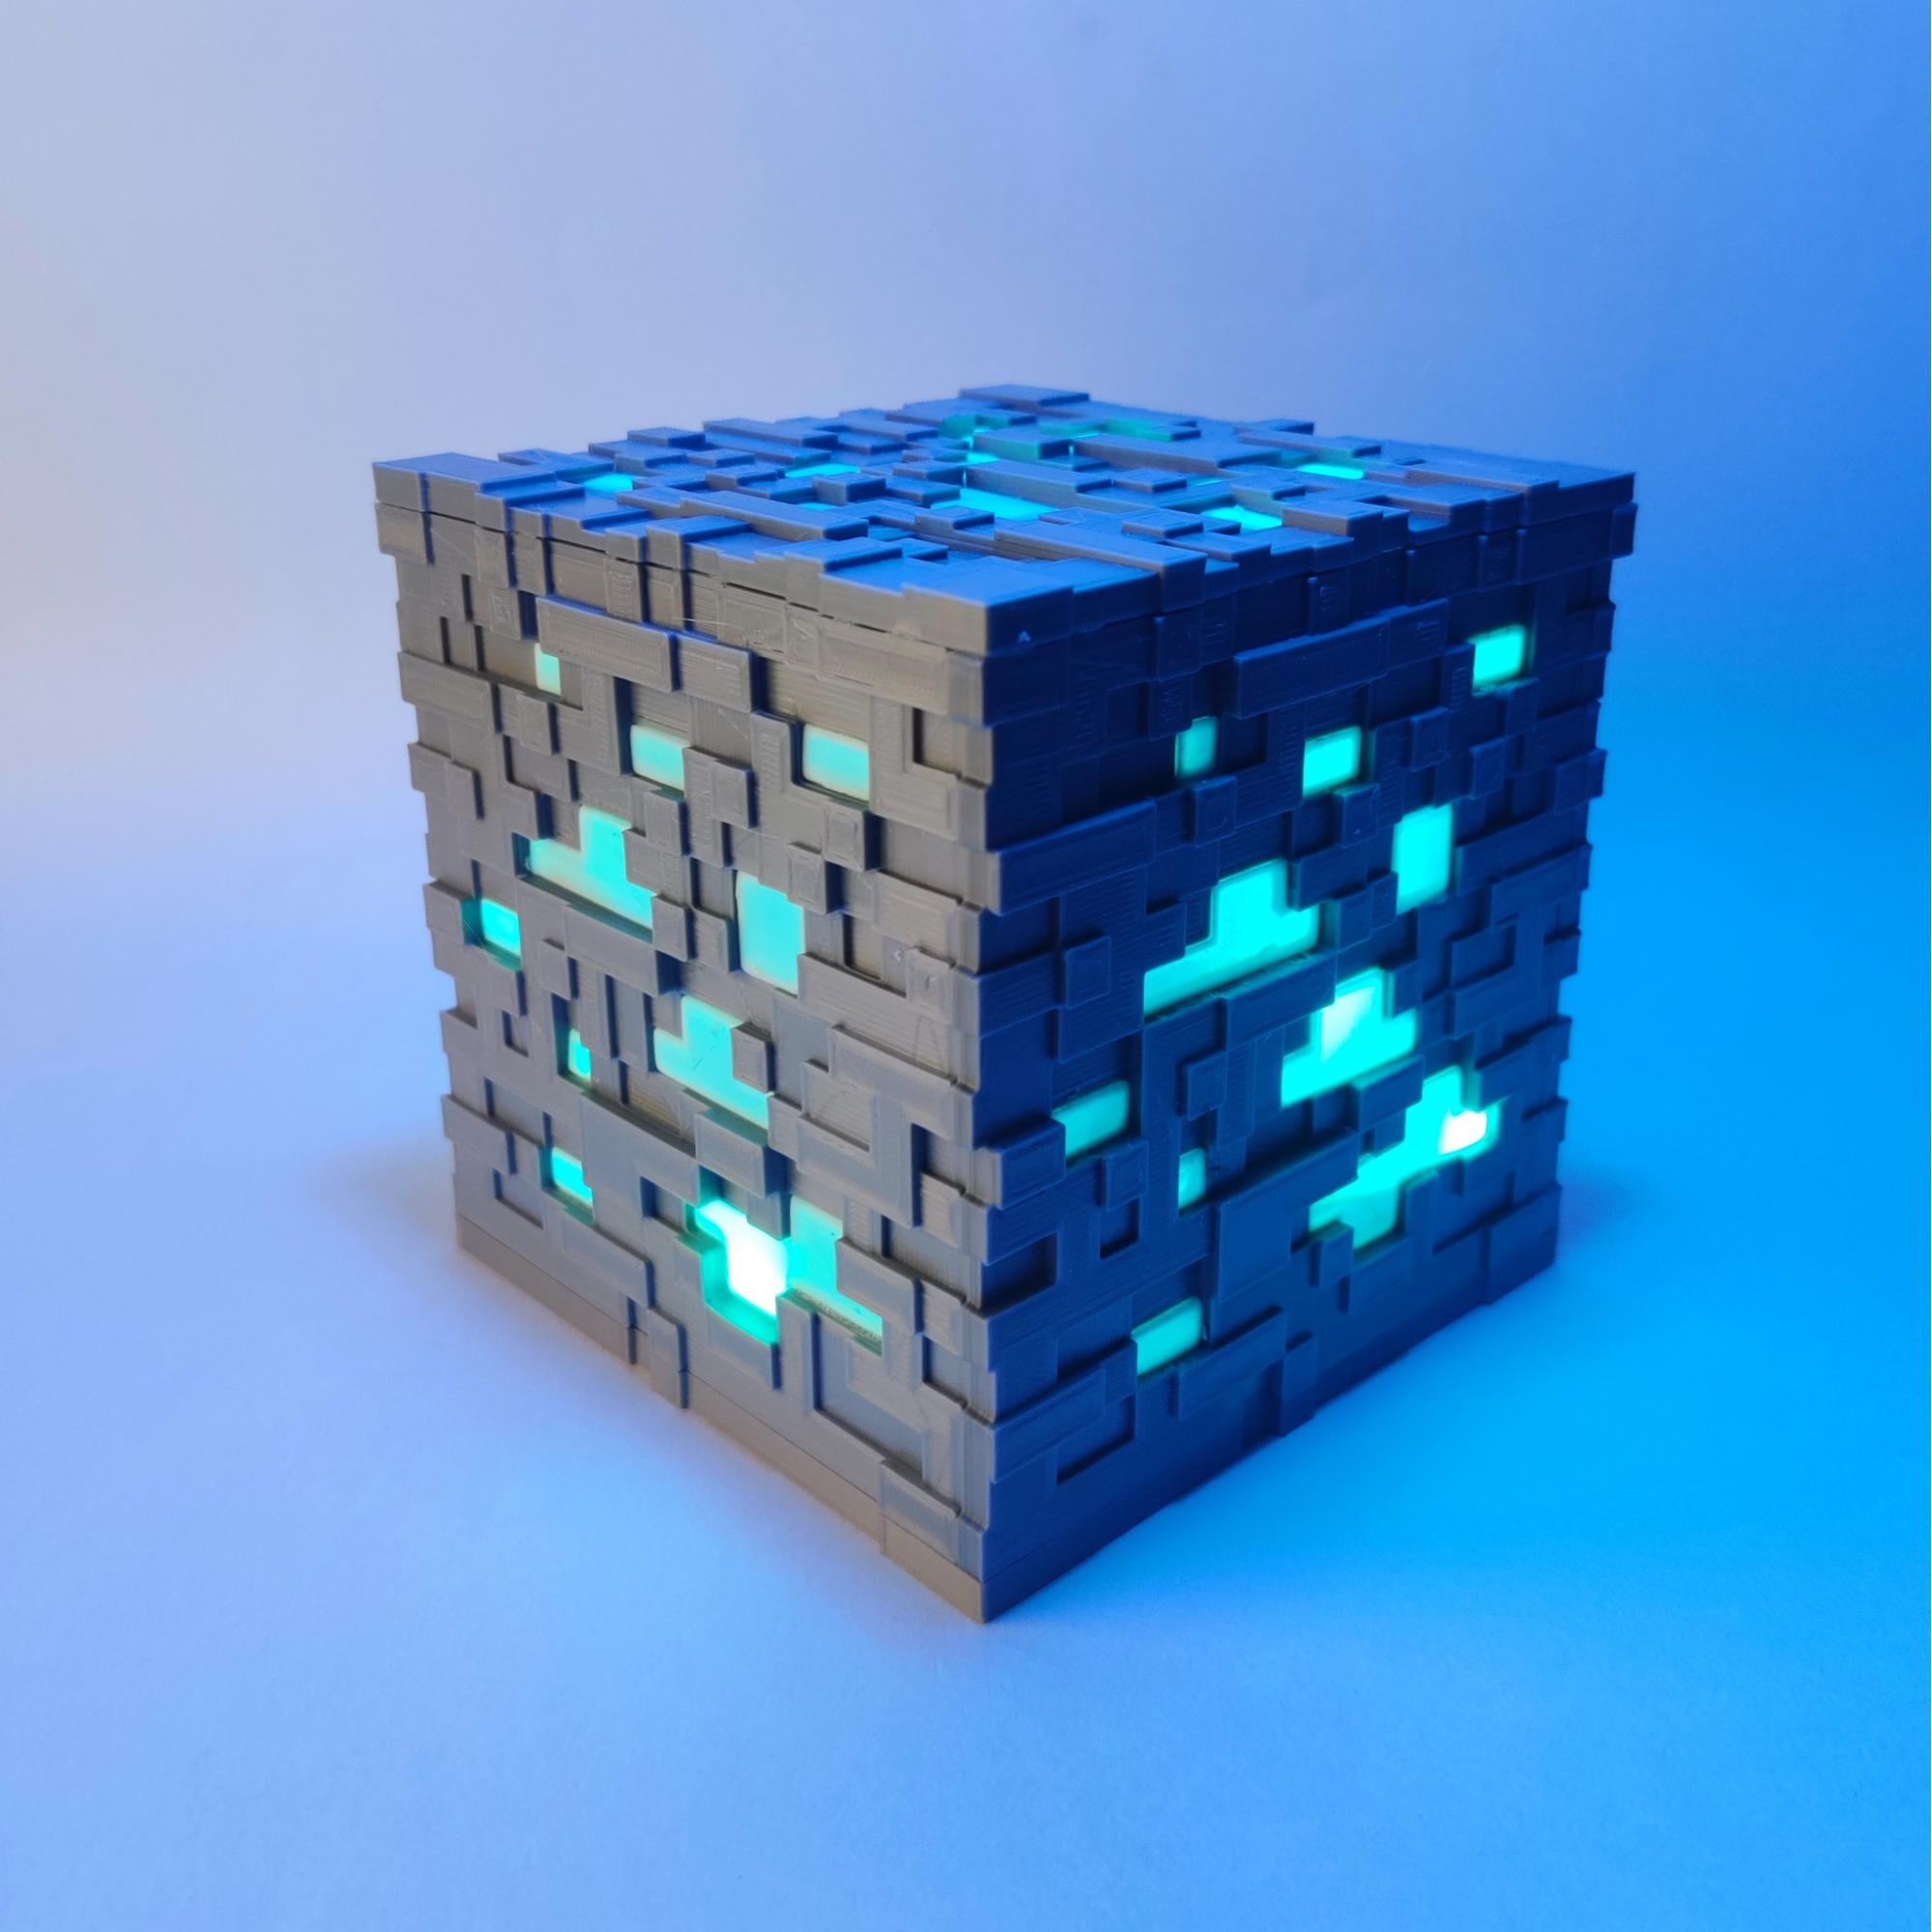
6. Minecraft Block Lamp
(Image credit: Bithur_Factory)
A Minecraft block lamp is a decorative piece replicating one of the game’s recognizable blocks, like the grass block we have just described above. The lamp emits a soft and comforting glow, making it a great bedside lamp.
You can also place it on a desk, shelf, or any spot where you can emit the light well. Whether reading, gaming, or simply relaxing, the Minecraft block lamp creates a warm and inviting atmosphere with a nod to your favorite virtual world.
Once you 3D print the parts, you can use glue to stick the four faces together and you add an LED strip. The designer recommends using 100% infill, a layer height of 0.2mm, and no supports or rafts are required.
Designer and link to download: Bithur_Factory via Cults3D
Number of downloads: 827
7. Minecraft Portal Style Phone Charging Dock With Animation
(Image credit: Impresoen3D)
The swirling pattern and vibrant colors of the Minecraft portal-style phone charging dock replicate the Nether portal from Minecraft. It adds a practical functionality of a phone charging dock and a touch of interactivity to your charging experience through the animations.
You can put a phone measuring 80 x 165 x 12.8mm inside. If your phone is smaller, you can scale the design until you achieve the perfect size. You can use glue to stick the detachable pieces together. No need to use supports when 3D printing, and the designer recommends using 8% v-roid infill, four overlayers, and four underlayers.
Designer and link to download: Impresoen3D via Cults3D
Number of downloads: 1,300
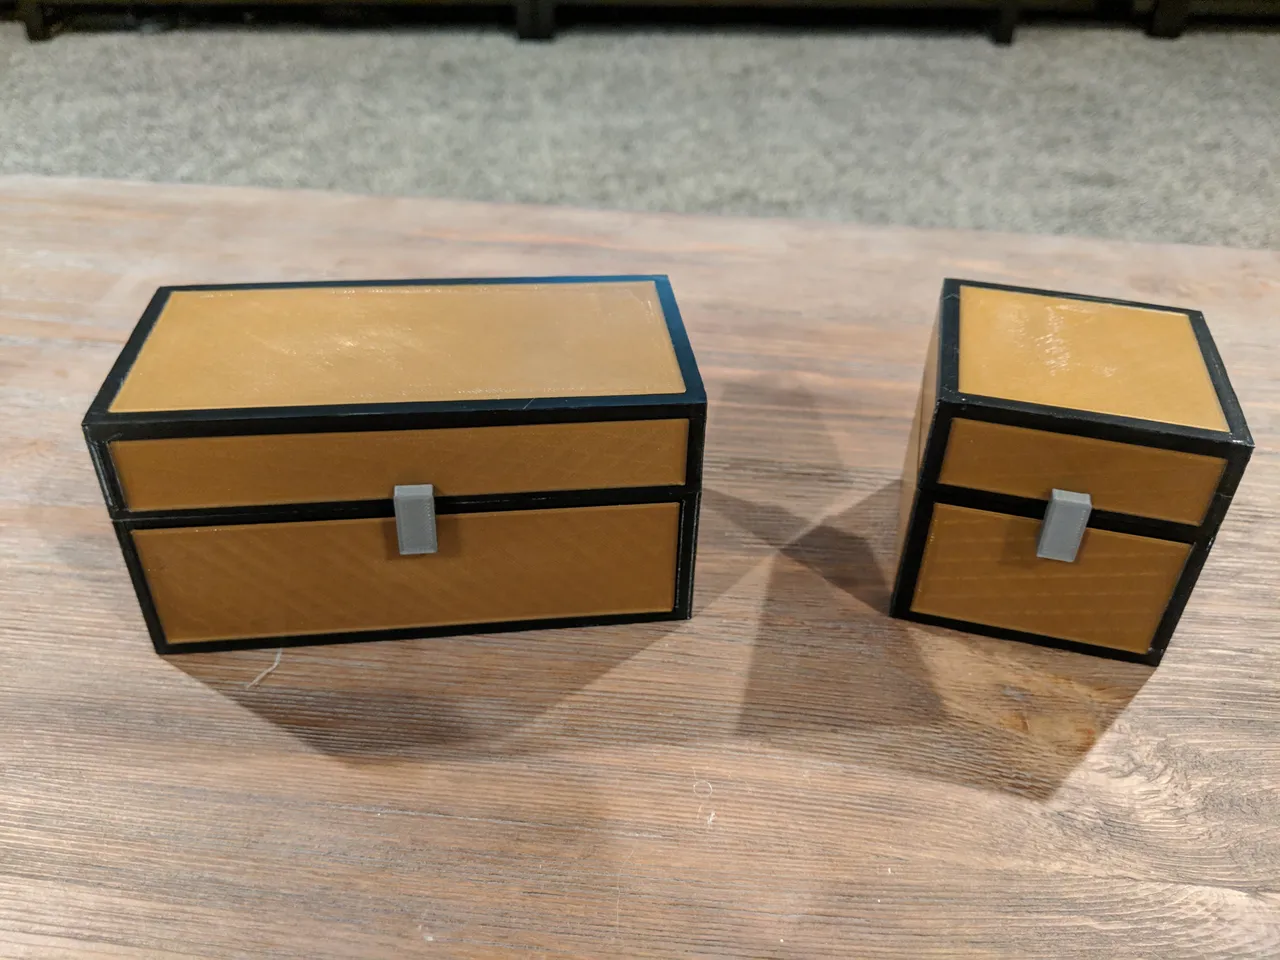
8. Minecraft Chest Single and Double
(Image credit: Spradlinb)
You can download and 3D print these Minecraft boxes and use them for storing your items and keeping them secure and organized. The single chest provides a single storage compartment with 27 available item slots. The double chest, on the other hand, is an expanded version of the single chest and provides a much larger storage capacity.
You can 3D print each panel without a brim. When 3D printing the double chest, the designer recommends printing with an infill of 20%, 0.2mm resolution, and no need for rafts and supports.
Designer and link to download: Spradlinb via Printables
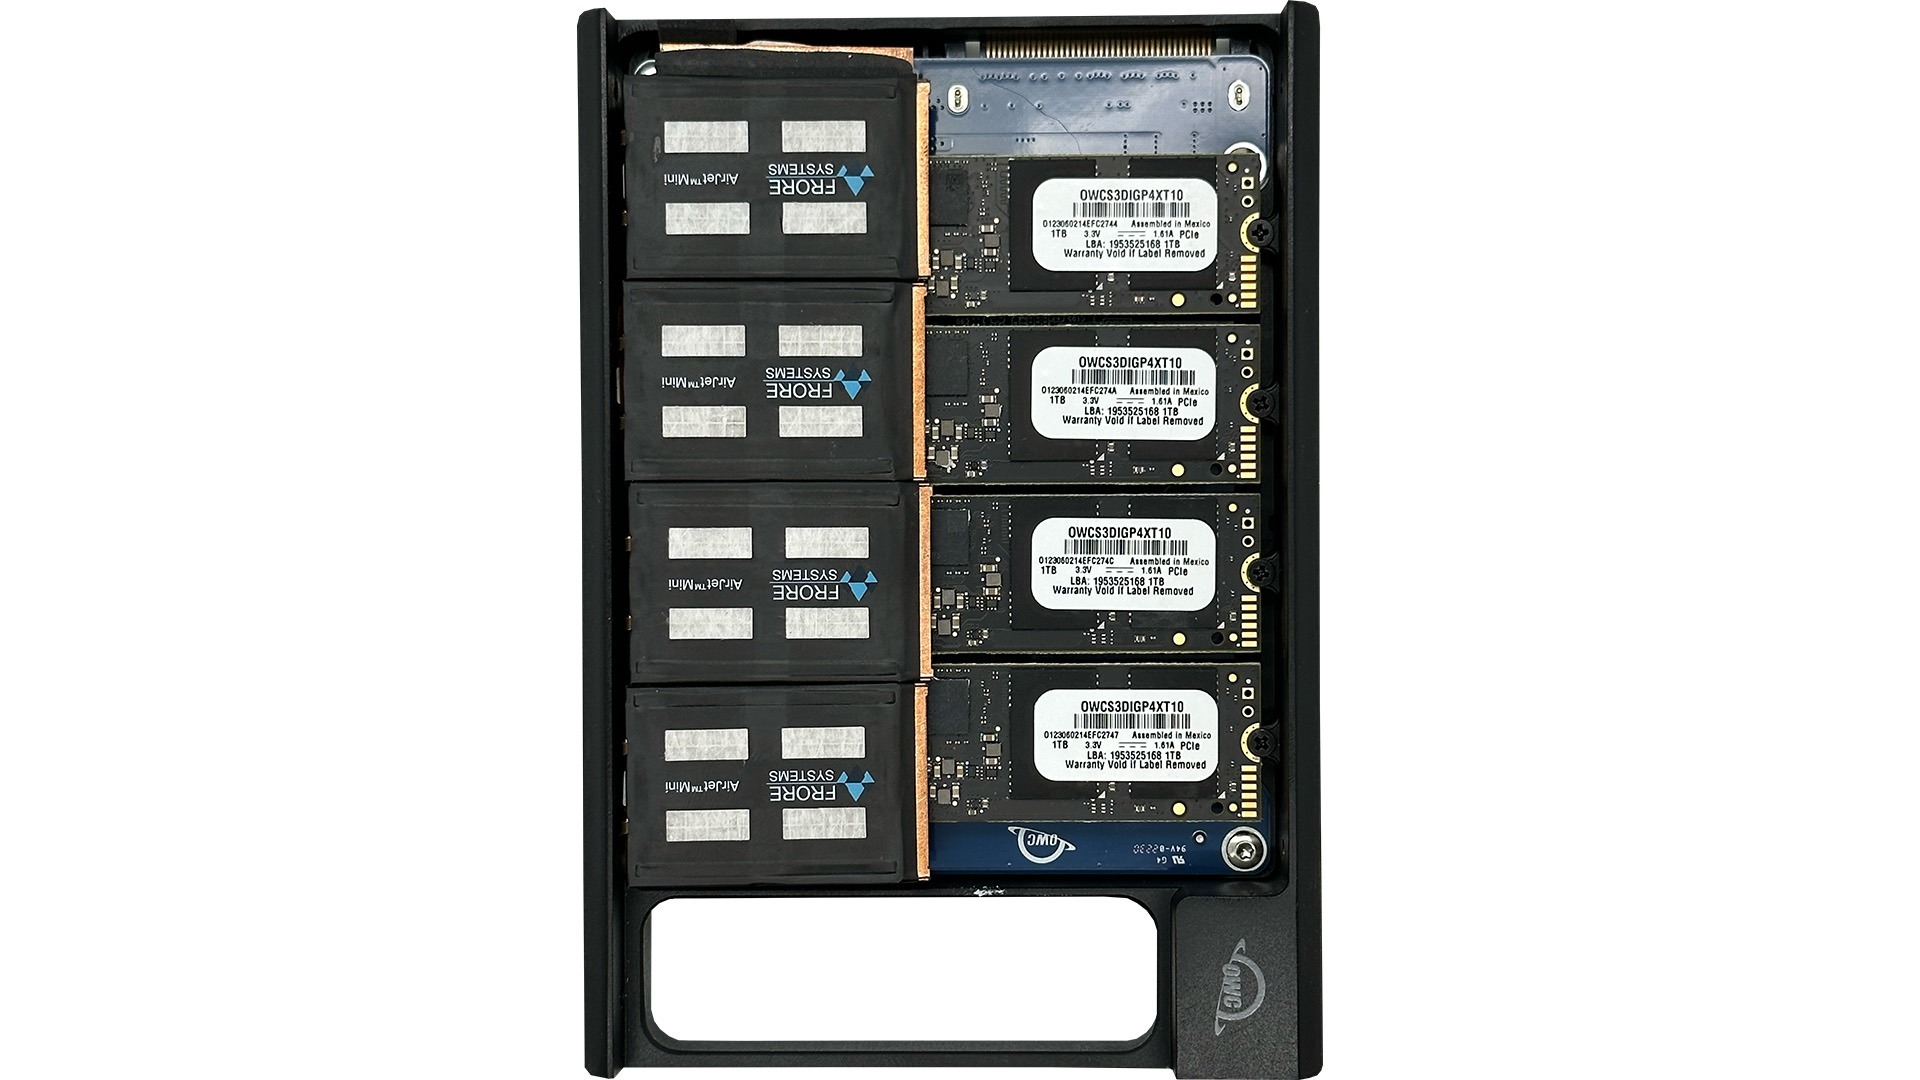
Frore Systems, the inventors behind the world’s first solid-state cooling devices, has unveiled a new 64TB U.2 SSD storage device cooled by the company’s AirJet Mini. Made in collaboration with OWC, the storage enclosure is known as the Mercury Pro and is the first storage enclosure to utilize Frore System’s technology.
For more details on Frore System’s solid-state cooling technology, check our previous coverage. The quick summary is that Frore System’s AirJet Mini and AirJet Pro coolers are the world’s first solid-state cooling devices featuring no moving parts. With a thickness of 2.8mm and a heat dissipation of 5W for the Mini and 10W for the Pro, respectively, the cooling capacity per mm is much higher than traditional cooling methods. Both devices can actively cool incredibly slim or compact devices that previously could only be cooled via passive cooling, or with weak active cooling solutions.
OWC’s new Mercury Pro is the first external storage enclosure to use an AirJet cooler. In the past, Frore Systems advertised its AirJet Mini and Pro as CPU/SoC coolers specifically, but in this case, the AirJets have been adapted to cool storage devices instead, thanks in no small part to the AirJet Mini’s ultra-thin form factor.
(Image credit: Frore System)
The unit houses eight M.2 SSDs in a compact 3.5-inch U.2 enclosure, with four SSDs residing on the top while the other four are installed on the bottom of the case. Each SSD gets its own AirJet Mini, attached to the SSD with a copper heat exchanger and thermal pads. OWC’s variant comes with eight 8TB SSDs, yielding 64TB of capacity as a whole, with throughput of 2200MB/s and 2600MB/s for sustained sequential writes with the added cooling capacity.
Thanks to the AirJet’s cooling capabilities, the Mercury Pro is able to dissipate 40W of heat, in a form factor the size of a single SATA hard drive. If this same amount of cooling potential used conventional fans, the storage enclosure would have to be significantly thicker to accommodate the extra hardware.
Sadly, OWC and Frore Systems have not announce a potential release date for the enclosure, and it goes without saying that it targets enterprise customers. We suspect both companies need to do more testing to ensure the AirJet-equipped enclosure is reliable enough for extended run times. Frore System’s new AirJets appear capable, but the design methodology is still very new and mostly unproven in the real world. That will change, once more OEMs start using AirJet coolers in their systems — like Zotac’s AirJet-powered ZBox.
In 2020, Chinese chip champion Semiconductor Manufacturing International Corp. was two or three generations behind global leaders. Today, following several rounds of crippling U.S. sanctions against the Chinese semiconductor sector, the People’s Republic’s chip industry is at least five generations behind — and the gap can expand, according to Gerald Yin, chief executive of Advanced Micro-Fabrication Equipment Inc., a wafer fab equipment manufacturer from China, reports DigiTimes.
The past two U.S. administrations have introduced 15 semiconductor-focused sanctions to keep China’s semiconductor production technologies generations behind the global leaders — namely Intel from the U.S., Samsung from South Korea, and TSMC from Taiwan. Back in 2020, SMIC was about to start making chips on its 7nm-class manufacturing process that featured a logic transistor density akin to that of TSMC’s N7 and Intel’s 10nm. At the time, SMIC was a couple of generations behind TSMC, which was gearing up to start production of chips on its N5 (5nm-class) node.
But the sweeping sanctions imposed by the U.S. government on October 7, 2022, and followed by Japan and the Netherlands in 2023, have set the Chinese semiconductor industry back by at least a decade. Wafer fab tools manufacturers need to obtain a special license to ship equipment that can be used to make logic chips with non-planar transistors on 14nm/16nm nodes and below, 3D NAND with 128 or more layers, and DRAM memory chips of 18nm half-pitch or less to a Chinese entity. This effectively limits China’s semiconductor industry to 28nm and thicker nodes — unless it can come up with its own wafer fab tools, or the export licenses are granted.
The ramifications of these restrictions are palpable in the Chinese semiconductor landscape. SMIC, a front-runner in China’s semiconductor domain, had once been vocal about its advancements with 14nm and 12nm nodes. Yet, by mid-2023, any mention of these technologies disappeared from its website and other official communications. Despite these setbacks, some insiders are optimistic, viewing the U.S. obstacles as an opportunity for China to bolster its domestic semiconductor equipment prowess.
If this does not happen, the gap between China’s semiconductor industry and the global leaders will expand even further, barring other changes in government policy.
The Raspberry Pi Zero form factor has launched a plethora of handheld Linux machines. For this project, pseudonymous maker IMBalENce has created Blackberry Pi, which pairs the Zero W with RIM’s Blackberry keyboard (remember those?) for a pocketable computing experience.
The Raspberry Pi Zero W is not the most powerful Raspberry Pi, as that accolade lies with the Raspberry Pi 4. But the Zero form factor does provide us with the Zero 2 W, a machine comparable to the Raspberry Pi 3B.
Blackberry Pi Bill of Materials (BoM)
Raspberry Pi Zero W
Composite LCD (320×240) Link
Solderparty BBQ20KBD keypad
Adafruit Powerboost 1000c power supply
Raspberry Pi camera NoIR v2.1
5V fan for cooling
2500mAh LiPo battery
(Optional) USB hub for external usb port
(Optional) RTC clock
(Optional) ADC ADS1015 battery voltage monitor
Image 1 of 5
(Image credit: IMBalENce)
(Image credit: IMBalENce)
(Image credit: IMBalENce)
(Image credit: IMBalENce)
(Image credit: IMBalENce)
The 3D printed case was designed using Solidworks, and printed using a modified Creality Ender 3 3D printer, possibly one of the Ender 3 range that features on our best 3D printers page. IMBalENce cleverly used multi-color printing to add a rainbow accent to the case, emulating the Sinclair ZX Spectrum’s famous rainbow mark. Some 3D printer slicing software will detect multi-color prints and from there you can specify the point to change and purge the filament. If not, then you can write some G Code to make this happen.
The overall Blackberry design is accentuated by SolderParty’s BBQ20KBD keypad, which is a breakout for Blackberry keypads. The keypad is connected to the Pi via the GPIO, specifically the I2C interface as it draws less power than a USB hub. Want to use some of the best Raspberry Pi HATs with Blackberry Pi? Well you can! IMBalENce has added a GPIO breakout to the top of the case. You will need a breakout board, such as Pimoroni’s Black HAT Hacker, to access the connector, as otherwise you’ll obscure the screen. If you’re just connecting jumper wires, you are all good.
A series of brass inserts are located around the top of the unit to provide secure anchor points for future expansions. The brass inserts are melted into the 3D print using a soldering iron. The TS100, TS101 and Pinecil smart soldering irons have specialist tips designed for the task.
Around the back is a Raspberry Pi NoIR 2.1 camera. It’s a fixed-focus (well, you can break the glue on the lens to manually focus) camera that offers decent quality live video and images in low light conditions. Power is provided by a 2500 mAh LiPo cell via an Adafruit Powerboost 1000C, which provides a stable 1A output (2A or 2.5A for a short time) to power everything and enable the battery to be charged while in use. A 5V fan connected to the Powerboost keeps everything cool, not a massive issue for the Pi Zero W, but should IMBalENce choose to upgrade to Pi Zero 2 W, the extra cooling will be beneficial.
The 320 x 240 px screen is good enough for the size and IMBalENce chose to boot directly into the terminal and set the framebuffer to match the resolution. This means that the screen is easy to read and ready to go for some terminal action.
IMBalENce Blackberry Pi is an impressive project. It crams a lot of tech into the Blackberry form factor. You can read more about the project here.