A research team with the University of California, Berkeley, reconstructed Pink Floyd’s iconic song “Another Brick in the Wall, Part 1” purely by decoding a listener’s brainwaves. Led by Dr. Robert Knight et al. and published in the journal PLOS Biology, the feat showcases how good humanity has become at decoding information that should be the last bulwark of privacy. In the future, someone with access to this technology wouldn’t even have to pay the proverbial penny for your thoughts: they’ll just be able to read them as well as one of those NYU ad walls.
The research, which took place between 2012 and 2013, strapped the brains of 29 epilepsy-suffering patients to electrodes (unlike other approaches, these had to be directly connected to the patient’s brain, meaning invasive surgery was required). The electrodes then captured the electrical activity of brain regions specifically responsible for music processing – areas that focus on pattern recognition and processing of tone, rhythm, harmony, and words.
The researchers then played a 3-minute clip from the original song, and the EEG proved to be accurate enough that they could decode the contents of the patients’ brainwaves – and successfully reconstruct the song from the brain activity’s electrical “echoes.” They even got part of the reconstructed song – 22 seconds – in a sound clip.
Brain-Computer Interfaces (BCI) are one of the most promising research areas for the bodily impaired (with specific applications even for the brain-function impaired segment of the population). But any great advancement presents itself as a double-edged sword. As Orwell’s increasingly-relevant 1984 novel shows, Thinkpol (Newspeak for Thought Police) is one area that any authoritarian regime (or person, or company) would love to explore.
There’s also the risk to the fabric of society. Interpersonal relationships happen in the space that lies between the thoughts we have in private (“Jesus, mom, I hate you for making me eat spinach”) and those we choose to release onto the real world (“But mom, I had spinach yesterday!”). But when the frontier between private and public is blurred, it becomes difficult to understand precisely where chips might ultimately fall – and who might be most negatively impacted.
It’s one thing to be able to reconstruct the outside world (and its stimuli) from a person’s brainwaves, but it’s also a typical truth that research tends to trickle down towards the consumer space (let alone the private and governmental branches of society). While it isn’t in the same league as the research covered in this article, even gamers have taken advantage of brain waves to control their in-game characters. Just look at what Twitter user @perrykaryal managed to do on From Software’s Elden Ring with a “simple” electroencephalogram machine (EEG). I couldn’t beat Godrick with my thumbs; she managed to do it by just thinking about it.
The fact that these experiments required physical contact and invasive surgery precludes most of the “bad actor” threats that could emerge from it. But there shouldn’t be any doubt that, given enough time, techniques that don’t require much physical availability will be developed.
I, for one, would love to be able to simply think articles into existence. But questions must be asked whether the benefits of such a technology being generalized outweigh the risks. Then again, most of us are lucky not to have to deal with life-limiting illnesses such as the epilepsy patients that took voluntary part in the study – it’s almost guaranteed they’d have a different outlook on all of this.
The newer Ryzen 5 5600G (Cezanne) has replaced the Ryzen 5 4600G (Renoir) as one of the best CPUs for gaming. However, a trick has breathed new life into the Ryzen 5 4600G, transforming the budget Zen 2 APU into a 16GB graphics card to run AI applications on Linux.
Not everyone has to budget to buy or rent a Nvidia H100 (Hopper) to experiment with AI. With the current demand for AI-focused graphics cards, you may be unable to access one even if you have the money. Luckily, you don’t need an expensive H100, an A100 (Ampere), or one of the best graphics cards for AI. One Redditor demonstrated how a Ryzen 5 4600G retailing for $95 can tackle different AI workloads.
The Ryzen 5 4600G, which came out in 2020, is a hexa-core, 12-thread APU with Zen 2 cores that operate with a base and boost clock of 3.7 GHz and 4.2 GHz. The 65W chip also wields a Radeon Vega iGPU with seven compute units clocked up to 1.9 GHz. Remember that APUs don’t have dedicated memory but share system memory. You can determine the amount of memory inside the motherboard’s BIOS. In this case, the Redditor had 32GB of DDR4 and allocated 16GB to the Ryzen 5 4600G. Typically, 16GB is the maximum amount of memory you can dedicate to the iGPU. However, some user reports claim that certain ASRock AMD motherboards allow for higher memory allocation, rumored up to 64GB.
The trick converts the Ryzen 5 4600G into a 16GB “graphics card,” flaunting more memory than some of Nvidia’s latest GeForce RTX 40-series SKUs, such as the GeForce RTX 4070 or GeForce RTX 4070 Ti, which are limited to 12GB. Logically, the APU doesn’t deliver the same performance as a high-end graphics card, but at least it won’t run out of memory during AI workloads, as 16GB is plenty for non-serious tasks.
AMD’s Radeon Open Compute platform (ROCm) doesn’t officially support Ryzen APUs. Third-party companies, such as BruhnBruhn Holding, offer experimental packages of ROCm that’ll work with APUs. That means APUs can work with PyTorch and TensorFlow frameworks, opening the gate to most AI software. We wonder if AMD’s latest mobile Ryzen chips, like Phoenix that taps into DDR5 memory, can work and what kind of performance they bring.
The Redditor shared a YouTube video claiming that the Ryzen 5 4600G could run a plethora of AI applications, including Stable Diffusion, FastChat, MiniGPT-4, Alpaca-LoRA, Whisper, LLM, and LLaMA. Unfortunately, he only provided demos for Stable Diffusion, an AI image generator based on text input. He doesn’t detail how he got the Ryzen 5 4600G to work with the AI software on his Linux system. The YouTuber has vouched to release a thorough video of the setup process.
As for the performance, the Ryzen 5 4600G only took around one minute and 50 seconds to generate a 512 x 512-pixel image with the default setting of 50 steps. It’s an excellent result for a $95 APU and rivals some high-end processors. The author said he used DDR4 memory but didn’t list the specifications. Although the Ryzen 5 4600G natively supports DDR4-3200, many samples can hit DDR4-4000, so it would be fascinating to see AI performance scaling with faster memory.
The experiment is fantastic for those who own a Ryzen 5 4600G or Ryzen 5 5600G and want to play around with AI. For those who don’t, throwing $500 into an APU build doesn’t make much sense when you can probably get a discrete graphics card that offers better performance. For instance, AMD’s Radeon 16GB graphics cards start at $499, and Nvidia recently launched the GeForce RTX 4060 Ti 16GB, which has a similar starting price.
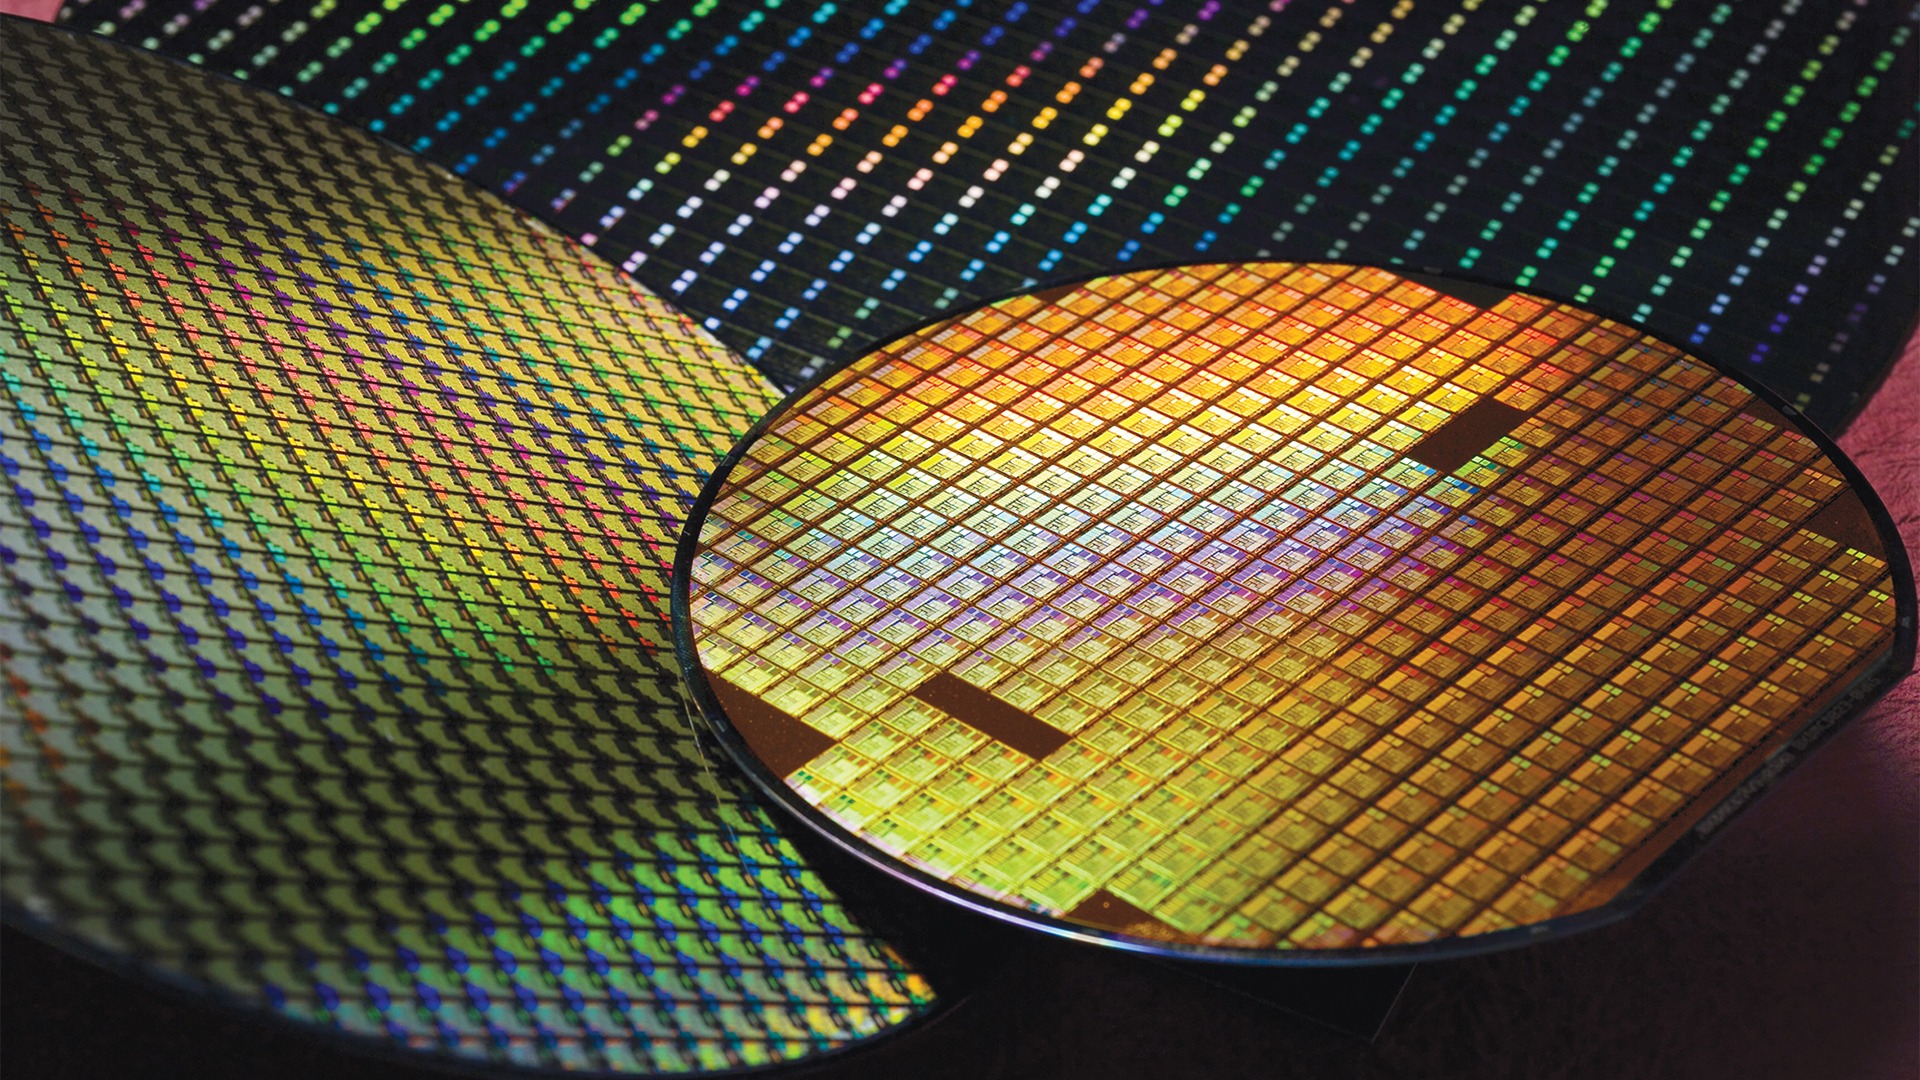
Prices for gallium are reported to have increased by 50% in just the past seventeen days, following the August 1st enforcement of China’s export restrictions on the rare metal. A vital yet relatively underrepresented material used in chipmaking (especially when reacted towards gallium arsenide [GaA] and gallium nitride [GaN]), gallium production (like that of many other rare earth metals) lays primarily in China’s hands. The country commands as much as 80% of the world’s output, making it a prime candidate for leverage in the global economic tug-of-war between the U.S. and the Middle Kingdom.
As reported by Bloomberg, the price increase means that gallium now sits at a 10-month-high of $400 per kilogram, putting a deeper squeeze on chipmakers and companies that depend on the material (luckily, in trace amounts) for high-performance semiconductor designs. For perspective, high-purity silicon metal (Si) is currently quoted at an average of $2,000 per metric ton – meaning a kilogram runs chipmakers just $2.
Worldwide, gallium refinement facilities are primarily present throughout China and Japan. A lone facility also exists in Europe, but as expected, that’s not nearly enough for the continent’s needs, let alone as an alternative source for the globalized (yet restricted) market. Therefore, non-producing countries must import either the base metal or already-processed gallium arsenide wafers.
Yet due to China’s imposed restrictions, U.S.-based entities looking to import the metal must submit for registration with China’s Ministry of Commerce. While that is a relatively common requirement, the fact that companies could only apply for a license starting August 1st (the same day the export restrictions went into effect) creates a measure of attrition. Add to that the fact that obtaining the license can take up to 45 days and that China announced the restrictions with barely a month to go for companies to adjust (in early July), and the stage was set for the country’s intended disruption.
Due to its relatively exotic usage in electronics and semiconductors, a squeeze on the supply side of gallium disproportionally impacts the U.S.’s chipmaking capabilities. While China may be its home at extraction, the country’s 5-generation gap compared to the U.S. in leading-edge microelectronics means there aren’t many occasions for its chipmaking players to take advantage of its properties. At the same time, the export restrictions mean that China can start stockpiling the rare metal for deployment whenever its chip manufacturing processes are up to the task.
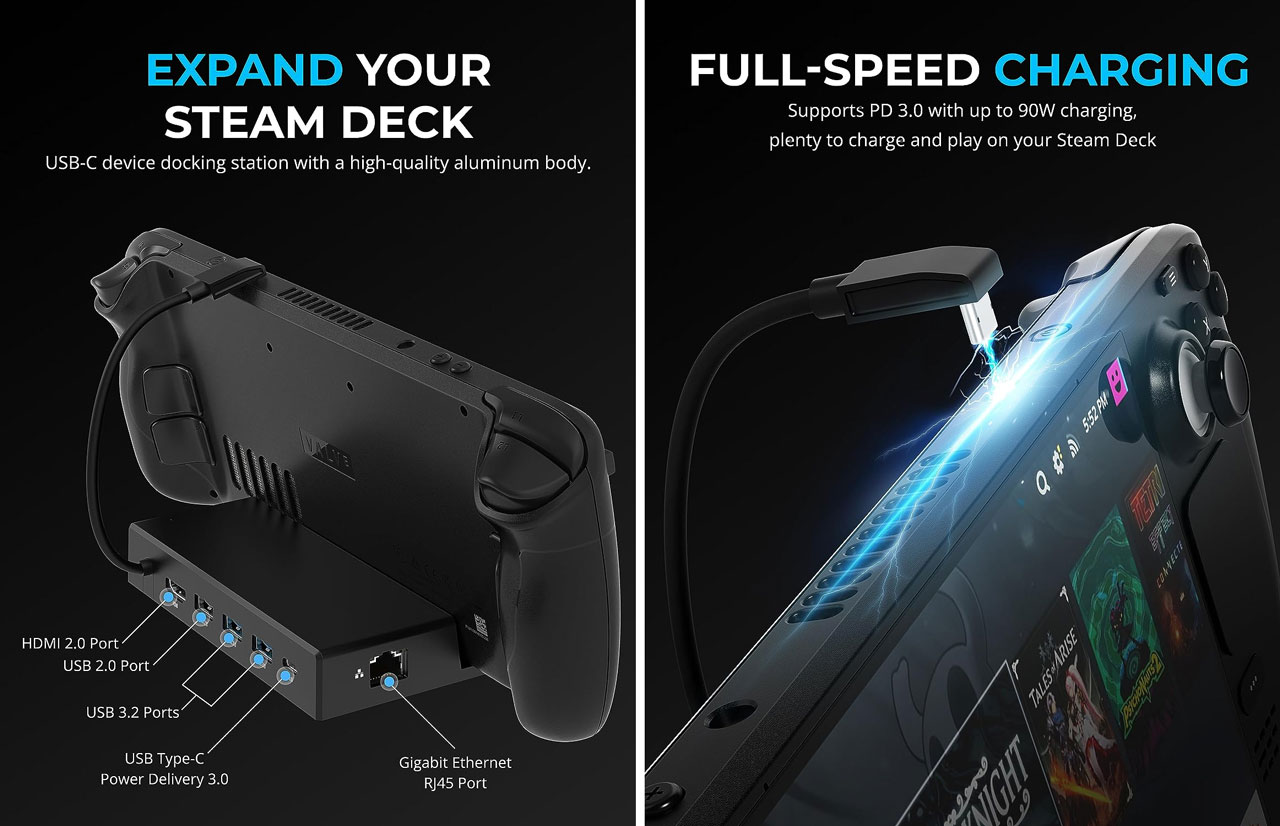
Sabrent has released a refined and expanded update to its first Steam Deck Dock (the DS-SD6P) in the shape of the new DS-SDNV, available now on Amazon. Also described as the ‘Sabrent 7-in-1 Steam Deck Dock with M.2 SSD Slot’, this device packs quite a lot of features into a familiar-looking device stand form-factor.
The Sabrent DS-SDNV isn’t restricted to use with the Steam Deck. It is claimed to be equally happy docking with a ROG Ally or other USB Type-C devices with DisplayPort Alternate (DP Alt) Mode support for output through HDMI 2.0 (HDCP 1.4). Linux, Windows, and macOS are supported.
If you have a compatible device/OS, there is quite a lot of convenient expandability offered here. The following ports are all easily accessible on this USB-C dock:
HDMI 2.0
USB 2.0
Two USB 3.2
USB Type-C PD 3.0
Gigabit Ethernet RJ45
(Image credit: Sabrent)
The slower USB port might be ideal for a mouse/keyboard, while the faster ports can be used for data transfer or other high-speed peripheral usage. Having a wired gigabit network port might also be appealing, with typically improved reliability, speed, and latency compared to wireless connectivity.
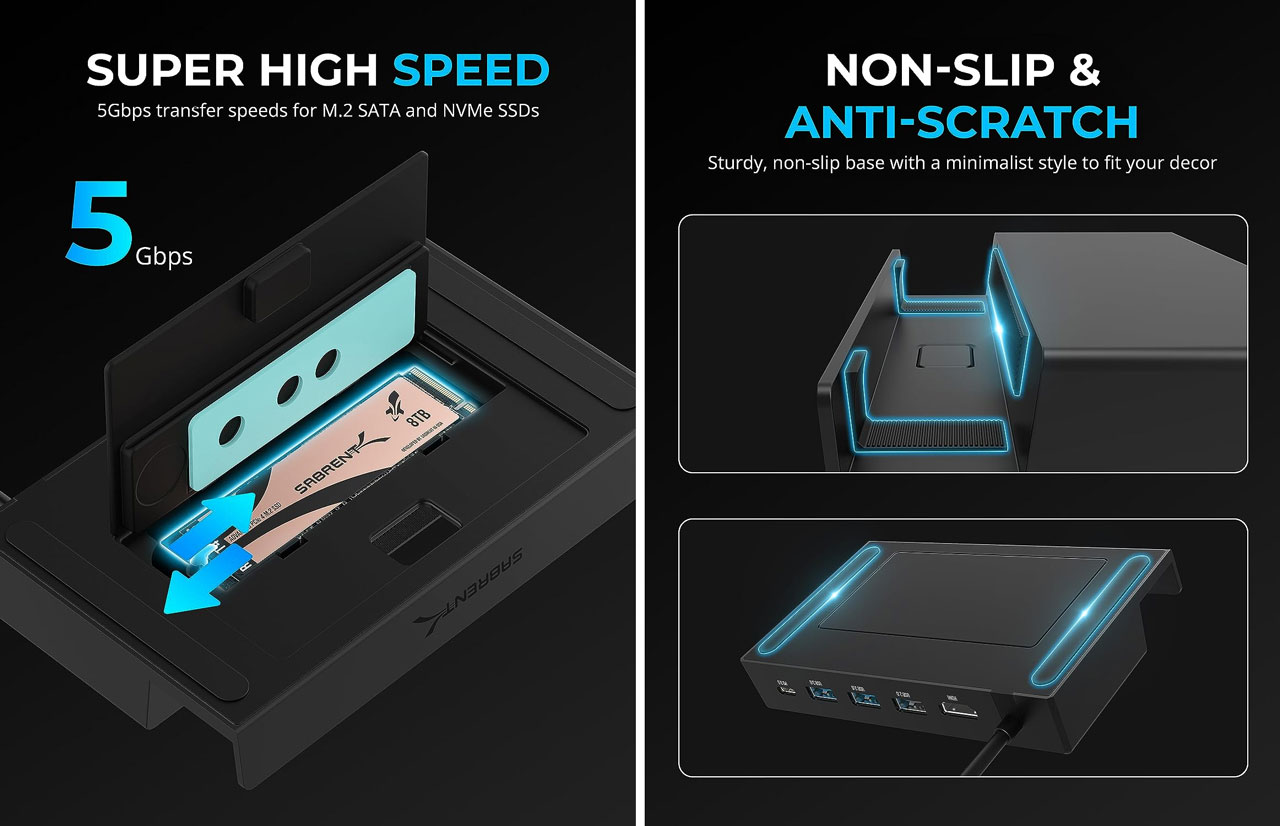
Moving on to what might be the Sabrent DS-SDNV’s raison d’être – it can fit an M.2 SSD inside. Under the device’s base, users can remove a cover panel and fit in their choice of M.2 drive. It looks like it can accept any size drive up to 80mm in length (M.2 2280), and Sabrent shows it with a roomy 8TB in place.
(Image credit: Sabrent)
The dock’s M.2 slot is equally happy with an M.2 SATA or NVMe drive. Its quoted maximum speed is 5 Gbps, so it sounds like there would be no speed advantage offered by the NVMe option here. If you need more storage and must keep it portable and as fast as possible, you may be better off replacing the Steam Deck’s internal M.2 2230 SSD.
Finally, Sabrent has some words about its dock’s build quality. It says it is rugged, yet minimalist to blend in with your décor. Additionally, non-slip anti-scratch pads are present on the device’s base, and within its docking cradle.
The Sabrent 7-in-1 Steam Deck Dock with M.2 SSD Slot DS-SDNV is currently listed at $84 on Amazon, with four in stock. That’s a lot more expensive than the first Sabrent Steam Deck Dock was pitched at (with no M.2 slot). However, it is roughly the same price as the official Valve Steam Deck Dock, which we thought was both uninspiring and a poor value.
The chief executive of SMIC faced criticism for proposing to advance chip packaging technologies and multi-chiplet designs after the company lost access to 7nm and 10nm-capable wafer fab tools due to U.S. sanctions. But his vision has now become central to China’s semiconductor approach for 2023, according to DigiTimes. Industry heavyweights like Huawei and government-backed entities with deep pockets are making substantial progress in this domain. Companies like JCET and Tongfu already offer their clients 2.5D and 3D packaging technologies.
Through the National Natural Science Foundation of China (NSFC), the Chinese government is channeling more funds into chiplet research. NSFC’s 2023 research areas encompass advanced 2.5D/3D packaging techniques, reusable chiplet design methods, parallel processing for multiple chiplets, electronic design automation (EDA) tools, and comprehensive multi-chiplet simulations. This intensified focus on chiplet technology showcases China’s strategy to minimize its dependence on foreign semiconductor innovations.
Large companies are also making strides in chiplet design, packaging, and multi-chiplet technologies. For example, Huawei ramped up chiplet-related patent filings from 30 in 2017 to over 900 in 2022. China-based companies recently formed the China Chiplet League to advance the homegrown Chiplet Interconnect Interface Standard.
Chinese companies are by no means novices in advanced packaging. Yet, for now, most of their efforts are tailored to cater to demand from non-Chinese companies with access to Taiwan-based TSMC and ASE Technology Group, the world’s largest outsourced semiconductor assembly and test (OSAT) company.
JCET, the world’s third-largest OSAT, is involved in the chiplet sector. The company can package chiplets made on a 4nm-class process technology, which is nearly on par with what TSMC can offer and is good enough to cater to domestic and international clientele.
Tongfu, another top OSAT, also has developed a set of 2.5D, 3D, and advanced chiplet packaging technologies. Tongfu reportedly indicated that it anticipates continuing benefits from AMD’s broad adoption of chiplet technology in the future. This suggests Tongfu has aligned its technological advancements with industry trends and foresees potential collaborations or synergies with major players like AMD.
NationalChip is collaborating on high-performance interconnect IP designs for chiplet applications. The company is also researching advanced chip design, including high-bandwidth memory (HBM) technology, with a primary focus on creating tailored products for customers.
As for VeriSilicon, it has multiple verification tools for multi-chiplet designs that are reportedly used by companies serving the high-performance computing (HPC) sector.
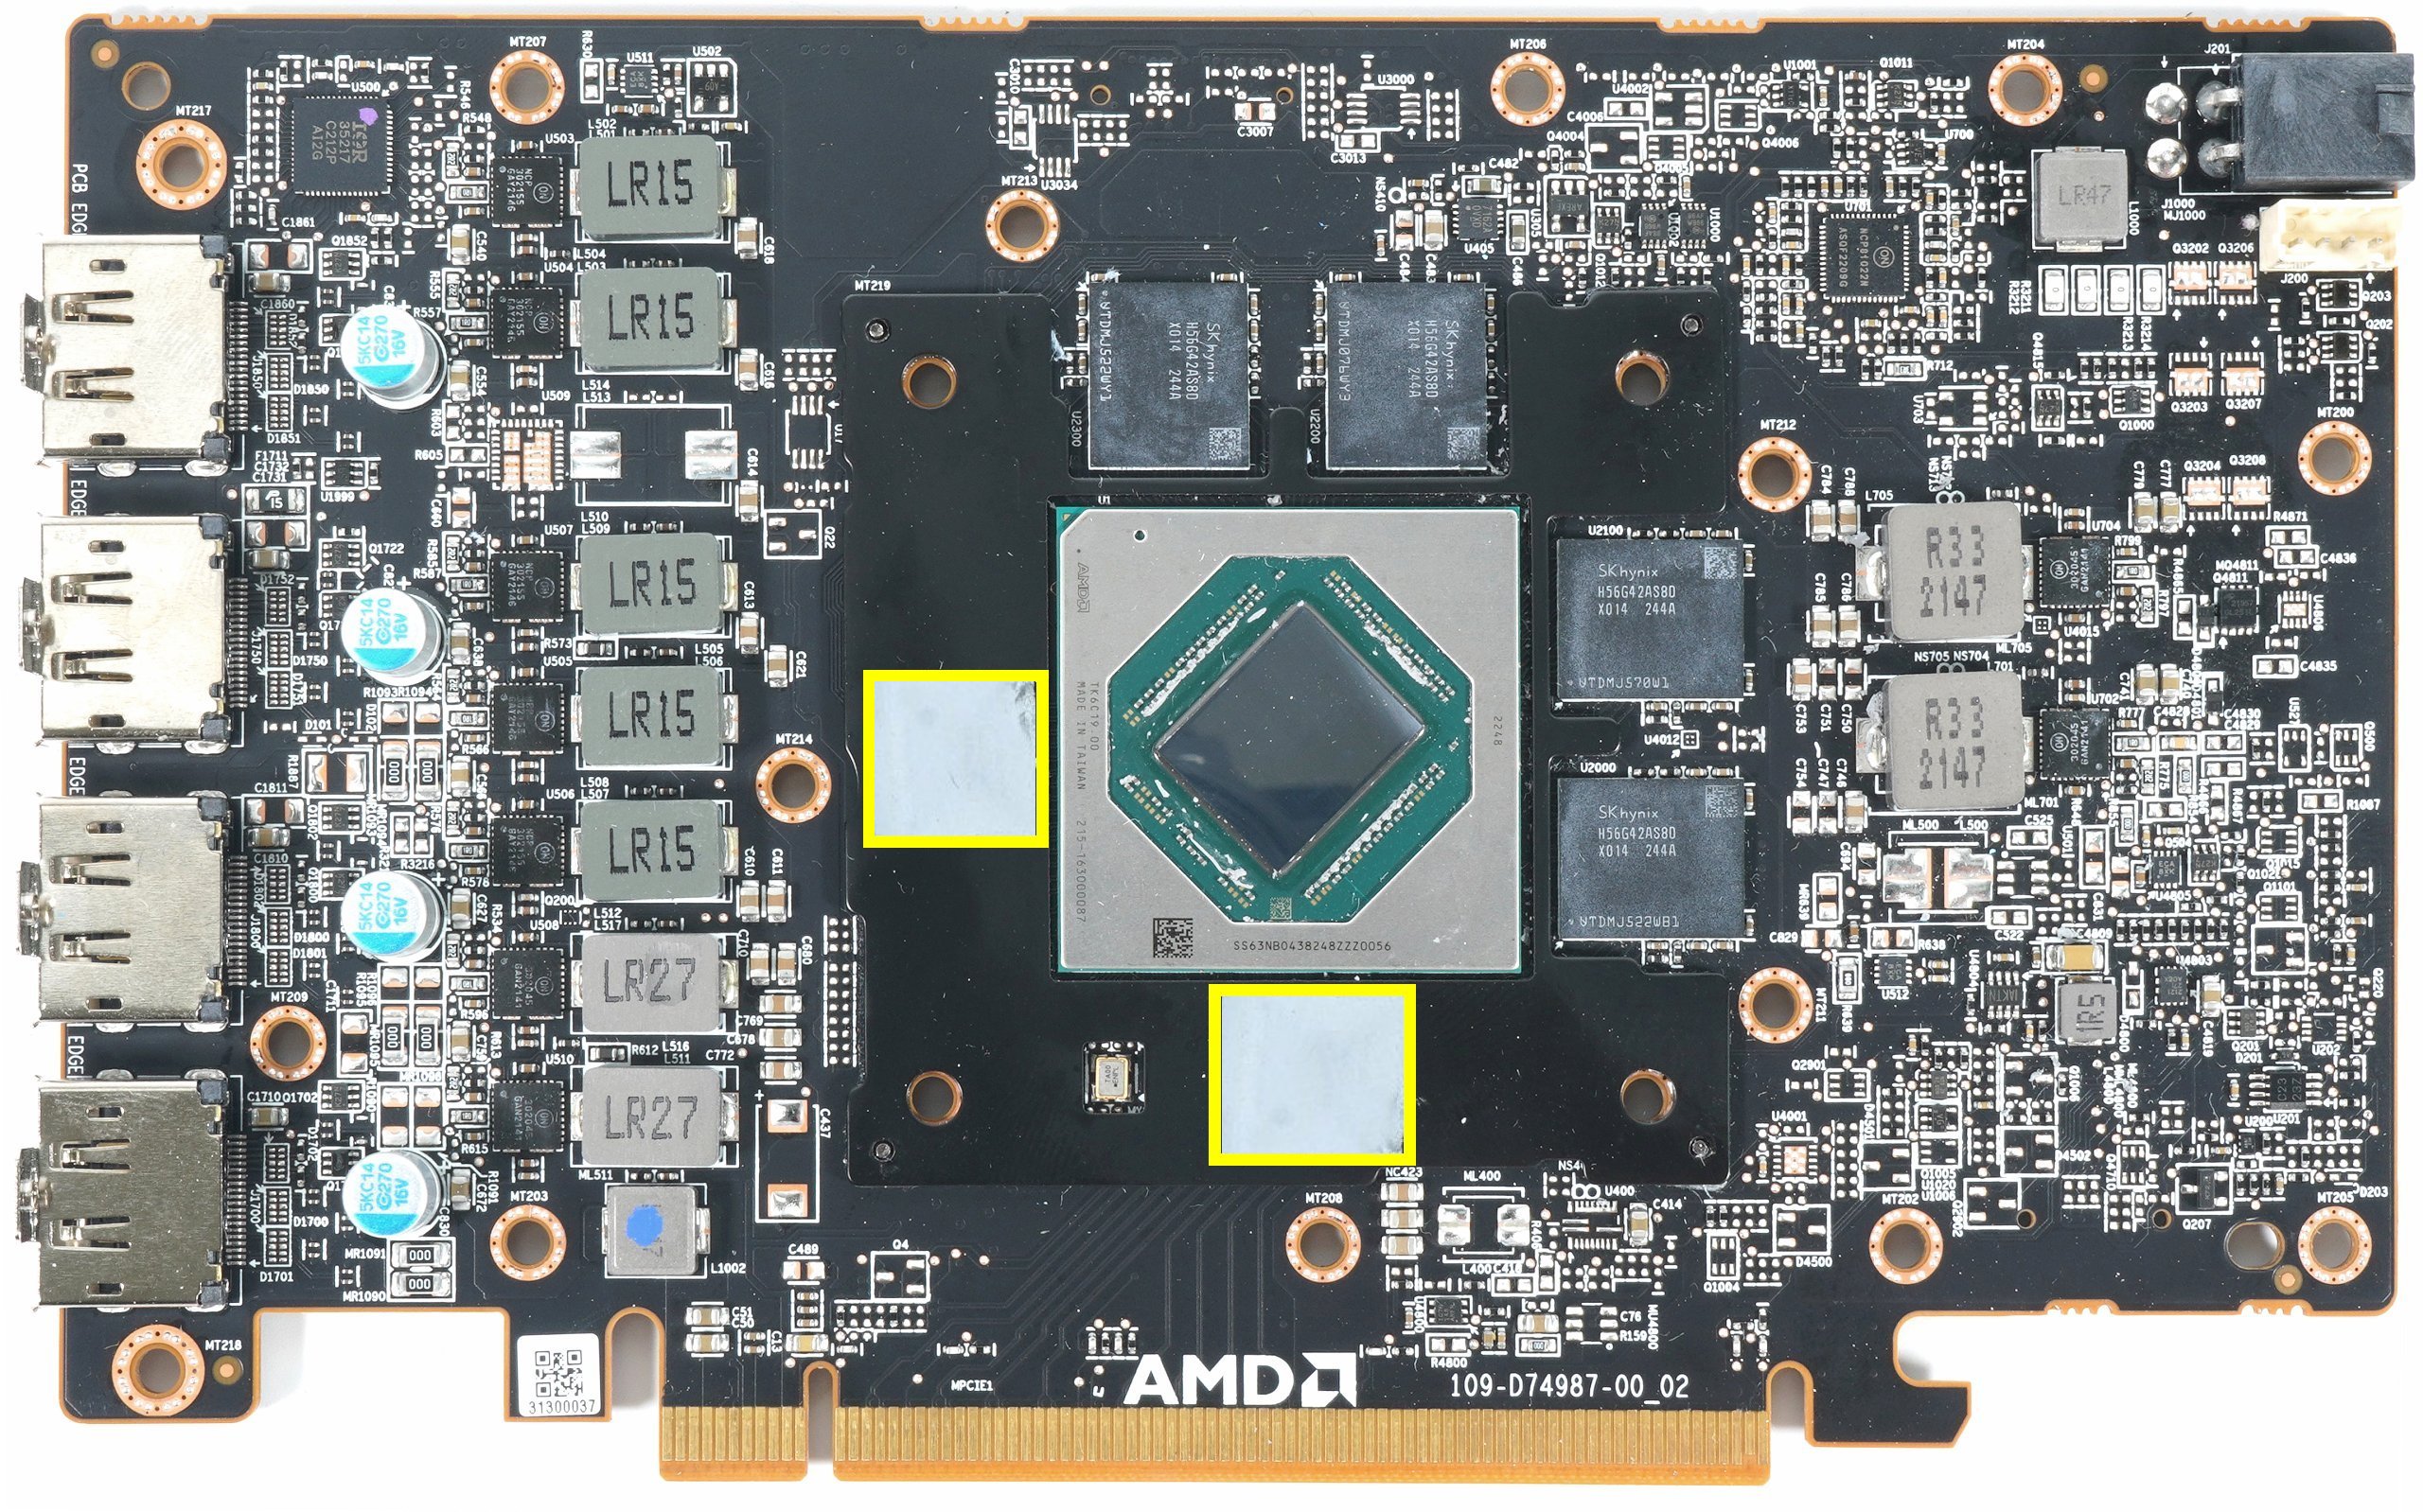
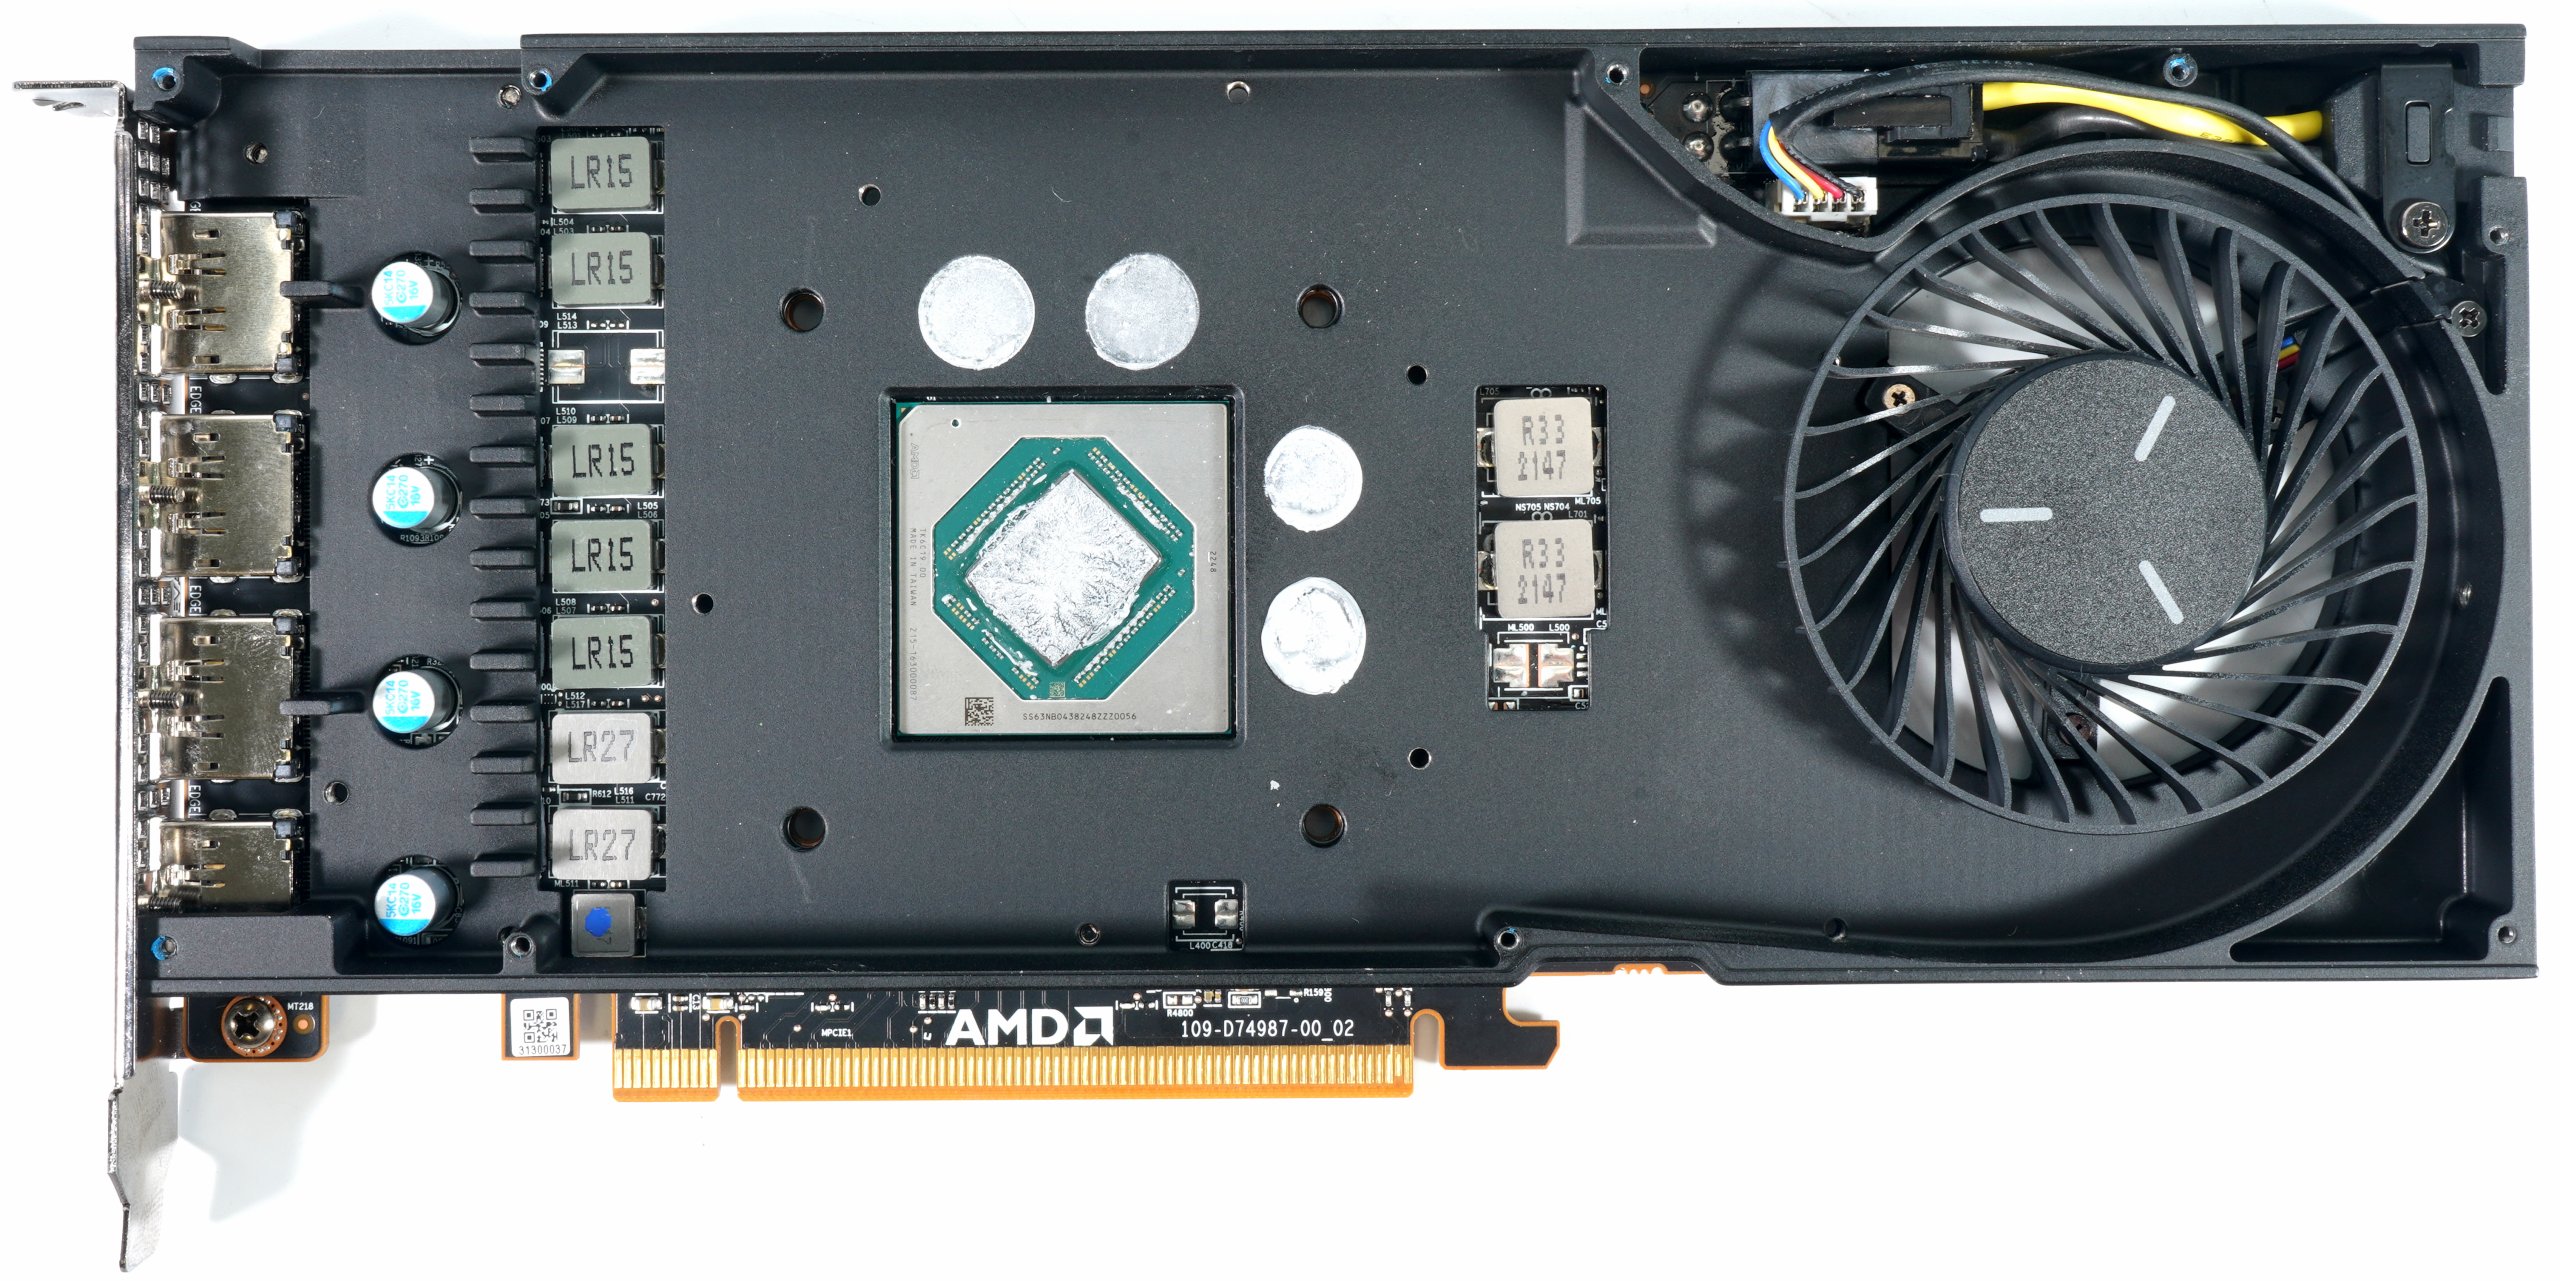
AMD has encountered some unfortunate issues with mounting pressure on some of its Best GPUs in the past. However, a new report from Igor’s Lab discovered a similar problem with AMD’s new Radeon Pro W7600 single-slot graphics card that is much worse, leading to complete blackouts from the GPU.
The symptoms began when Igor tested AMD’s new single-slot W7600 for a review. He found that testing the card for less than 6 minutes under Lightwave, Horizon Zero Dawn or Furmark would cause the GPU to stop producing an image to the monitor altogether — causing the screen to blackout. This happened even though the card’s PCB, memory, and GPU temperatures were being reported within their specified limits (albeit at the higher end of those limits).
It turns out there was a serious problem with the thermal pads AMD installed on the Radeon Pro W7600. Igor discovered that the thermal pads covering the four GDDR6 memory modules were too thick and too hard, resulting in the single-slot vapor camber tilting on the GPU die and preventing the GPU die from making perfect contact with the vapor chamber cooler.
To make matters worse, AMD did not add additional spacers to the W7600 to counter the mounting pressure from the extra-thick memory pads. The W7600’s four GDDR6 memory modules sit right next to the GPU die, on the top and right sides, forcing all the contact pressure from the pads to sit on one side of the card. Spacers are a common practice in the consumer GPU space to ensure that GPU mounting pressure remains sufficient across all die areas.
AMD also did not provide direct contact from the heatsink to the W7600’s mid-plate sandwiched between the PCB and the cooler. Doing this traps heat in and around the memory modules since they and their associated thermal pads are directly connected to the mid-plate.
You’re supposed to make cutouts for the GDDR6 memory modules so that the thermal pads can directly contact the cooler, bypassing the mid-plate altogether. Or, you connect the mid-plate to the cooler with thermal pads or a combination of thermally conductive metals paired with thermal pads.
Igor’s W7600 Thermal Paste Modification For The Mid-Plate (Image credit: Igor’s Lab)
To fix the issue, all Igor did was replace the GDDR6 memory pads with slightly thinner and softer 0.5mm pads to reduce the right and top-most mounting pressure, apply two additional pads on the opposite sides of the GDDR6 memory modules to stabilize the cooler, and use additional thermal paste connecting the heatsink to the mid-plate. As a result, the mid-plate now has direct contact with the heatsink, allowing all the heat generated from the memory ICs to be transferred directly into the heatsink.
It’s surprising to see such mediocre craftsmanship from AMD, especially on a card designed for the workstation market. Usually, workstation cards are held to higher manufacturing standards than gaming cards due to their purpose. But this isn’t the first time we’ve seen cooling problems like this from AMD. A similar issue was also present on AMD’s reference RX 7900 XTX graphics card, which caused GPU hotspot temps to spike as high as 110C even though the GPU core might be sitting as low as 50-60C.
For now, Igor seems to be the only one with this issue, but we do not doubt that more people will have similar issues down the road as the card ages. Hopefully, AMD will rectify the problem quickly with another revision of the Pro W7600 in the near future.
Intel Arc Alchemist GPUs landed about a year ago, and now compete among the best graphics cards. Drivers have been a recurring theme with Arc, both good and bad, but Intel has made strides to improve things and close the performance gap. To that end, Intel has released new drivers specifically aiming to improve its DirectX 11 performance.
We spoke with Intel earlier this week, and the gains for now are limited to specific games. To provide some background detail, after the initial Arc launch, Intel found that many of the base driver elements for their GPUs — integrated and discrete — were suboptimal, particularly for Arc. With integrated graphics, you can basically always assume that the GPU is the bottleneck. Anything that could be done to move work back to the CPU to alleviate that bottleneck was a “good thing.” Obviously, that same logic doesn’t necessarily apply any longer when the GPU becomes ten times faster, as in the case of the Arc A770.
So, since the initial launch, Intel spent a lot of time and effort reworking the drivers. We saw this first in early 2023 when Intel touted gains in DirectX 9 performance. The initial drivers for Arc leveraged Microsoft’s DX9 on DX12 tools, which provided compatibility and got things up and running. There was a lot of performance left on the table, however. We’re told Intel’s driver team worked with the open source DXVK project (DirectX on Vulkan) to optimize the various elements better — something it couldn’t do with the closed-source Microsoft tool. Eventually, things reached the state that all the DX9 support (or most of it?) was transitioned to using the new DXVK-optimized path.
We’re now getting a similar treatment for DirectX 11 games — not in the DXVK sense, but Intel has worked to build a from the ground-up different code path for DX11 support into its drivers. Since the existing DX11 support already works, even if performance isn’t ideal, the focus has been on testing specific games and then “whitelisting” them in the drivers to use the new code path. At present, Intel has whitelisted ten popular DX11 games: Apex Legends, Counter-Strike 2, Destiny 2, DOTA 2, Genshin Impact, GTA Online / GTA V, League of Legends, Middle-Earth: Shadow of War, Overwatch 2, and Valorant.
In short, the latest drivers optimize how the graphics hardware interacts with the DX11 API. By fine-tuning various parameters and implementing more efficient rendering techniques (it didn’t go into any low-level details), Intel improved overall performance on DirectX 11 games. Here are the results of its internal performance testing, comparing its latest drivers (internal versions 4571 and 4642, though version 4644 drivers are now out) with the original launch drivers (3490).
Image 1 of 5
(Image credit: Intel)
(Image credit: Intel)
(Image credit: Intel)
(Image credit: Intel)
(Image credit: Intel)
Across the ten games (eleven if you want to count GTA Online and GTA V as separate entries), the new DX11 code path boosted performance by anywhere from 5% to 33%. But what’s particularly interesting is that Intel specifically targeted the driver optimizations at “mainstream” CPUs — it tested with a Core i5-13400F and an Arc A750.
Later in the slides, Intel notes that the gains with a top-end Core i9-13900K weren’t as pronounced. The performance increased by only 0% to 28% across the selected games, with an overall average improvement of 12%, compared to the 19% seen with the Core i5 CPU.
We applaud Intel’s efforts and testing, as this makes a lot of sense for potential buyers of the Arc A750. With Arc A750 cards now starting at $199, they’re a great bargain, providing performance roughly equivalent to the RTX 3060 and RX 6700 10GB. Both of those still tend to sell in the $270 range (while supplies last on the 3060), meaning the A750 provides great bang for the buck. At the same time, while we might standardize all of our testing on a Core i9-13900K CPU to eliminate other bottlenecks as much as possible, people building a PC with an A750 aren’t likely to go much above $200 for the CPU, and that’s where the i5-13400F sits.
Image 1 of 6
(Image credit: Intel)
(Image credit: Intel)
(Image credit: Intel)
(Image credit: Intel)
(Image credit: Intel)
(Image credit: Intel)
Intel had some other interesting news and bullet points to discuss. The major one is that PresentMon — the foundation of Nvidia FrameView, AMD OCAT, and CapFrameX — is getting an update. PresentMon was created by Intel as an open-source performance monitoring tool to capture frametimes and other metrics related to graphics performance. It has seen many updates over the years, and now Intel is joining AMD and Nvidia in offering a more robust solution.
The new PresentMon beta adds a GUI, making it far more user-friendly than the existing version. Intel has also added a bunch of new features, including a robust overlay, histograms, and more. There’s also a new “GPU Busy” metric, which shows how much time was spent waiting on the GPU versus waiting on the rest of the system. Minimizing this difference has been a key focus of the new drivers.
Intel continues to work on validating additional games with the new DX11 code path, and they’ll roll those into future drivers. Perhaps at some point, the new code will be deemed robust enough that Intel will simply flip a switch, and all games will default to it — and maybe instead have a blacklist where games known to have issues can stick to the older code.
The new drivers and the PresentMon Beta are available for anyone to try. In fact, the DX11 performance improvements discussed here have been present in the past three Intel WHQL driver releases. The full slide deck for Intel’s Q3’23 quarterly driver update is below for your reference.
TSMC has formed an internal ‘One Team’ task force dedicated to timely development, trial production, and mass production of its N2 (2nm-class) process technology, according to reports from CNA and TorrentBusiness (via@DanNystedt). The ‘One Team’ approach suggests a unified and concerted effort, bringing together expertise and resources to streamline the development and implementation of the 2nm process.
Forming a special task force is somewhat out of character, as TSMC typically launches pilot and then mass production on its latest fabrication technologies at one fab. This time around, according to reports, things will be different. TSMC has plans to commence simultaneous pilot production on its N2 process at two fabs at its Hsinchu site: one in Baochan and another in Kaohsiung. The company intends to start pilot production at both locations in 2024 and initiate volume production in 2025.
TSMC is developing N2 fabrication technology at its special R&D center near Hsinchu. Hence, the fabs are close to the research and development facility, making it easier for fab engineers to communicate with teams that developed the manufacturing process. Meanwhile, TSMC is reportedly transferring 300 employees from its Fab 15A and 400 employees from its Fab 15B near Taichung to its fabs to ‘support the 2nm projects.’
TSMC confirmed the establishment of the ‘N2 One Team’ task force but refrained from disclosing detailed information about its structure and specific projects, according to TorrentBusiness. An intriguing detail here is that the website mentioned projects instead of project when discussing TSMC’s N2. The world’s No.1 foundry is working on multiple 2nm-class projects, including N2 that introduces gate-all-around nanosheet transistors for early 2026, N2P that add backside power delivery in early 2027, and N2X with extended performance due later this decade. Meanwhile, based on the report, N2 is coming to the two fabs at the Hsinchu site.
Intensified competition in the field of leading-edge process technologies is perhaps one of the key reasons why it is making notable shifts in its strategy and resources. On the one hand, Intel Foundry Services is set to offer its 2nm and 1.8nm-class process technologies to its clients about two years ahead of TSMC. In contrast, Samsung Foundry is getting more competitive in general, which is why it may win some production contracts on proven nodes.
Another potential reason for TSMC assembling a special task force to expedite its 2nm endeavors is the heightened complexity of modern nodes. The cadence for introducing new nodes has expanded from two years, as seen with N7 and N5, to approximately three years with N3. Mass production on TSMC’s N2 node is anticipated to commence in late 2025 or early 2026, marking roughly three years since the initiation of high-volume manufacturing for N3.
Obviously, TSMC wants to streamline its N2 development and implementation as much as possible, so forming a special task force makes sense. Yet, launching pilot production and the HVM at two fabs (albeit adjacent) is also a significant challenge.
There’s a good chance you have enough devices with wireless charging support that a single-device pad or stand just won’t cut it. However, buying a multiple-item wireless charger can be a headache. You not only have to contend with varying levels of support, but different designs as well — the last thing you want is something that won’t fit on your nightstand. While this space can be confusing, there are plenty of options out there that are worth your money. We’ll walk you through what you need to know to find the best buy while shopping for a multi-device wireless charging station, and recommend a few models that belong on your short list.
Future-proofing
It won’t be shocking to hear that your smartphone choice influences your choice in a wireless charger. Only iPhone owners will need to consider Apple Watch compatibility. Likewise, you’ll need an Android phone if you expect to power a Galaxy Watch. Buy an iPhone 12 or newer and you can attach your phone magnetically using MagSafe, while the latest Android phones often have some form of fast wireless charging.
However, it’s not simply a question of getting the fastest charger. You should consider what you might buy in the future. Don’t buy a two-device charger if you have an iPhone and AirPods, but have been eyeing an Apple Watch. And if you think you might switch to an Android cell phone (or vice versa), you’ll want to get something more generic that doesn’t lock you into any one ecosystem.
Some chargers include cradles, trays and other features that are heavily optimized for particular products, and might not even account for year-to-year changes. Some vertical stands are too tall for small phones like the iPhone 13 mini, for instance. While you can never completely guarantee that next year’s phone or watch will work, it’s worth buying something more likely to last.
Having said all this, don’t be afraid to get a charger with vendor-specific features if you’re fiercely loyal to one brand. Apple isn’t expected to ditch MagSafe any time soon, and Samsung will likely keep making Galaxy Watches for a while to come.
Where and how will you use it?
Sebastian Bednarek on Unsplash
Even without a charging cable to worry about, you’re probably buying a multi-device wireless charger with one location in mind. It might sit on your nightstand or on your desk. Not everyone buys a charger just for themselves, though; you might want to use one as a shared station for you and a partner.
If the charger will sit on your nightstand, you’ll likely want a compact, stable unit that won’t swallow all your free space or tumble to the floor (and if it does fall, one with enough durability to survive). You may also prefer a lay-flat phone pad so your screen is less likely to keep you awake. The Apple Watch and some other smartwatches can double as tiny alarm clocks, so you might want a vertical charging option for any wristwear.
At a desk, however, you may want a vertical phone stand so you can check notifications. Will the charger sit on a low table? Horizontal charger pads may make it easier to grab your devices in a hurry. Travel chargers should fold up or otherwise protect the pads while they’re in your bag. And, yes, aesthetics count. You may want something pretty if it’s likely to sit in a posh room where guests will see it.
If it’s a shared charging station, you’ll want something with multiple generic surfaces, and you’ll probably have to forgo charging more than one watch at a time. In those cases, consider the handful of 4-in-1 wireless chargers on the market, or models with USB ports.
Performance
It’s no secret that wireless charging is typically slower than wired, and powering multiple devices adds a new wrinkle. As these chargers often have to support a wide range of hardware, you’ll have to forget about the fastest, device-specific options from brands like Google, OnePlus and Samsung.
That’s not to say these will be slow, but there just isn’t much separating them on the charging speed front. As a general rule, the quickest multi-device chargers tend to top out at 15W for phones. And you’ll need an Apple MagSafe charger if you want to get that full 15W on an iPhone.
It’s rare that you’ll find a truly slow example, mind you. Even some of the most affordable options we’ve seen will recharge your phone at a reasonable 7.5W or 10W, and the 5W for other devices is more than enough. If you’re only docking overnight or while you work, speed won’t make a huge difference. Just be sure that whatever you buy is powerful enough for a phone in a case. It’s also worth noting that fast charging for other devices is rare, although you’ll occasionally find speedier options for the Apple Watch Series 7.
Quality, box contents and small details
Melvin Thambi on Unsplash
The difference between a good charger and a great one often boils down to little details. You won’t always need to pay extra to get those, but a larger outlay may be worthwhile to avoid frustrations for years to come.
A textured surface like rubberized plastic or fabric will reduce the chances your expensive gadgets will slide off their charging points. The base should have enough grip and weight that the charger won’t easily shift out of place. Any floating or vertical stands should be sturdy — steer clear if there’s any wobble.
You’ll also want to make a note of what’s included in the box. Some chargers don’t ship with power adapters, and we’ve seen numerous models whose Apple Watch “stands” are merely holders for your existing charging puck.
Then there’s helpful touches like status lights for confirming correct placement, although you’ll want to make sure they dim or shut off after a certain amount of time. And while it’s still true that cradles and trays can limit compatibility, you do want your devices to stay where you put them. Shelves and lips can prevent your phone or watch from sliding. Oh, and be wary of floating smartwatch mounts, as heavier timepieces might sag.
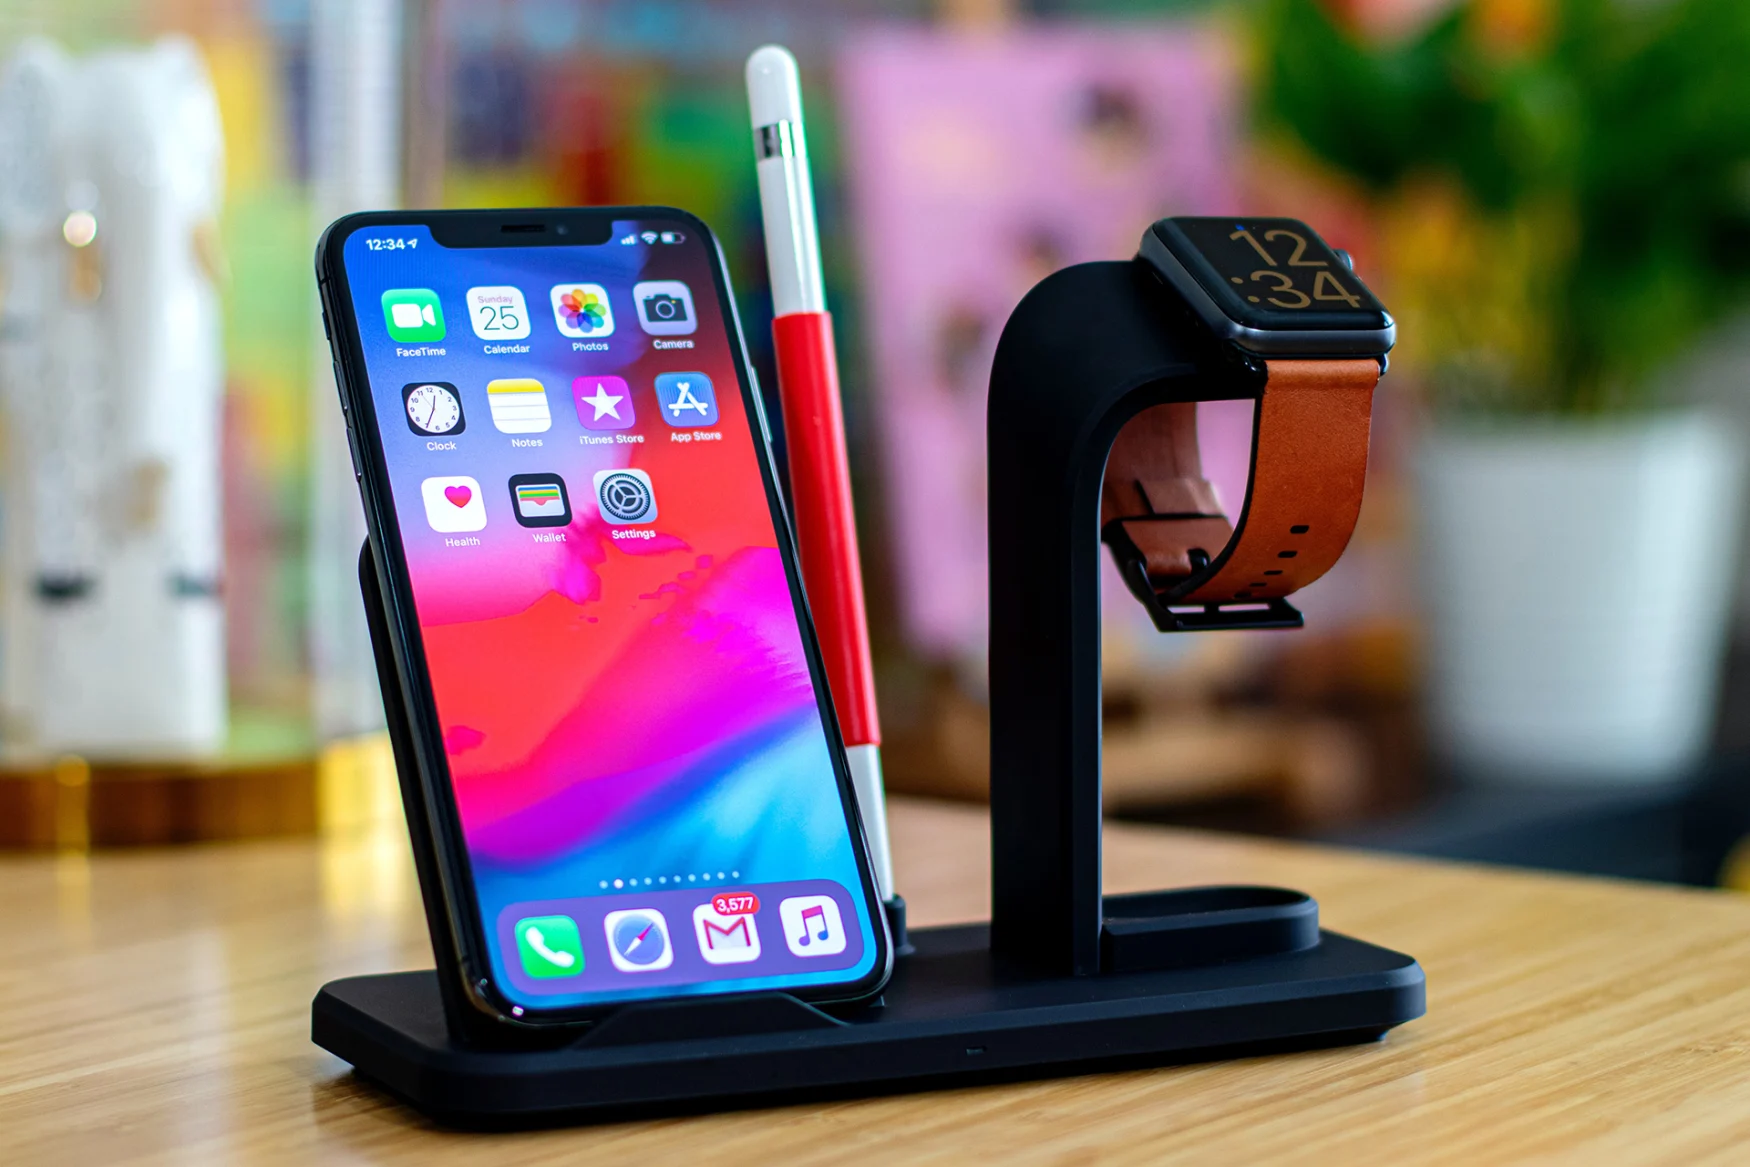
Best premium 3-in-1 charger: Belkin BoostCharge Pro 3-in-1 Wireless Charging Pad with MagSafe
It doesn’t get much better than Belkin’s most advanced model of wireless charger if you’re an Apple devotee. The high-quality BoostCharge Pro 3-in-1 pad offers 15W MagSafe charging for your iPhone, fast charging for the Apple Watch and a space for AirPods Pro or other earbuds with Qi-compatible cases. The base is weighty, covered in rubberized plastic and includes a discreet status light for your earbuds. More importantly, it supports more devices than you might think. Although the Pro pad uses MagSafe, the horizontal layout lets you charge virtually any phone at reduced speeds. We also have to give Belkin kudos for one of the most convenient Apple Watch chargers we’ve seen. It not only works horizontally and vertically, but includes a knob to adjust for different sizes and third-party cases.
This is quite large compared to some 3-in-1 chargers, so it’s not the greatest choice for a nightstand. Consider the smaller footprint of its counterpart, the BoostCharge Pro 3-in-1 Wireless Charger with MagSafe 15W, if you have an iPhone 12 or newer. You also won’t find USB ports, and the indented earbud pad rules out a second phone. Still, it’s easily worth the $150 asking price.
Runner-up 3-in-1: Logitech Powered 3-in-1 Dock
There are many quality high-end chargers to choose from, but Logitech’s Powered 3-in-1 Dock offers a few features that help it rise above. It consumes relatively little space, and the rubberized horizontal and vertical chargers deliver up to 10W while gripping your devices tightly, so both you and your partner can top off.
It has a few limitations, though. The vertical stand isn’t well-suited to the iPhone 13 mini and other small phones. And while the floating stand works with most Apple Watches, heavier ones tend to sag (such as this author’s steel Series 5 with a Leather Link strap) and might not charge properly. If those aren’t issues, though, your $130 will be well-spent.
Best budget 3-in-1 charger: Anker 533 Wireless Charger
You can find plenty of more affordable 3-in-1 chargers. Few, however, offer quite as much for the money as the Anker 533 Wireless Charger 3-in-1 Stand. It offers an adjustable-angle 10W vertical stand and lets you charge an Apple Watch either horizontally or vertically. There’s also a 20W USB-C power adapter in the box, so you won’t have to buy an aftermarket brick (or rely on proprietary cabling) to get started.
The limitations mostly stem from the cost-cutting measures. You probably won’t have room for a second phone. And like some chargers we’ve seen, the Apple Watch mount is a bring-your-own-cable affair that only supports older USB-A connections. The included cable with your Series 8 or SE won’t work here. At $58, though, this 3-in-1 wireless charging stand is a good bargain.
Another good option: Otterbox 3-in-1 Charging Station for MagSafe
If you’re willing to spend a bit more and live in Apple’s universe, the Otterbox 3-in-1 Charging Station for MagSafe is worth your attention. The extremely small footprint of this wireless charger is ideal for nightstands. You can tuck a trio of your phone, earbuds and Apple Watch into an area normally reserved for a single device. The company supplies a surprisingly powerful 36W USB-C power adapter in the box that serves as a fast wired option in a pinch.
The caveats are clear. The floating MagSafe stand rules out Android phones and older iPhones. You’ll need to bring your own Apple Watch cable, and the USB-A port won’t work with the USB-C cables bundled with newer watches. The horizontal-only watch mount also rules out clock functionality. The overall balance of space and utility is still difficult to top for $80.
Best 2-in-1 charger: Mophie Dual Wireless Charging Pad
The 2-in-1 field is highly competitive and makes it difficult to choose an absolute winner. However, Mophie’s Dual Wireless Charging Pad hits many of the right marks. It can charge two devices at up to 10W each, making it a great pick for a two-phone household. The fabric surface with rubberized trim should keep your gadgets steady, and the status lights will confirm accurate placement. There’s even a USB-A port to plug in your watch charger or any other wired hardware.
The complaints are few. You won’t charge at 15W, and we’d rather have USB-C than USB-A. It’s nonetheless a safe choice at $80, and worth buying over less expensive options.
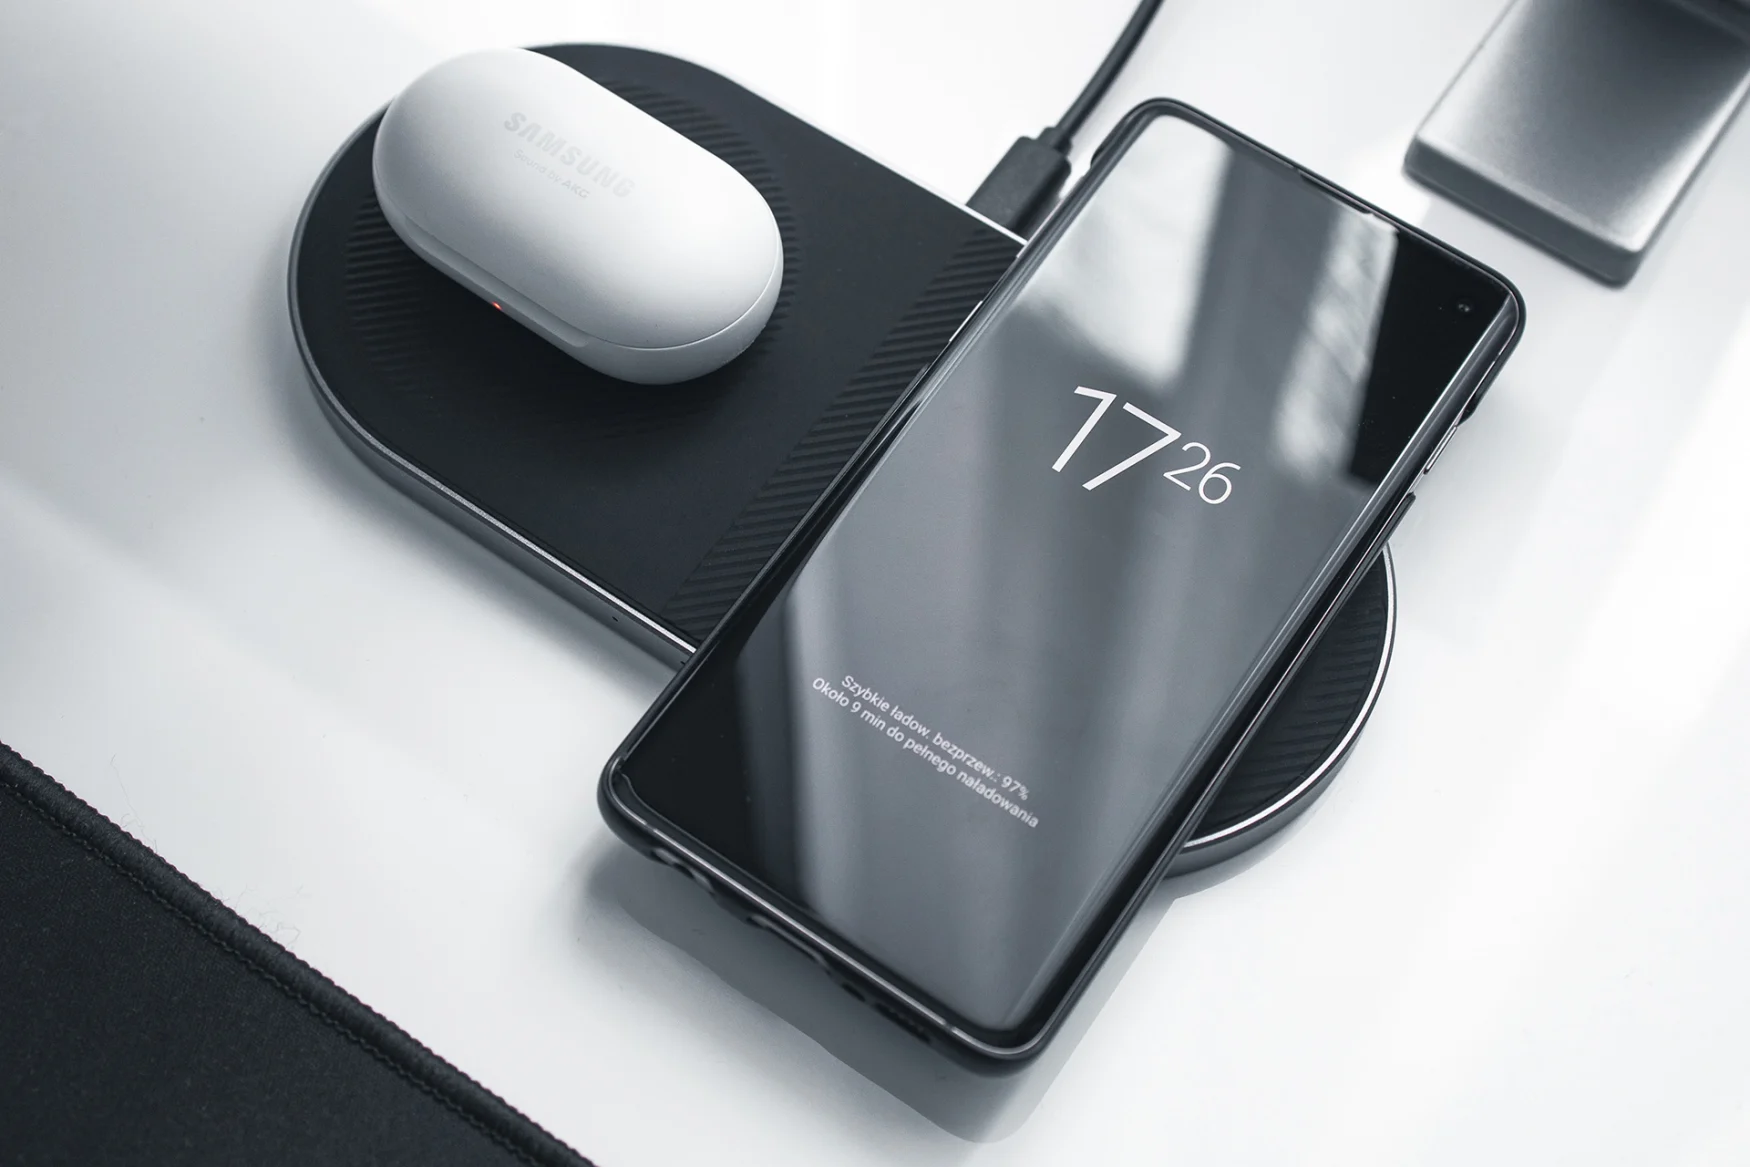
Runner-up 2-in-1: Samsung Super Fast Wireless Charger Duo
Multi-device chargers from phone manufacturers tend to be either compromised or highly proprietary, but Samsung’s Super Fast Wireless Charger Duo (sometimes known as the 15W Duo Fast Wireless Charger) bucks that trend. It’s compact and delivers high-speed charging for one phone and an accessory, whether it’s a Samsung Galaxy Watch or another manufacturer’s earbuds. The status lights will even dim at night, and change color to indicate when your batteries are full.
This won’t help for two-phone households, and Samsung only guarantees 15W charging for some of its own phones (the Galaxy Note 10, Galaxy S20 and later). You’ll also want to be mindful of which version you buy, as there are variants with and without a power adapter in the box. Neither is cheap at respective prices of $90 and $70. This remains an elegant charger for nightstands and travel, though, and the pads are sufficiently device-agnostic.
Best charger for two people: Mophie 4-in-1 Wireless Charging Mat
There are few wireless chargers built with more than one person in mind, but Mophie’s 4-in-1 Wireless Charging Mat is the most well-rounded of the bunch. The pad can handle up to four devices wirelessly at 10W, including two phones and two accessories. There’s also a spare USB-A port for charging earlier Apple Watch models (using the included mount and your own cable) or wired items. A fabric surface, subtle device trays and indicator lights will also take the mysteries out of charging.
This is a giant charger compared to most, and you might find it limiting if your home has more than one Apple Watch or accessories that won’t fit the smaller charging pads. Even so, Mophie is offering considerable value for $150. The 4-in-1 does more than some 3-in-1 chargers at that price, and it doesn’t suffer the compatibility issues of rivals like Nomad’s Base Station Pro.
This week’s best tech deals include the 9th-gen iPad on sale for $250, which ties the lowest price we’ve seen. While the 10.2-inch slate is showing its age design-wise, it’s still a good bargain for those who just need a tablet for the basics and want the most affordable Apple tablet possible. Elsewhere, Sony is still running a rare $50 discount on PlayStation 5, while Amazon’s Fire TV Stick 4K Max is within $2 of its best price to date. We’re also seeing all-time lows on the top picks in our gaming headset and microSD card buying guides, plus Apple’s third-gen AirPods. Here are the best tech deals from this week that you can still get today.
Apple iPad (9th gen)
The 9th-gen Apple iPad is back down to $250 at Amazon, matching its all-time low. You should see the full discount at checkout. Apple sells the 10.2-inch tablet for $329, though we’ve regularly seen it retail closer to $275.
The entry-level slate is certainly getting long in the tooth, as its non-laminated display, thick bezels and Lightning port give it an altogether more dated design than newer iPads. Its 64GB of storage is low, too. At this price, though, the 9th-gen iPad remains one of the better values in the tablet market, with a sturdy aluminum frame, 10 or so hours of battery life and fast-enough performance for casual media consumption. There’s always a chance Apple will introduce new iPads later this year, but if you just want the cheapest route into iPadOS, this model should be enough.
Astro A40 TR
The Astro A40 TR is on sale for $100, which is $30 off its usual street price and ties the lowest price we’ve seen. The A40 TR is the top pick in our guide to the best gaming headsets, as its open-back design gives it a more spacious and enveloping sound that most competitors. It emphasizes the bass, but not to an overwhelming degree, and it’s comfortable to wear to extended periods. That said, the built-in mic is just OK, and like any open-back headphone, the whole thing both leaks and lets in lots of outside noise, so it’s not ideal if you usually play in a noisy room. In general, you can get better value from a pair of “normal” wired headphones than a dedicated gaming headset unless you need a mic. If you really want an all-in-one solution, though, the A40 TR is a worthwhile compromise.
Samsung Pro Plus
The Samsung Pro Plus is the top pick in our microSD card buying guide, and right now its 128GB, 256GB and 512GB models are down to $12, $20 and $35, respectively. Each of those deals match an all-time low. The Pro Plus technically isn’t the fastest microSD card you can buy, but at this price it’s a fantastic value for a Nintendo Switch, GoPro or Android tablet, as it topped all the cards we tested in sequential write speeds and random read/write performance. It also comes with a 10-year limited warranty.
Sony PlayStation 5
The PlayStation 5 is still on sale for $449 at various retailers, which is a $50 discount. We highlighted this deal when Sony kicked off its latest summer sale a couple of weeks ago, but the company says that is scheduled to end on August 19. Discounts for the PS5 have been exceedingly rare since the console arrived in late 2020, so consider this a last-minute PSA. We gave the device a review score of 87 at launch, though it’s become a much better value proposition over the last three years as it’s built out its games library.
Sony PlayStation 5 DualSense Controller
In other PS5 deals, the DualSense wireless controller is still on sale for $49 in various colors. Depending on which model you pick, that’s $20 or $25 off. This matches the lowest outright discount we’ve seen for the gamepad, which is also compatible with Steam. Elsewhere, console covers for the PS5 are down to $45 at the PlayStation Direct store. That’s a $10 discount.
PS5 and PS4 exclusive game sale
A number of PlayStation-exclusive games we recommend are discounted as well, including God of War Ragnarök for $49 and Marvel’s Spider-Man: Miles Moralesfor $20. The thrilling roguelike Returnaland the charming action game Ratchet & Clank: Rift Apartare both down to $29, while the open-world samurai game Ghost of Tsushima: Director’s Cut is available for a buck more. Elsewhere, Death Stranding: Director’s Cutis on sale for $19, while a PS4 copy of Horizon Forbidden West(which includes a free upgrade to the digital PS5 version) is down to $29. We’ve seen all of these deals before, but if you need something new to play, each matches or at least comes within a few dollars of the lowest price we’ve seen.
Anker 622 Magnetic Battery
The Anker 622 Magnetic Battery is back on sale for $40, which isn’t quite an all-time low but still comes in $10 below the device’s typical street price. This portable wireless charger has a slim frame that snaps easily onto the back of a MagSafe-compatible iPhone. It also includes a built-in kickstand for propping your phone up. This deal applies to the “Upgraded Version” of the battery, with a USB-C port on the side; an older variant places that port on the bottom, which is a bit less convenient for pass-through charging. Just note that, like many wireless power packs, the 622 can’t deliver a particularly fast charge (only 7.5W), nor does it have a high capacity (5,000mAh). It can get hot, too. Still, if you want a truly cable-free way to extend an iPhone’s battery on the go, it’s a decent value at this price.
Apple AirPods (3rd gen)
The third-gen Apple AirPods are back down to $140, tying its all-time low. Apple sells the wireless earbuds for $169, though we often see them go for $10 or $20 less elsewhere. This open-back pair has a more balanced sound than most unsealed earbuds, with more bass depth than usual (albeit not a ton). There’s no ANC, as expected, but you still get wireless charging, relatively intuitive touch controls and the usual Apple-friendly features like fast pairing and Find My tracking. Just note that the earpieces are a little large, so they may not fit well with certain ear shapes. This set is also pricey, and like any other open-back pair, it doesn’t isolate much outside noise. Still, if you own an iPhone and hate the feeling of traditional in-ear headphones, it might work. We gave the AirPods a score of 88 in late 2021.
Amazon Fire TV Stick 4K Max
The Amazon Fire TV Stick 4K Max is down to $27, which is $2 more than the lowest price we’ve seen but still roughly $20 below the 4K streamer’s usual street price. This is Amazon’s fastest streaming stick, with support for all the necessary apps and HDR standards, plus Alexa voice controls built into its remote. We generally prefer Roku’s and Google’s respective streaming platforms over Amazon’s Fire OS, as the latter is more aggressive about displaying ads and promoting Amazon’s own content across the UI. But if you just want an affordable device for casual 4K streaming, or if you regularly use Amazon services like Prime Video, this is a fine option.
Amazon Echo Studio
The Amazon Echo Studio is on sale for $160, which is a $40 discount and within $5 of the smart speaker’s all-time low. This is the largest and best-sounding option in Amazon’s Echo lineup. Though we recommend the newer Sonos Era 100 to most people looking for an audio-focused smart speaker, the Echo Studio is still a strong alternative for those who want to save some cash or add a centerpiece to an existing set of Echo devices.
Logitech Litra Glow
The Logitech Litra Glow is back down to $50, which is a deal we’ve seen a few times before but still takes $10 off the device’s usual going rate. The Litra Glow is a USB-powered video light we recommend in our guide to the best game-streaming gear, as we found it to deliver relatively soft and pleasant lighting without harsh edges or shadows. The hardware clips onto the top of a monitor and is easy to rotate or tilt, and you can customize the lighting’s brightness and color temperature through built-in control buttons or Logitech’s companion software. While Logitech markets the device toward content creators, it can also be useful for those who frequently have to take Zoom calls in a room with poor natural lighting.
Instant Pot Duo (3-quart)
If you’ve been thinking about jumping on the Instant Pot bandwagon, the 3-quart Instant Pot Duo is now on sale for $60, or $20 below its typical street price. While that’s not an all-time low, it does match the best price we’ve seen in 2023. We recommend this smaller variant to those who want an electric pressure cooker for individual use or smaller kitchens in our Instant Pot buying guide. It’s one of the more basic options available, but it’s still easy to operate, and it comes with modes for sautéing, slow cooking, steaming and making rice or yogurt, among others.
Samsung Galaxy Z Flip 5
The 256GB Samsung Galaxy Z Flip 5 is down to $900 at Amazon with an on-page coupon, which is a $100 discount for a phone that only went on sale earlier this month. If you shop at Amazon regularly, you can also get the foldable phone with a $150 Amazon gift card, but you’ll have to pay the standard $1,000 MSRP. We gave the Galaxy Z Flip 5 a review score of 88 earlier this month, and we currently list it as the “best foldable for selfies” in our guide to the best smartphones. The big upgrades are a larger 3.4-inch cover display that’s more useful for quickly checking notifications or using apps and a redesigned hinge that lets the device fold flat. You still give up some battery life and camera performance compared to more traditional flagship phones around this price, and like any foldable device, you have to take extra care when handling it. But if the idea of a phone you can fold in half appeals to you, this is the new leader in that market.
Follow @CunghoctinDeals on Twitter and subscribe to the Cunghoctin Deals newsletter for the latest tech deals and buying advice.
Whimsical tech blogger John Graham-Cumming recently wrote about fixing a faulty M.2 SSD using humble workshop tools that are typically used for woodworking endeavors. After a bit of detective work on a crash-prone PC, the blogger discovered one of his Seagate FireCuda 530 (review) SSDs was misbehaving. What managed to get it to work reliably again was strategically focused pressure from a G-clamp plus a carpentry square with a thermal pad.
Graham-Cumming describes the onset of his PC issues as starting with an in-game freeze, followed by a boot to BIOS loop. The blogger deduced that the debilitating PC issues were caused by one of his two Seagate FireCuda 530 SSDs, by trying various combinations of the two SSDs in his two M.2 slots.
It was subsequently discovered that the faulty FireCuda would work (briefly) when the system was started from cold. This observation pointed towards the dodgy drive having a problem that occurred only when its PCB / chips had reached a specific temperature. Confirmation of a thermal issue came from quickly testing the drive after a spell in the deep freeze. It was usable for a good few minutes before it failed this time.
That a thermally affected SSD component caused issues got Graham-Cumming thinking. Sometimes the expansion/contraction of PCB solder joints can cause problems, and it didn’t take long to find out that pressure applied to a particular chip made the FireCuda work ‘reliably.’
Image 1 of 3
(Image credit: John Graham-Cumming )
(Image credit: John Graham-Cumming )
(Image credit: John Graham-Cumming )
Above, some images show how the first working G-clamped SSD was put together. The second slide shows some refinement, with a PC thermal pad and carpentry square added to even the thermals. A thermal camera shot is also in the gallery, showing some portions of the SSD hit about 90 degrees Celsius when used.
With the woodworking tools cooling contraption in place, Graham-Cumming successfully shoveled his user documents to another drive for safekeeping.
Of course, not many people would be happy with this bulky SSD / G-clamp / set square arrangement sitting next to their workstation. The blogger felt the same and updated his post to tell readers he’d been inspired to heat the temperamental SK Hynix DDR4 cache chip with a hot air rework station. The result is that “the SSD works without having woodworking tools applied to it” and is OK to put back in the PC, according to Graham-Cumming.
Some would say the Nvidia GeForce RTX 4060 Ti 16GB is the card that Nvidia and its partners don’t want to see reviewed. No add-in board (AIB) partner would send us a card, and Nvidia didn’t sample anyone… so we bought one, at retail, after searching for over a week to find one in stock. Is it one of the best graphics cards? You can probably already guess the answer to that question.
Based on the same Ada Lovelace architecture and with the same core specs as the RTX 4060 Ti Founders Edition, the sole difference is the use of two 2GB memory chips on each memory channel, doubling the capacity to 16GB. More memory should be good in certain workloads, though the 128-bit memory interface remains and will sometimes hold the GPU back.
More critically, tacking on $100 for the extra VRAM represents yet another cynical move from Nvidia. Yes, some people will be willing to pay the price, but Intel’s Arc A770 comes in both 8GB and 16GB variants (albeit with a 256-bit interface), with about a $50 gap in pricing. Put bluntly, Nvidia charges as much as it feels it can get away with, and sometimes more.
There’s no Founders Edition for the 4060 Ti 16GB, which makes the definition of a “reference” card somewhat nebulous. We figure anything available at the base $499 MSRP qualifies, and after looking at the options available at Newegg, Amazon, and elsewhere, we opted for the Gigabyte RTX 4060 Ti 16GB Gaming OC. Other MSRP models include the MSI Ventus 2X and the Zotac Amp (that’s the Across the Spider-Verse bundle, in case that’s a selling point for you).
Supposedly over 20 other 4060 Ti 16GB variants are available from other AIBs, but most are currently out of stock. We figured the triple fans on the Gigabyte card would provide a better overall cooling solution, so let’s hit the speeds and feeds.
Swipe to scroll horizontally
Nvidia RTX 4060 Ti 16GB Specifications
Graphics Card
Gigabyte RTX 4060 Ti 16GB
RTX 4060 Ti 16GB
RTX 4070
RTX 4060 Ti
RTX 4060
RTX 3060 Ti
RX 6800 XT
RX 6800
RX 6750 XT
Architecture
AD106
AD106
AD104
AD106
AD107
GA104
Navi 21
Navi 21
Navi 22
Process Technology
TSMC 4N
TSMC 4N
TSMC 4N
TSMC 4N
TSMC 4N
Samsung 8N
TSMC N7
TSMC N7
TSMC N7
Transistors (Billion)
22.9
22.9
32
22.9
18.9
17.4
26.8
26.8
17.2
Die size (mm^2)
187.8
187.8
294.5
187.8
158.7
392.5
519
519
336
SMs / CUs / Xe-Cores
34
34
46
34
24
38
72
60
40
GPU Cores (Shaders)
4352
4352
5888
4352
3072
4864
4608
3840
2560
Tensor / AI Cores
136
136
184
136
96
152
N/A
N/A
N/A
Ray Tracing “Cores”
34
34
46
34
24
38
72
60
40
Boost Clock (MHz)
2595
2535
2475
2535
2460
1665
2250
2105
2600
VRAM Speed (Gbps)
18
18
21
18
17
14
16
16
18
VRAM (GB)
16
16
12
8
8
8
16
16
12
VRAM Bus Width
128
128
192
128
128
256
256
256
192
L2 / Infinity Cache
32
32
36
32
24
4
128
128
96
ROPs
48
48
64
48
48
80
128
96
64
TMUs
136
136
184
136
96
152
288
240
160
TFLOPS FP32 (Boost)
22.6
22.1
29.1
22.1
15.1
16.2
20.7
16.2
13.3
TFLOPS FP16 (FP8)
181 (361)
177 (353)
233 (466)
177 (353)
121 (242)
65 (130)
41.4
32.4
26.6
Bandwidth (GBps)
288
288
504
288
272
448
512
512
432
TDP (watts)
160
160
200
160
115
200
300
250
250
Launch Date
Jul 2023
Jul 2023
Apr 2023
May 2023
Jul 2023
Dec 2020
Nov 2020
Nov 2020
May 2022
Launch MSRP
$499
$499
$599
$399
$299
$399
$649
$579
$549
Online Price
$500
$500
$590
$374
$300
$335
$520
$440
$350
The RTX 4060 Ti 16GB has the same specs as the 8GB variant, other than VRAM capacity. The Gigabyte model we’re using for this review gets an extra 60 MHz for its boost clock, which in practice usually won’t matter much — the 4060 Ti Founders Edition averaged just under 2.8 GHz across our test suite, while the Gigabyte card was closer to 2.75 GHz. Paper specs aren’t everything, in other words.
As you can imagine, there’s quite a bit of healthy competition for the 4060 Ti 16GB. AMD’s RX 6800 can now be picked up starting at $450, while the RX 6800 XT has frequently been on sale for $500 over the past couple of months — the cheapest price at the time of writing is $520. Previous generation RTX 3070 and RTX 3070 Ti cards also cost less than the 4060 Ti 16GB now — as they should, considering the overall performance. We’ll also toss in some Intel Arc cards for the benchmarks as well, but we’ll get to those in a few pages.
The bump in memory capacity will definitely help, but raw bandwidth remains a potential problem. If you’re playing games that don’t need or use more than 8GB of VRAM, we’d expect similar performance — with a bit of wiggle room since we’re comparing a factory overclocked card to the reference models. 1440p, and especially 4K, could benefit from the extra VRAM, but Nvidia isn’t marketing the RTX 4060 Ti as a 1440p or 4K gaming solution. That’s probably thanks to its lack of compute and bandwidth, even though the RTX 3060 Ti and RTX 3070 both targeted 1440p.
Note also that the 16GB cards, in the same power envelope, may perform slightly worse than the 8GB models. We definitely saw that in some of our benchmarks. It’s not clear precisely how much power the extra memory uses, but it’s more than zero watts, and that could, in some cases, reduce the maximum boost clocks. Or perhaps it’s just the Gigabyte card in particular, but the difference in favor of the 8GB Founders Edition was generally in the low single-digit percentage points and was basically within the margin of error.
Image 1 of 2
RTX 4060 Ti block diagram (Image credit: Nvidia)
Full AD106 block diagram (Image credit: Nvidia)
Here’s the block diagram for the RTX 4060 Ti, along with the full AD106 chip. Nothing is changed for the RTX 4060 Ti 16GB. There’s one disabled NVDEC (Nvidia Decoder) block and two disabled SMs (Streaming Multiprocessors). Manufacturing would be more complex, as GDDR6 chips need to be mounted on both sides of the PCB. That used to be relatively common, but in recent years such cards are usually professional models or “prosumer” cards like the Titan series.
All the other Ada Lovelace architectural features are present, including the heavily marketed DLSS 3 Frame Generation. If you’re willing to trade latency for a bit more visual smoothness, that’s what it gives you, but the performance charts with DLSS 3 enabled can be rather misleading in our experience. A 50% or larger boost in frames via DLSS 3 doesn’t feel 50% faster — we’d say more like 10–20 percent at best.
Besides gaming, VRAM capacity can also be a factor in AI workloads. Many large language models (LLMs) benefit from lots of memory, and 8GB isn’t enough for even “medium” sized models in many cases. I have to wonder if some of the RTX 4060 Ti 16GB scarcity at launch was from AI researchers and companies grabbing it for experimentation just because of its memory capacity. It still feels like a bit of a throwback to 2021, where GPUs just were sold out at launch, though at least now there are cards priced at MSRP.
Let’s go ahead and move on to the specifics of the Gigabyte RTX 4060 Ti Gaming OC.
Over-ear noise-canceling headphones typically offer the most comprehensive set of features we want for our listening pleasure. The best of these wireless options combine stellar sound quality with powerful active noise cancellation (ANC) and other handy tools to create as complete a package as possible. Of course, some companies do this better than others. For Cunghoctin’s best wireless headphones guide, we tested out a number of different models with a variety of features, including noise cancellation, customization options and sound quality. Plus, our favorites span a range of prices so you can decide how much you’re comfortable spending and, ultimately, get the best buy for you.
Best headphones for 2023
What to look for
When it comes to shopping for headphones, the first thing you’ll need to decide on is wear style. Do you prefer on-ear or over-ear headphones? For the purposes of our buyer’s guide, we focus on the over-ear style as that’s what most noise-canceling headphones are nowadays. Sure, you can find on-ear models with ANC, but over-ear designs are much more effective at blocking sound. Speaking of noise cancellation, you’ll want to determine early on if you even want that. If you frequently listen to music in noisy environments, you’ll want to not only make sure it’s there, but also make sure it’s good. If you plan to use your new headphones in quieter spaces, skipping ANC can save you some money.
The next area to consider is features. We recommend trying to get the most bang for your buck, but as you’re shopping around you should determine which items are must-haves and what you can live without. And don’t take basic things like automatic pausing and Bluetooth multipoint connectivity for granted, as not all companies include them. We also suggest reading reviews to see how well a company’s more advanced features work. This will help you decide if those are something you’re willing to (likely) pay extra for. Pay close attention to battery life estimates and don’t be easily swayed by lofty promises about call quality.
Sound can be subjective, so we recommend trying before you buy if at all possible. We understand this isn’t easy at a time when we’re doing most of our shopping online. But trying on a set of headphones and listening to them for a few minutes can save you from an expensive case of buyer’s remorse. We also recommend paying attention to things like Spatial Audio, Dolby Atmos, 360 Reality Audio and other immersive formats. Not all headphones support them, so you’ll want to make sure a perspective pair does if that sort of thing excites you.
How we test wireless headphones
The primary way we test headphones is to wear them as much as possible. We prefer to do this over a one- to two-week period, but sometimes embargoes don’t allow it. During this time, we listen to a mix of music and podcasts, while also using the earbuds to take both voice and video calls. Since battery life for headphones can be 30 hours or more, we drain the battery with looping music and the volume set at a comfortable level (usually around 75 percent). Due to the longer battery estimates, we’ll typically power the headphones off several times and leave them during a review. This simulates real-world use and keeps us from having to constantly monitor the process for over 24 straight hours.
To judge audio quality, we listen to a range of genres, noting any differences in the sound profile across the styles. We also test at both low and high volumes to check for consistency in the tuning. To assess call quality, we’ll record audio samples with the headphones’ microphones as well as have third parties call us.
When it comes to features, we do a thorough review of companion apps, testing each feature as we work through the software. Any holdovers from previous models are double checked for improvements or regression. If the headphones we’re testing are an updated version of a previous model, we’ll spend time getting reacquainted with the older set. Ditto for the closest competition for each new set of headphones that we review.
Best headphones overall: Sony WH-1000XM5
Sony’s 1000X line has been our top pick for best wireless headphone for a long time now. Until another company can pack in as many high-quality features as Sony, and do so with a mix of excellent sound quality and effective ANC, the crown is safe. With the WH-1000XM5, Sony redesigned its flagship headphones, making them way more comfortable to wear for long periods of time. We also noticed in our tests that the company made noticeable improvements to the active noise cancellation, thanks to a separate V1 chip in addition to the QN1 that was inside the M4. There are now eight total ANC mics as well – the previous model only had four. This all combines to better block background noise and high frequencies, including human voices.
The 1000XM5 still has all of the features that typically make Sony’s top-of-the-line headphones showstoppers. That includes 30-hour battery life and crisp, clear sound with balanced tuning and punchy bass. A combo of touch controls and physical buttons give you on-board access to music, calls and noise modes without reaching for your phone. Speak-to-Chat automatically pauses audio when you begin talking, and like previous Sony headphones, the M5 can change noise modes based on your activity or location. Plus, this model offers better call quality than most of the competition. The only real downside is that they’re $50 more than the WH-1000XM4 at full price ($400).
Noise cancellation: Yes
Multipoint: Yes
Battery life: 30 hours
Weight: 0.55 pounds
Water resistance: None
Read our full review of Sony WH-1000XM5 headphones
Runner up: Bowers and Wilkins Px7 S2
I’ll admit I didn’t expect Bowers & Wilkins to make the year’s best headphones list, or even be in contention for a spot. However, the company’s revised Px7 headphones impressed me during my review. The Px7 S2 are pricey at $399, but Bowers & Wilkins pair impressive sound quality with solid ANC performance. In fact, the Px7 S2 are my favorite headphones right now in terms of sound. There’s also a more refined design that doesn’t look overly plasticky and the headphones fit comfortably even after hours of use. Call quality, ambient sound and automatic pausing aren’t the best here, but they get the job done. At the end of the day, the design, sound quality and excellent noise cancellation make the Px7 S2 a strong pick in the current true wireless headphone field.
Noise cancellation: Yes
Multipoint: Yes
Battery life: 30 hours
Weight: 0.67 pounds
Water resistance: None
Read our Full Review of Bowers & Wilkins Px7 S2 Headphones
Best headphones for those on a budget: Audio-Technica ATH-M20xBT
Audio-Technica has introduced affordable wireless headphones in the past, and while they didn’t offer active noise cancellation, they’re still worth considering. The company’s latest is the M20xBT, a Bluetooth version of the A-T’s popular M20x wired cans. For just $79, you can expect a comfy fit and up to 60 hours of battery life. Bluetooth multipoint connectivity allows you to connect to multiple devices at once and physical buttons provide reliable on-board control. The design isn’t as refined as the company’s pricer models like the M50xBT2, but you get the bulk of what makes Audio-Technica’s cheaper options so good.
Noise cancellation: No
Multipoint: Yes
Battery life: 60 hours
Weight: 1.42 pounds
Water resistance: None
Another solid option: Bose QuietComfort 45
The Bose 700 was one of our top wireless Bluetooth headphones last time around, but the company recently revived a workhorse with the QuietComfort 45. The design is mostly unchanged from the previous QC models, which could be a deal breaker for some. Once you get past that though, the QC45 combines Bose’s excellent active noise cancellation with clear and balanced audio. You can expect up to 24 hours of battery life on a single charge and a comfortable fit that doesn’t get tiresome during long listening sessions. We’ve already seen them on sale for $50 less than full price, which makes the QuietComfort 45 even more compelling.
Noise cancellation: Yes
Multipoint: No
Battery life: 24 hours
Weight: 0.96 pounds
Water resistance: None
Read our Full Review of Bose QuietComfort 45 Headphones
Another solid option: Technics EAH-A800
Back at CES 2022, Panasonic announced the EAH-A800: a new set of active noise canceling headphones under the iconic Technics brand. While most of the features are what you see on any number of wireless headphones, one figure stood out. The company says you can expect up to 50 hours of battery life on the A800, and that’s with active noise cancellation enabled. These are currently in my stable of review units for detailed analysis, but I have already tested them on a long flight. The ANC is impressive and they’re comfortable enough to avoid becoming a burden after several hours. Sound quality is also quite good (there’s LDAC support, too) and there are enough features here to justify the premium price tag.
Noise cancellation: Yes
Multipoint: Yes
Battery life: 50 hours
Weight: 0.65 pounds
Water resistance: None
Another solid option: Master and Dynamic MW75
While Master & Dynamic is known for its design prowess, the company’s over-ear headphones were due for a refresh. With the MW75 that debuted in June, the company opted for a look that takes cues from its MG20 gaming headset and mixes them with a combo of aluminum, leather and tempered glass. The company’s trademark sound quality returns with multiple ANC modes and ambient sound options for a range of situations. At $599, the high-end looks don’t come cheap, but if you’re looking for something beyond the pure plastic fashion of most headphones, M&D has you covered.
Noise cancellation: Yes
Multipoint: Yes
Battery life: 28 hours
Weight: 0.75 pounds
Water resistance: None
Another solid option: Sennheiser Momentum 4
I’ll be honest, I had a hard time choosing between the Px7 S2 and the Momentum 4 wireless headphones for the runner-up spot this time around. However, Bowers & Wilkins gets the edge in terms of design even though the Px7 S2 and the Momentum 4 are very evenly matched on great sound quality. They’re the two best-sounding sets of Bluetooth headphones I’ve tested this year – and it’s not even close. Sennheiser does have an impressive 60-hour battery life in its favor and improved ANC performance. Those two items alone might be enough for you to overlook the very generic design.
Noise cancellation: Yes
Multipoint: No
Battery life: 60 hours
Weight: 0.65 pounds
Water resistance: None
Read our Full Review of Sennheiser Momentum 4 Headphones
FAQs
How can you tell the quality of headphones?
I typically look at three factors: design, sound quality and features. In terms of design, I’m usually looking to see if the build quality of the headphones feels cheap and plasticky. Plenty of companies use plastic, but they can do so in a way that doesn’t look or feel like budget models. For sound quality, I want to hear a nice, even tuning where highs, mids and lows are all well represented. No overly boomy bass or scooped out mids. I also want good clarity where you can pick up fine details and an open, immersive soundstage. Features is typically a distant third, but if a company doesn’t cover basic functionality (automatic pausing, transparency mode, multipoint Bluetooth, etc.) it can be an indication of overall quality.
How do I choose the best quality headphones?
“Best” can be pretty subjective, but I always recommend going to a place where you can listen to the headphones you’re thinking about buying before you commit. Sometimes this isn’t possible, so you’ll want to check return policies. I also recommend doing some research to determine what your priorities are in a new set. Are you an audiophile who wants the best sound quality? Is powerful active noise cancellation (ANC) the most important? Would you rather have conveniences like automatic pausing?
Which brand has the best headphones?
Sony consistently tops our list with its 1000X line. This is mostly due to the combination of sound quality, ANC performance and the truckload of features these headphones pack in. I’ll be the first to tell you that there are better sounding options and other companies, like Bose, offer more effective noise cancellation. But when you add everything up, no one comes close to the full slate of tools Sony puts in its premium headphone line.
Do expensive headphones sound better?
Exorbitant price tags don’t mean better audio quality. Bowers & Wilkins’ headphones are on the high end for wireless noise-canceling models and they sound amazing. However, Audio-Technica’s M50xBT2 is much more affordable and doesn’t have ANC, but these headphones have a warm, natural sound profile that I find very inviting. At the end of the day, it will come down to personal preference, but you don’t need to spend a lot to find great headphones.
More is usually better, and boosting your Steam Deck up to 2TB of fast internal storage is now easier than ever. You may not have heard of Addlink, but they are an established SSD brand and often offer better pricing for the same hardware you find from better-known brands. The S91 is one of those special drives that you can pick up to upgrade your Steam Deck, ROG Ally, or other M.2 2230-requiring system with the right tools and a good guide. The possibility of having this much capacity with NVMe performance on the go, what’s not to like?
The 2TB Addlink S91’s performance is relatively good, particularly when run at the Steam Deck’s PCIe 3.0 speed, and the drive is quite efficient. Addlink backs it with a five-year warranty, although overall support may not be as good as you’ll find with the Sabrent Rocket Q4 2230. That’s okay, as the S91 is currently a bit less expensive. At 1TB, the S91 has stiffer competition, but you can save some money if you’re willing to go with the S91’s QLC flash over a TLC contender. The S91 uses TLC for the 512GB model, but a drive like the Inland TN446 is a better bet.
We think a QLC drive like the Addlink S91 or Rocket Q4 2230 makes sense at 2TB in this form factor. Just be aware that write performance may tank after the initial installation process, and leaving some space free is a good idea to improve performance. At 1TB, it is harder to recommend the S91, but it could be a budget option if money is tight. Let’s see how it stacks up.
Specifications
Swipe to scroll horizontally
Product
512GB
1TB
2TB
Pricing
$52.88
$84.88
$199.88
Form Factor
M.2 2230
M.2 2230
M.2 2230
Interface / Protocol
PCIe 4.0 x4 / NVMe 1.4
PCIe 4.0 x4 / NVMe 1.4
PCIe 4.0 x4 / NVMe 1.4
Controller
Phison E21T
Phison E21T
Phison E21T
DRAM
N/A (HMB)
N/A (HMB)
N/A (HMB)
Memory
Kioxia 112-Layer TLC (BiCS5)
Micron 176-Layer QLC
Micron 176-Layer QLC
Sequential Read
3,500 MB/s
4,900 MB/s
5,000 MB/s
Sequential Write
2,300 MB/s
3,200 MB/s
3,200 MB/s
Random Read
400K
570K
480K
Random Write
550K
750K
750K
Security
N/A
N/A
N/A
Endurance (TBW)
300TB
250TB
450TB
Part Number
ad512GBS91M2P
ad1TBS91M2P
ad2TBS91M2P
Warranty
5-Year
5-Year
5-Year
The Addlink S91 is available in 512GB, 1TB, and 2TB capacities. It performs up to 5,000 / 3,200 MB/s for sequential reads and writes and up to 570K / 750K random read and write IOPS. All capacities are warrantied for five years and can absorb 300TB, 250TB, and 450TB of writes, respectively. Current pricing has decreased during the review’s writing to $52.88, $84.88, and $199.88, respectively.
This pricing is somewhat competitive, but the 512GB Inland TN446 at $49.99 is probably the better deal. At 1TB, the S91 saves you a little money if you want to go with QLC over TLC. At 2TB, it’s one of the less expensive QLC options.
Software and Accessories
Addlink does not provide cloning/imaging software with this SSD, but a downloadable SSD toolbox is available on Addlink’s site. We recommend using free, third-party applications for cloning and imaging.
A Closer Look
Image 1 of 4
(Image credit: Tom’s Hardware)
(Image credit: Tom’s Hardware)
(Image credit: Tom’s Hardware)
(Image credit: Tom’s Hardware)
The Addlink S91 is your typical, DRAM-less M.2 2230 SSD. It has an SSD controller, a single NAND package, and a PMIC. It’s single-sided to ensure it will fit in embedded devices.
Image 1 of 2
(Image credit: Tom’s Hardware)
(Image credit: Tom’s Hardware)
The flash, labeled ICCVG96AZA, is Micron’s 176-Layer QLC (N48R). This is the same flash on the Sabrent Rocket Q4 2230. Packing 2TB into a single package requires 16 1Tb dies (HDP), which is the typical limit.
The S91 deviates from other existing M.2 2230 SSDs we’ve tested at 512GB. Here it uses Kioxia’s 112-Layer TLC (BiCS5) instead of QLC. Due to the lower-than-expected performance specifications, I had expected either QLC or BiCS5 TLC at 512GB. When I asked, it was confirmed that it uses BiCS5. This is the same flash on the Inland TN436 and WD SN740. It may be slower due to less internal interleaving. Additionally, it may be less efficient due to the lack of CMOS under Array (CuA) and from being of an older flash generation. This does not apply at 1TB or 2TB, where the S91 uses Micron’s QLC. This is why the TN446, which has 176-Layer Micron TLC, is probably the better option at 512GB.
Fisker has shed some more light on its Alaska electric pickup, which it says will have a relatively low base price of $45,400. The Alaska is a work-friendly vehicle, letting you run your business from the cockpit. It has dedicated work glove and cowboy hat storage, a slide-out laptop tray and a cup holder big enough to hold a day’s worth of water.
The default flatbed is 4.5 feet, but you can drop the partition to increase that to 7.5 feet. Lower the seats and the liftgate and you can push it to 9.2 feet, big enough to haul several sheets of plywood from one job to the next. But much as Fisker may promise this will be one of the lightest and cheapest EVs in its class, we’ll wait to see how much it actually costs when it debuts in 2025 before making a judgment.
– Dan Cooper
You can get these reports delivered daily, direct to your inbox. Subscribe right here!
The biggest stories you might have missed
The best wireless earbuds for 2023
The best budget laptops for 2023
Amazon sale slashes Fire TV streaming devices by up to 51 percent
Samsung’s revamped Freestyle projector is now available to pre-order
Call of Duty: Modern Warfare III will include the series’ biggest zombies map ever
Homeworld: Deserts of Kharak will be free on Epic Games Store this month
Alan Wake II, delayed by 10 days, will arrive on October 27
How to take a screenshot on a Windows PC
It’s a Swiss Army-microphone for audio pros on a budget.
Photo by James Trew / Cunghoctin
Professional microphones are as unique as the instruments they’re built to record, each with their own voices. The Sphere LX is a $1,000 modeling microphone designed to alter its qualities to ape the voices of several extremely expensive studio microphones. James Trew explores what it’s like to use this chameleonic device, comparing it to several of the pro microphones it’s trying to impersonate. I may not find the technical intricacies of audio engineering that gripping, but James’ in-depth report is a must-read, even for me.
Continue Reading.
Farewell, old friend.
After nearly two decades of faithful service, the Xbox 360 store will close for good on July 29, 2024. Microsoft’s Movies & TV app will stop working on the same day as the company pulls the last vestiges of support for its console. The company has already promised games compatible with newer consoles will stay on the Xbox One and Series X/S storefronts. And media bought via the Xbox 360 will stay in your library, so you shouldn’t lose too much of anything.
Continue Reading.
It’s got detachable controllers!
Windows Report
With the Legion Go, Lenovo may have its own rival to the Steam Deck, Ayaneo and ASUS’ ROG Ally. A leak, including product renders, suggests it’s a PC gaming handheld equipped with AMD’s new Phoenix processors and a pair of Switch-like detachable controllers. It looks very possible to prop this thing on a table, addressing the issues of hand fatigue so common with other PC-class handhelds. Just a shame it won’t be able to play Tears of the Kingdom.
Continue Reading.
If those range claims are accurate, it’s pretty compelling.
MullenLowe
The Acura ZDX is the latest all-electric vehicle from Honda’s premium brand, due to launch in early 2024. The ZDX boasts CarPlay, Android Auto, a Bang & Olufsen audio setup and an as-yet unofficial range of 325 miles on a single charge. The base model is likely to cost around $60,000, and it’s certainly a pretty-looking way to get around.