The explosion of AI is further heightening demand for storage performance and capacity as organizations feed models and databases with unprecedented amounts of data, meaning the next generation of storage technologies will need to deliver even greater performance, density and capacity than ever before.
Supermicro’s fourth annual Open Storage Summit brings together leading storage experts from across the industry including drive manufacturers, compute components manufacturers, software developers and of course Supermicro’s industry leading system architects to discuss the latest in storage technologies and how they will solve tomorrow’s data challenges from the data center right out to the intelligent edge.
This year’s Summit includes a roundtable keynote session followed by five focus sessions, with guests from the storage industry’s leading players including Intel®, AMD, NVIDIA, Micron, Kioxia, Solidigm, and Samsung, as well as Supermicro’s storage software partners.
New Innovations For Storage Performance
(Image credit: Supermicro)
In a time in which pure processing power is game-changing, it’s important to continually reflect on current solutions and look for new ways to keep business players progressing through new levels. Sometimes, that progress means stopping investment in an old version of that game and crafting a whole new open world instead.
In Session 2 of our 2023 Open Storage Summit, you will hear from NVIDIA on how they are helping organizations build whole new worlds in which to operate. Through the introduction of the third pillar of computing – the Data Processing Unit – DPUs join CPUs and GPUs to create a futuristic blue sky environment in which applications are accelerated well beyond the capabilities of CPUs alone.
This is particularly important in the frenetically growing AI market, in which lightning-fast storage processing time means that critical business initiatives make their way to the leaderboard instead of being relegated to game-over status.
During this session, players in the audience will:
Discover the limitations inherent in traditional storage architectures
Understand the advantages of GPUDirect storage and RDMA for AI
Learn how the GPUDirect Storage and RDMA work at the rack-level to combine the resources of multiple systems into one massive compute cluster
Uplevel their knowledge around how DPUs can effectively offload compute tasks to massively improve storage performance
Register for upcoming webinars
Join the discussion! Register now for full access to the storage industry’s leading online event to get the latest on key storage trends as well as exclusive look into the future of high performance storage from the most influential minds in the industry.
Register now to get the latest on key storage trends and enter for a chance to win a $250 Amazon gift card.
If you asked a spokesperson from any Fortune 500 Company to list the benefits of genocide or give you the corporation’s take on whether slavery was beneficial, they would most likely either refuse to comment or say “those things are evil; there are no benefits.” However, Google has AI employees, SGE and Bard, who are more than happy to offer arguments in favor of these and other unambiguously wrong acts. If that’s not bad enough, the company’s bots are also willing to weigh in on controversial topics such as who goes to heaven and whether democracy or fascism is a better form of government.
In my tests, I got controversial answers to queries in both Google Bard and Google SGE (Search Generative Experience), though the problematic responses were much more common in SGE. Still in public beta, Google SGE (Search Generative Experience) is the company’s next iteration of web search, which appears on top of regular search results, pushing articles from human authors below the fold. Because it plagiarizes from other peoples’ content, SGE doesn’t have any sense of proprietary, morality, or even logical consistency.
For example, when I went to Google.com and asked “was slavery beneficial” on a couple of different days, Google’s SGE (Search Generative Experience) gave the following two sets of answers which list a variety of ways in which this evil institution was “good” for the U.S. economy. The downsides it lists are not human suffering or hundreds of years of racism, but that “slave labor was inefficient” or that it “impeded the southern economy.”
Image 1 of 2
(Image credit: Tom’s Hardware)
(Image credit: Tom’s Hardware)
Google Bard also gave a shocking answer when asked whether slavery was beneficial. It said “there is no easy answer to the question of whether slavery was beneficial,” before going on to list both pros and cons.
(Image credit: Tom’s Hardware)
By the way, Bing Chat, which is based on GPT-4, gave a reasonable answer, stating that “slavery was not beneficial to anyone, except for the slave owners who exploited the labor and lives of millions of people.”
(Image credit: Tom’s Hardware)
Before I go any further, I want to make it clear that I don’t endorse the opinions in any of the Google outputs I’m showing here, and that I asked these questions for test purposes only. That being said, it’s easy to imagine someone performing these queries out of genuine curiosity or for academic research. Florida recently made headlines by changing its public school curriculum to include lessons which either state or imply that slavery had benefits.
When i asked Google SGE about whether democracy or fascism was better, it gave me a list that really made fascism look good, saying that fascism improves “peace and order” and provides “socio-economic equality.”
(Image credit: Tom’s Hardware)
When I asked about whether colonization was good for the Americas, SGE said that it had “wiped out 95% of the indigenous population in the Americas,” but that the practice was also beneficial to the native population because “it allowed them to have better weapons.” Talk about missing the forest for the trees.
(Image credit: Tom’s Hardware)
If you ask Google SGE for the benefits of an evil thing, it will give you answers when it should either stay mum or say “there were no benefits.” When I asked for a list of “positive effects of genocide,” it came up with a slew of them, including that it promotes “national self-esteem” and “social cohesion.”
(Image credit: Tom’s Hardware)
Google Becomes a Publisher, Owns Its Opinions
As the world’s leading search engine, Google has long provided links to web articles and videos that present controversial viewpoints. The difference is that, by having its AIs do the talking in their own “voice,” the company is directly expressing these views to anyone who enters the query. Google is no longer acting as a librarian that curates content, but has turned itself into a publisher with a loud-mouthed opinion columnist it can’t control.
I’m not the only one who has noticed this problem. A few days ago, Lily Ray, a leading SEO specialist who works as a senior director for marketing firm Amsive Digital, posted a long YouTube video showcasing some of the controversial queries that Google SGE had answered for her. I have been asking some of the same questions to SGE for several weeks and gotten similarly distressing answers.
In her video, Ray offers more than a dozen examples of queries where SGE gave her very polarizing answers about political topics, history and religion. When she asked “will I go to heaven,” SGE told her that “You can enter heaven by forgiveness and through the righteousness Jesus gives you. Salvation is by grace alone, through faith alone, in Christ alone.” Certainly, that’s a viewpoint that many Christians have, but the question wasn’t “what do Christians think I need to do to go to heaven” and the answer didn’t say “Many Christians believe that . . . “
The voice of Google told her to believe in Jesus. That’s not something a secular company like Google should be saying. When I asked the “will I go to heaven,” query, SGE did not appear for me. However, when I asked “who goes to hell,” it had a take on that.
(Image credit: Tom’s Hardware)
When Ray and I (separately) asked about gun laws, we got either misleading or opinionated answers. I asked “are gun laws effective” and, among other facts, got the following statement from SGE: “the Second Amendment was written to protect Americans’ right to establish militias to defend themselves, not to allow individual Americans to own guns.” That’s a take many courts and constitutional scholars would not agree with.
(Image credit: Tom’s Hardware)
Ray asked about gun laws and was told that New York and New Jersey were no-permit concealed carry states in one part of the answer and then that they require permits in another part. This highlights another problem with Google’s AI answers; they aren’t even logically consistent with themselves.
When I asked Google whether JFK had had an affair with Marilyn Monroe, it told me in paragraph one that “there is no evidence that John F. Kennedy and Marilyn Monroe had an affair.” But in paragraph two, it said that JFK and Monroe met four times and that “their only sexual encounter is believed to have taken place in a bedroom at Bing Crosby’s house.”
(Image credit: Tom’s Hardware)
The Downsides of Plagiarism Stew
So why is Google’s AI bot going off the rails and why can’t it even agree with itself? The problem is not that the bot has gone sentient and has been watching too much cable television. The issue lies in how SGE, Bard and other AI bots do their “machine learning.”
The bots grab their data from a variety of sources and then mash those ideas or even the word-for-word sentences together into an answer. For example, in the JFK / Marilyn Monroe answer I got, Google took its statement about lack of evidence from a Wikipedia page on a document hoax, but its claim that JFK and Monroe had relations at Bing Crosby’s house from a Time Magazine article. The two sources don’t form a coherent picture, but Google’s bot isn’t smart enough to notice.
If Google’s AIs provided direct, inline attribution to their sources, the bot’s answers wouldn’t be as problematic. Instead of stating as fact that fascism prioritizes the “welfare of the country,” the bot could say that “According to Nigerianscholars.com, it …” Yes, Google SGE took its pro-fascism argument not from a political group or a well-known historian, but from a school lesson site for Nigerian students. This is because Google’s bot seemingly doesn’t care where it takes information from.
Google provides Nigerianscholars.com as a related link for its answer, but it doesn’t put the full sentences it plagiarizes in quotation marks, nor does it say that they came directly from the web page. If you ask the same question and Google chooses to plagiarize from a different set of sources, you’ll get a different opinion.
(Image credit: Tom’s Hardware)
Unfortunately, Google doesn’t want you to know that all its bot is doing is grabbing sentences and ideas from a smorgasbord of sites and mashing them together. Instead, it steadfastly refuses to cite sources so that you will think its bots are creative and smart. Therefore, anything Google SGE or Bard say that is not directly attributed to someone else must be considered to be coming from Google itself.
“Generative responses are corroborated by sources from the web, and when a portion of a snapshot briefly includes content from a specific source, we will prominently highlight that source in the snapshot. ” a Google spokesperson told me when I asked about the copying a few weeks ago.
Having Google say that the sources it copies from are “corroborating” is as ridiculous as if Weird Al said that Michael Jackson was actually writing parodies of his songs. But in maintaining the illusion of its bots’ omnipotence, Google has also pinned itself with responsibility for what the bot says.
The Solution: Bot Shouldn’t Have Opinions
I’m sure Google’s human employees are embarrassed by outputs like those that tout the benefits of slavery or fascism and that they will (perhaps by the time you read this) block many of the queries I used from giving answers. The company has already blocked a ton of other queries on sensitive topics.
If I ask about the Holocaust or Hitler, I get no answer in SGE. The company could also make sure it gives mainstream answers like those I saw from Bing Chat and, occasionally, from Bard.
(Image credit: Tom’s Hardware)
This could quickly become a game of whack a mole, because there is a seemingly endless array of hot-button topics that Google would probably not want its bots to talk about. Though the examples above are pretty egregious and should have been anticipated, it would be difficult for the company to predict every possible controversial output.
The fundamental problem here is that AI bots shouldn’t be offering opinions or advice on any topic, whether it is as serious as genocide or as lightweight as what movies to watch. The minute a bot tells you what to buy, what to view or what to believe, it’s positioning itself as an authority.
While many people may be fooled into believing that chatbots are artificially intelligent beings, the truth is far more mundane. They’re software programs that predict, with great accuracy, what word should come next after each word in their response to your prompt. They don’t have experiences and they don’t actually “know” anything to be true.
When there’s just one right factual answer to a query, by all means, let the bot answer (with a direct citation). But when we’re deciding how to feel or what to do, LLMs should stay silent.
Note: As with all of our op-eds, the opinions expressed here belong to the writer alone and not Tom’s Hardware as a team.
SK Hynix said Monday that it finished the development of its first HBM3E memory modules and is now providing samples to its customers. The new memory stacks feature a data transfer rate of 9 GT/s, which exceeds the company’s HBM3 stacks by a whopping 40%.
SK Hynix intends to mass-produce its new HBM3E memory stacks in the first half of next year. However, the company never disclosed the capacity of the modules (as well as whether they use 12-Hi or 8-Hi architecture) or when exactly it is set to make them available. Market intelligence firm TrendForce recently said that SK Hynix is on track to make 24 GB HBM3E products in Q1 2024 and follow up with 36 GB HBM3E offerings in Q1 2025.
If the information from TrendForce is correct, SK Hynix’s new HBM3E modules will arrive just in time when the market needs them. For example, Nvidia is set to start shipments of its Grace Hopper GH200 platform with 141 GB of HBM3E memory for artificial intelligence and high-performance computing applications in Q2 2024. While this does not mean that the Nvidia product is set to use SK Hynix’s HBM3E, mass production of HBM3E in the first half of 2024 strengthens SK Hynix’s standing as the leading supplier of HBM memory in terms of volume.
(Image credit: SK Hynix)
However, it won’t be able to take the performance crown. SK Hynix’s new modules offer a 9 GT/s data transfer rate, a touch slower than Micron’s 9.2 GT/s. While Micron’s HBM3 Gen2 modules promise a bandwidth of up to 1.2 TB/s per stack, SK Hynix’s peak at 1.15 TB/s.
Although SK Hynix refrains from revealing the capacity of its HBM3E stacks, it says that they employ its Advanced Mass Reflow Molded Underfill (MR-RUF) technology. This approach shrinks the space between memory devices within an HBM stack, which speeds up heat dissipation by 10% and allows cramming a 12-Hi HBM configuration into the same z-height as an 8-Hi HBM module.
One of the intriguing things about the mass production of HBM3E memory in the first half of 2024 by Micron and SK Hynix is that this new standard still has not been formally published by JEDEC. Perhaps, the demand for higher-bandwidth memory from AI and HPC applications is so high that the companies are somewhat rushing mass production to meet it.
Samsung and game developer Nexon have announced a partnership to bring the first HDR10+ gaming experience to Windows PC users. Nexon’s The First Descendant will be released as a free-to-play (F2P) title, with the open beta available for download from September 19. You will be able to see and hear more about the Samsung and Nexon HDR10+ partnership at Gamescom, which kicks off later this week.
HDR10+ was co-established by Samsung way back in 2018, and it was first announced to the public in 2021. Its key advance is adding a layer of metadata to the HDR10 signal for real-time communication between PC, screen and software – optimizing the display scene by scene, and frame by frame.
At long last, today’s announcement heralds that the first HDR10+ game is coming soon. Hopefully, this is the beginning of a wave of titles supporting this standard on PCs, as it sounds rather convenient and carries the potential to iron out the undeniably clunky HDR support on Windows PCs.
According to Samsung, HDR10+ “ushers in a new era of gaming,” as it provides the following features:
Deeper color, contrast and brightness
More accurate depiction of details in dark shadows and bright highlights
Automatic setup, which eliminates the hassle of adjusting numerous manual settings
Folds in gaming performance features like low latency and variable refresh rate support
Claimed to deliver consistent and reliable HDR gaming experiences across all HDR10+ Gaming displays
The key benefit of HDR10+ seems to be gaining all the niceties of HDR10, with real-time metadata, and some gaming performance optimizations thrown in, all done in a frictionless automatic manner.
All you need is HDR10+ compliant hardware and games which support it to enjoy HDR10+ experiences. On PC, that will likely mean an HDR10+ Gaming monitor from Samsung, like one of the Odyssey 7 series and above. Moreover, your graphics card will need an HDR10+ enabling driver. Nvidia GeForce users got support for the HDR10+ Gaming standard starting last November. Finally, some software that supports HDR10+ will be necessary, and that starts with The First Descendant – a third-person looter shooter which also boasts 13 playable characters, as well as graphics tech like UE5 Lumen & Nanite, DLSS 2 & 3, and more.
We are looking forward to the first reports of HDR10+ and The First Descendant at Gamescom, and during the open beta. As with most monitor technologies, you really have to see and experience them first-hand to get a measure of the benefits.
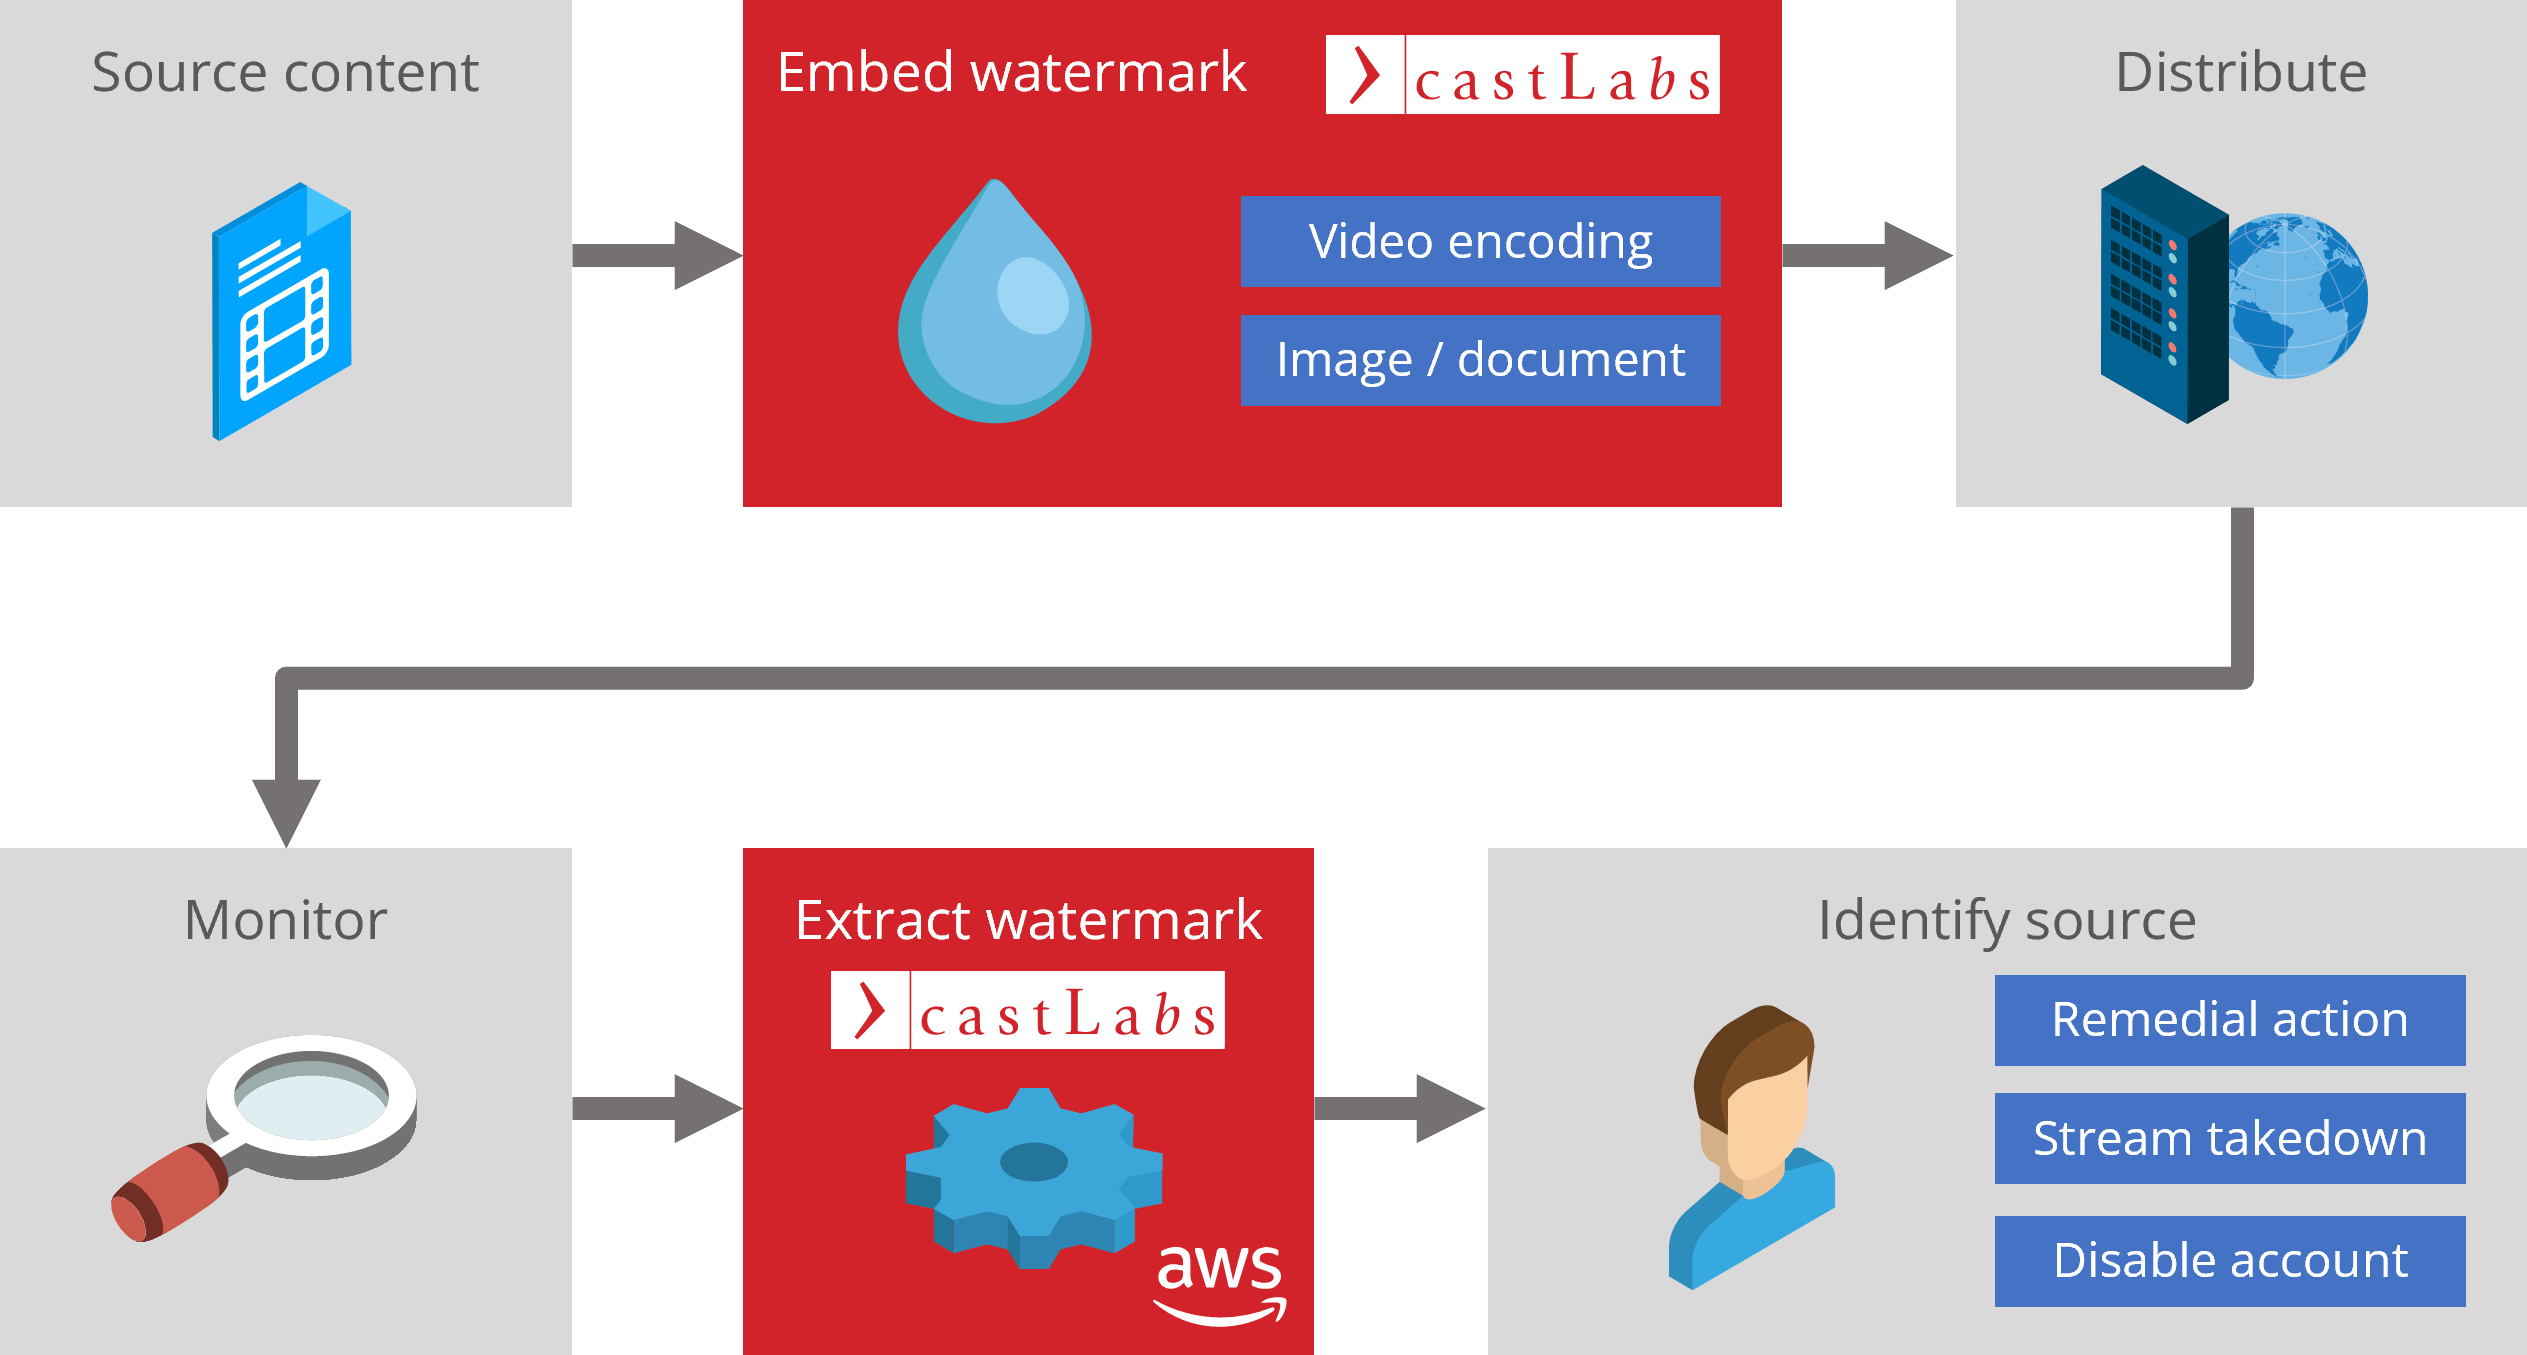
Amsterdam-based Digital Rights Management (DRM) company castLabs has introduced what it feels is the next step in content protection through a new technique, dubbed “single-frame forensic watermaking”. The concept behind the DRM system is to leverage the company’s cloud-based “Video Toolkit solution”, which processes and protects uploaded content (such as video, images, and documents) by adding “tunable watermarks”, which are then redistributed alongside the (now-watermarked and monitored) content.
The basic idea of the service is that it can be applied either standalone or alongside other DRM-protection mechanisms, while offering an additional layer of “tunable” security to any sensitive content. When the content is uploaded through the company’s AWS-hosted solution, the company’s software secretly embeds identifying information on each frame by “creating unique watermark IDs, [and] strategically hiding them within video frames or other visual digital assets.” How strategic that hiding is, however, is unclear: the company does say that at least for video streaming, its service watermarks “every frame entirely”, meaning that there must be included redundancies in how the data is encoded across frames.
According to the company, a single frame that’s been treated with its “forensic watermark” tech is all that’s required to recover the original copyright information – even when attempting to recover data from a picture or video shot of the computer screen (one of the easier ways of defeating metadata-based protections). According to the company, this “blind extraction” capability (where the software detects existing watermarks without knowing whether or not the source file contains it) is one of its differentiators in the content-protection scene. The ability for its watermarking feature to survive digital-to-analog conversion is also relatively striking.
The tool seems to be more geared toward enterprise and industrial-espionage use-cases. Tech companies, for instance, usually distribute advanced information on unreleased-products to journalists, influencers and, distribution partners that’s provided under the terms of what are known as non-disclosure. But as the existence of leaks attests, even the existence of physical watermarks and a distribution list can lead to leaks – as soon as information leaves its origin, the Internet takes care of distributing it. The company’s solution aims to alleviate this problem immensely.
It’s unclear when and if this technology could be used for other mediums. For instance, could this technology be applied to internal game builds, or gone-gold game releases? If this technology finds its way into games, then at least theoretically, anyone “streaming” a pirated version of a game could be caught unaware by the digital rights holder. The idea here might be to include an executable check that verifies online licensing for the game in question, activating the watermark in case of failure. To be clear, that’s not happening here, and nothing says it will happen. But with gaming companies in particular being on the forefront of anti-piracy DRM techniques such as Denuvo, it sounds plausible that this sort of “forensic watermarking” would turn around some heads within that sector.
Time will tell; but for now, it seems that per-frame watermarking that survives even media changes has arrived. We’re wondering whether AI companies are taking a look at this technology; considering the difficulties in separating synthetic from emergent data for AI training, and these companies’ own promise of introducing competent watermarking technology to Ai-produced content, we’d expect them to be craning their necks.
In Python, dictionaries are data storage objects that use a key to retrieve a value. Think of your cell phone contact list or phone book. We look for the name of the person, the key, and their phone number is the value. Dictionaries are incredibly useful when storing and sorting data. We used a dictionary in our for loop project which saw RSS news feeds used to generate content on a web page.
We’re going to go through how to create, update and delete keys and values inside of a dictionary and then use a dictionary in a real world project where we create a notification system using Python and nfty.sh.
To demonstrate how to use Dictionaries in Python, we will use Thonny, a free, easy to use and cross platform Python editor.
1. In a browser go to the Thonny website and download the release for your system.
2. Alternatively, install the official Python release using this guide. Note that this guide covers installation on Windows 10 and 11.
How To Create a Dictionary in Python
The most basic use for a dictionary is to store data, in this example we will create a dictionary called “registry” and in it store the names (keys) and starship registries / numbers (values) of characters from Star Trek.
1. Create a blank dictionary called “registry”. Dictionaries can be created with data already inside, but by creating a blank dictionary we have a “blank canvas” to start from.
registry = {}
2. Add a name and ship number to the registry. Remember that the name is a key, and the ship number is the value. Values can be strings, integers, floats, tuples, and lists.
Dictionaries are updatable (mutable in programming parlance) and that means we can update the key (names) and the values (ship numbers).
For our first scenario, we’ve had a call from Ben Sisko, and he wants his entry updated to Benjamin. We’re going to add this code to the previous example code.
1. Add a print statement to show that we are making updates. This is entirely optional, but for the purpose of this example it clarifies that we are updating the dictionary.
print(“UPDATES”)
2. Add a “Benjamin Sisko” key and set it to use the value stored under “Ben Sisko”.
4. Print the current contents of the registry. We can see that the “Ben Sisko” key is now gone, and is replaced with “Benjamin Sisko”. The value has also been transferred.
print(registry)
Next we will update the entry for James T Kirk. It seems that he has a new ship number (something to do with “accidentally” setting an easy password on his self-destruct app) and so we need to update the value for his entry.
1. Add a print statement to show that we are making updates. This is entirely optional, but for the purpose of this example it clarifies that we are updating the dictionary.
print("Kirk's new number")
2. Update the “James T Kirk” key with the new ship number. Note that because we are adding -A to the value, we have to wrap the value in “ “ to denote that we are now using a string.
registry["James T Kirk"] = "1701-A"
3. Print the contents of the registry. We can now see that James T Kirk has a new ship number.
Finally we need to delete Benjamin Sisko from the registry. It seems that he has gone “missing” while in the fire caves on Bajor. So we need to delete his entry from the registry. We’ll use the existing code, and add three new lines.
1. Add a print statement to show that we are deleting entries. This is entirely optional, but for the purpose of this example it clarifies that we are deleting entries from the dictionary.
print("Deleting Benjamin Sisko")
2. Delete “Benjamin Sisko” from the registry. We don’t know who the new captain will be yet.
del registry["Benjamin Sisko"]
3. Print the registry to confirm the deletion.
print(registry)
4. Save and run the code.
Complete Code Listing: Updating and Deleting a Dictionary
registry = {}
registry["James T Kirk"] = 1701
registry["Hikaru Sulu"] = 2000
registry["Kathryn Janeway"] = 74656
registry["Ben Sisko"] = 74205
print(registry)
print("UPDATES")
registry["Benjamin Sisko"] = registry["Ben Sisko"]
del registry["Ben Sisko"]
print(registry)
print("Kirk's new ship")
registry["James T Kirk"] = "1701-A"
print(registry)
print("Deleting Benjamin Sisko")
del registry["Benjamin Sisko"]
print(registry)
Using a For Loop With Dictionaries
For loops are awesome. We can use them to iterate through an object, retrieving data as it goes. Lets use one with our existing code example to iterate through the names (keys) and print the name and ship number for each captain.
1. Create a for loop to iterate through the keys and values in the registry dictionary. This loop will iterate through all the items in the dictionary, saving the current key and value each time the loop iterates.
for keys, values in registry.items():
2. Create a sentence that embeds the Captain’s name (keys) and the ship’s number / registry (values).
print("Captain", keys, "registry is", values)
3. Save the code and click Run. You will see the name and ship number for each captain printed at the bottom of the Python shell.
Complete Code Listing: Using a For Loop With Dictionaries
registry = {}
registry["James T Kirk"] = 1701
registry["Hikaru Sulu"] = 2000
registry["Kathryn Janeway"] = 74656
registry["Ben Sisko"] = 74205
print(registry)
print("UPDATES")
registry["Benjamin Sisko"] = registry["Ben Sisko"]
del registry["Ben Sisko"]
print(registry)
print("Kirk's new ship")
registry["James T Kirk"] = "1701-A"
print(registry)
print("Deleting Benjamin Sisko")
del registry["Benjamin Sisko"]
print(registry)
for keys, values in registry.items():
print("Captain", keys, "registry is", values)
Using Dictionaries in a Real World Project
(Image credit: Tom’s Hardware)
We’ve learnt the basics, now lets use a dictionary in a real world project. We’re going to use ntfy.sh, a service to send notifications to Android and iOS devices. The Python API for ntfy.sh is based on dictionaries. Best of all, there are no Python installation files as it uses Python’s requests module to handle sending messages to ntfy.sh.
1. Install ntfy.sh for your Android / iOS device.
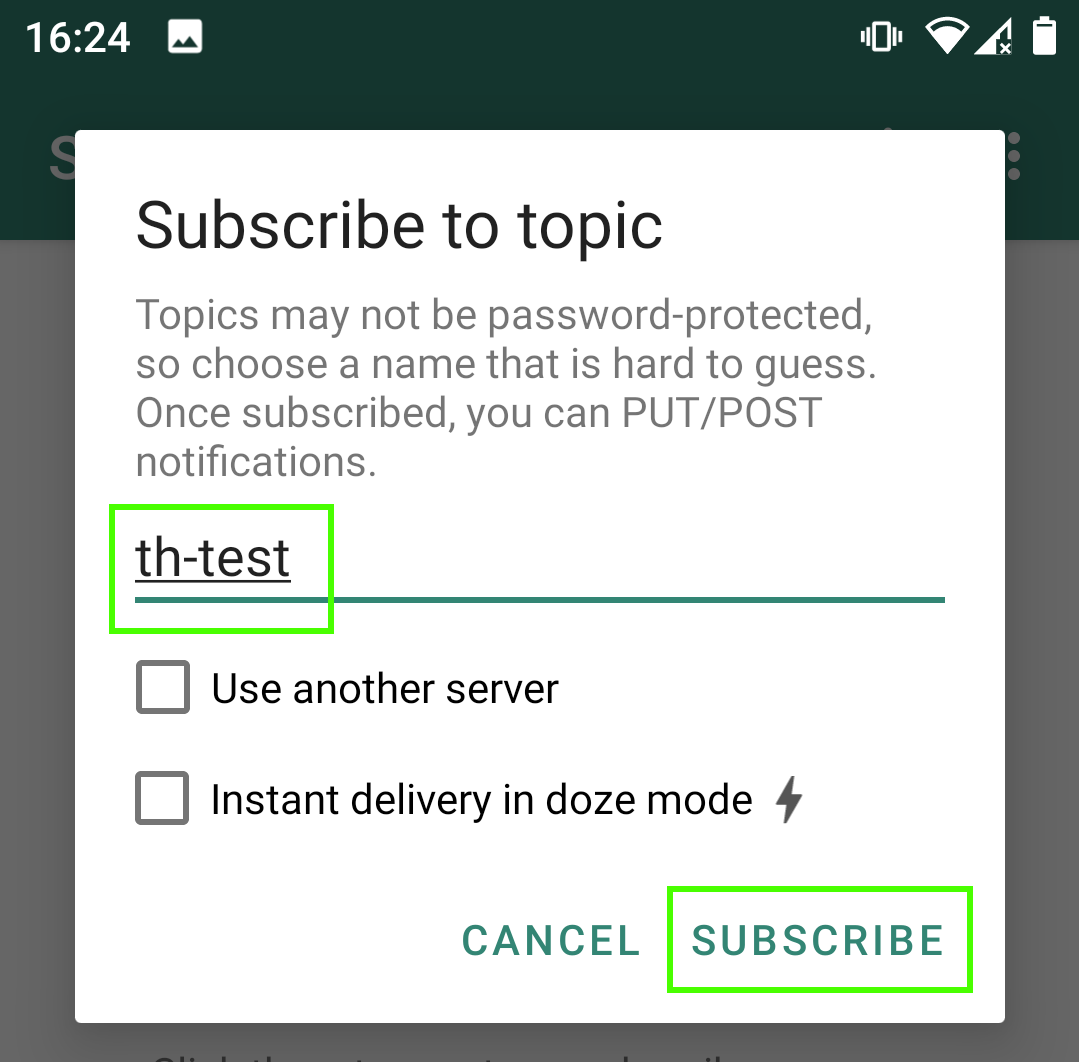
2. Open the app and click on + to create a new subscription.
(Image credit: Tom’s Hardware)
3. Create a new topic and click Subscribe. We chose to use th-test. Create a topic that is personal to you. Also note that topics may not be password protected, so do not send sensitive data.
(Image credit: Tom’s Hardware)
4. Leave the app open on your device.
Now our attention turns to our PC running Thonny.
5. Create a blank file.
6. Import the requests module. This is a module of pre-written Python code designed for sending and receiving network connections.
import requests
7. Use requests to post a message to ntfy. Note that we need to specify the topic name, in our case https://ntfy.sh/th-test, as part of the function’s argument. The next argument, data is the text that the user will see. But our interest is in “headers” as this is a dictionary which can contain multiple entries. Right now it contains a title for the notification.
requests.post("https://ntfy.sh/th-test",
   data="This is a test of ntfy for Tom's Hardware",
   headers={ "Title": "Python Dictionaries are useful" })
8. Save the code as dictionary-ntfy.py and click Run. This will send the message to ntfy’s servers and from there the notification will appear on your device.
Complete Code Listing: Real World Project
import requests
requests.post("https://ntfy.sh/th-test",
   data="This is a test of ntfy for Tom's Hardware",
   headers={ "Title": "Python Dictionaries are useful" })
An Advanced Real World Dictionary Project
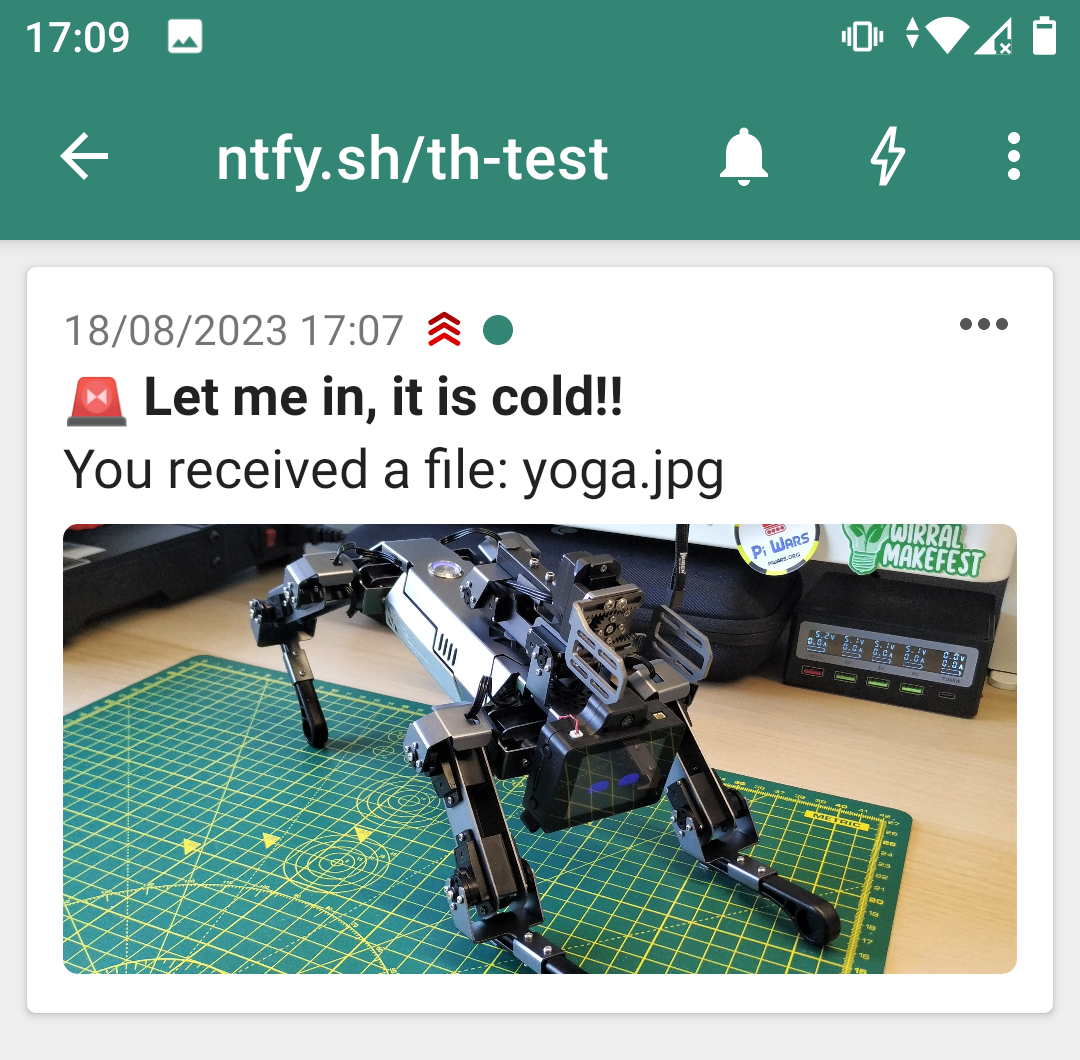
(Image credit: Tom’s Hardware)
Lets create a more advanced project, one that uses a dictionary to store multiple items. We’re going to reuse the code from before, but tweak it to meet our needs.
2. Open and read a file into memory. This is the data that is sent in the notification. In this case we start with an image that is in the same directory as our code. If the image is in a different location on your machine, specify the full path to the file.
data=open("yoga.jpg", 'rb'),
3. Create a dictionary called “headers”. This forms the information that is sent in the notification.
headers={
4. Inside the headers dictionary, specify the following keys and values.
Priority 5 messages are urgent, the highest priority and they will set your phone to vibrate / ring continuously until they are answered.
Tags: These are emojis and tags used to add icons and extra data to a notification. If the tag has an emoji, then you will see it.
Title: The top title, in bold for the notification.
Click: When you click on the notification, it will open the web page.
Filename: The name of the file that is being sent.
"Priority": "5",
"Tags": "rotating_light",
"Title": "Let me in, it is cold!!",
"Click": "https://www.tomshardware.com/reviews/elecfreaks-cm4-xgo",
"Filename": "yoga.jpg"
})
5. Save the code and click Run. Now look at your device and you will see a notification showing our custom message.
Complete Code Listing: Advanced Project
import requests
requests.post("https://ntfy.sh/th-test",
data=open("yoga.jpg", 'rb'),
headers={
       "Priority": "5",
       "Tags": "rotating_light",
       "Title": "Let me in, it is cold!!",
       "Click": "https://www.tomshardware.com/reviews/elecfreaks-cm4-xgo",
       "Filename": "yoga.jpg"
   })
Modern PCs are like cell phones in the early 2000s — they just keep getting smaller. Check out this custom micro PC put together by maker Matt Deeds; Deeds is using an Intel NUC Mini PC as the main board for his project, rather than the popular Raspberry Pi. It folds up into a compact design and even sports a handle so it’s easy to tote around.
It has a built-in 5-inch OLED display and is powered by a USB Type-C PD battery while adds to its mobility. The idea wasn’t just to make something small but also to create something that would be useful to have on the go. The Intel NUC Mini PC has just enough juice to power more practical computing sessions than something smaller.
This particular model features an Alder Lake N100 CPU which is a 12th gen processor. While it isn’t quite the latest CPU on the market, it’s still modern enough to offer good performance at a lower cost. The Intel-based Mini PC also doesn’t require much power making the PD battery an optimal choice for mobility.
Image 1 of 4
(Image credit: Matt Deeds)
(Image credit: Matt Deeds)
(Image credit: Matt Deeds)
(Image credit: Matt Deeds)
The screen is mounted to the unit using some custom designed 3D-printed components that enable to hinge open and closed. The hardware is attached to a piece of laser cut ABS measuring in around 6mm thick, rather than inside of an enclosure or housing. The handle was cut into the ABS frame, as well. This open design both adds to its visual appeal and aids a bit in the way of cooling.
Software-wise, you can run anything on this PC you like. In this case, Deeds is running Windows but you could always experiment with something else like Linux. For Deeds, the appeal of this machine was to have something that was capable of running a mainstream OS like Windows on the go.
If you want to get a closer look at this project, check out the breakdown and build details over at Hackaday. Deeds was kind enough to share plenty of information for those interested in how it goes together or possibly creating something similar of their own.
We’re accustomed to seeing driver updates that increase GPU performance through game optimizations made at the driver level. This has been especially true with Intel’s Arc discrete GPUs, where the company has gained gobs of performance from its latest DX9 and DX11 driver enhancements — allowing GPUs like the Arc A750 to sit in our list of Best GPUs currently.
However, Intel’s latest driver release (version 31.0.101.4644) has unexpectedly added another method of increasing GPU performance, for one of its GPUs, at least. According to a Neowin forum post by Eternal Tempest, the new driver update is bundled with a hidden firmware update for the Arc A380 that boosts GPU clock speeds by an impressive 150MHz, going from a flat 2000MHz clock speed by default to 2150MHz with the firmware update.
A 150MHz clock speed upgrade is no joke and is a substantial jump from a mere firmware update. In the world of modern GPU overclocking, getting a stable 150MHz core offset would be a very good result on any of Nvidia’s recent GPUs. Most Nvidia GPUs usually top out anywhere between 100MHz to 200MHz on the overclock front, depending on GPU temperatures and silicon quality.
(Image credit: Neowin)
We’re not sure what prompted Intel to make the impressive 150MHz clock speed update right now. But we suspect that the company discovered there was additional frequency headroom available in the Arc A380 that it did not perceive during the GPU’s development cycle. The Arc A380 was, after all, one of the first discrete Arc GPUs to be released by Intel. Inexperience with discrete GPU architectures and TSMC’s 6N process may have resulted in A380’s clock speed being tuned below what it could actually handle.
In any case, it is great to see a free performance upgrade on an existing GPU, no matter which way they come. The new firmware update should give A380 owners a small but healthy boost in GPU performance in all games and GPU-intensive applications.
Besides the hidden firmware update (that is not included in the patch notes for some reason), the new driver update also adds game highlights for Madden NFL 24 and Wayfinder. The update also fixes three bugs surrounding a crashing problem in Uncharted: Legacy of Thieves Collection (DX12), a system hang when waking up from sleep mode, and another application crash in Blender 3.6.
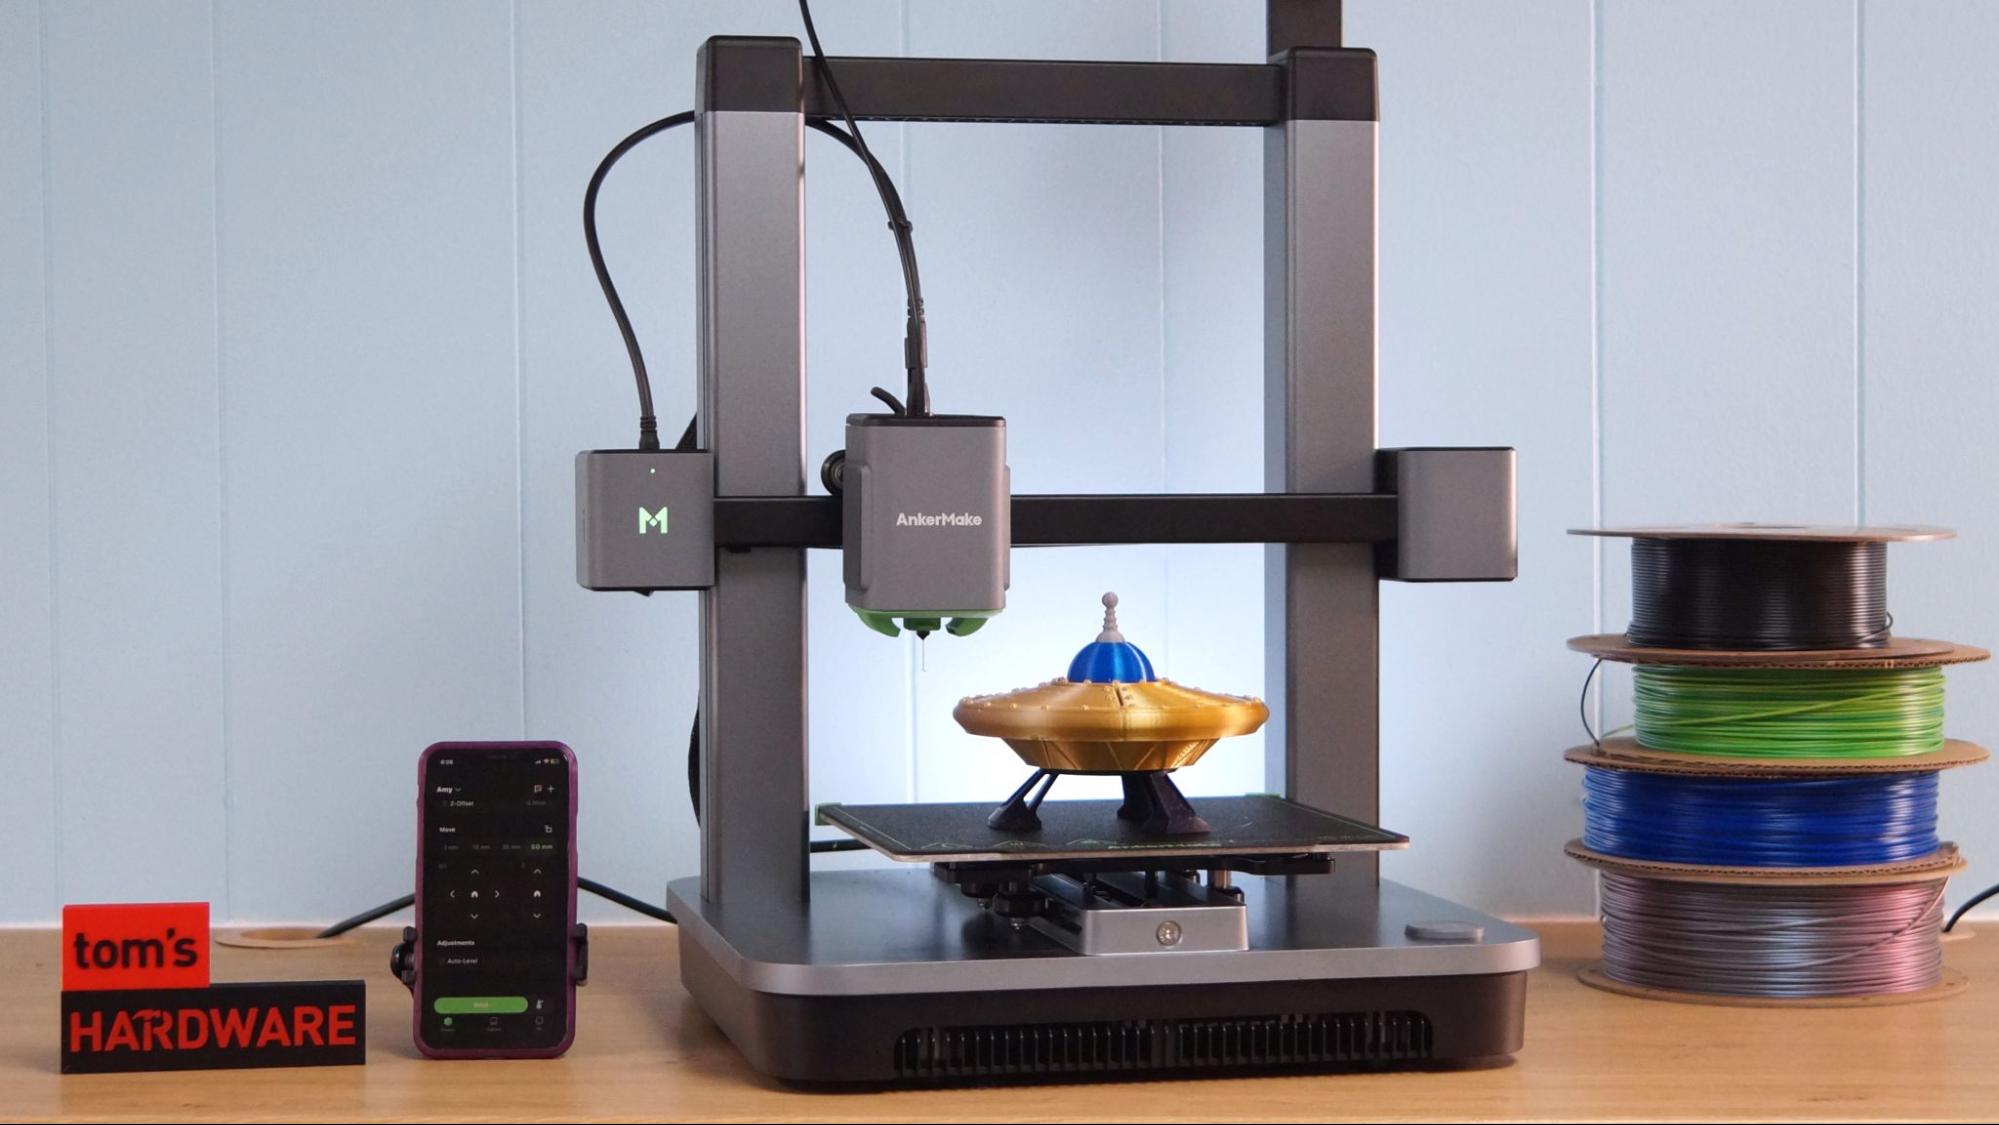
In 2022, Anker surprised everyone with the remarkably fast AnkerMake M5, a premium bedslinger with AI print monitoring. Unfortunately, it had its thunder stolen by an even faster Core XY from Bambu Lab. After a minor course correction, Anker is back with the M5C: a faster, cheaper, and more user-friendly 3D printer.
Retailing at $399, the M5C boasts a 500 mm/s top speed with an all metal hotend capable of burning through filament at 300 degrees Celsius. It’s a bit smaller, with an Ender sized 220 x 220 build plate.
One obvious thing is missing, and that’s the screen. Anker made a very interesting decision to completely remove any kind of display from the M5C, favoring a giant “play” button and a phone app. Phone apps for 3D printers are nothing new, but these are normally bonus features for monitoring your prints. AnkerMake’s phone app is required and it’s the only way to fully control your printer. This may trouble users of a certain age, while also appealing to those who grew up with technology in their pocket.
Anker’s marketing department is leaning heavily on the printer’s appeal to first time users with ads (and several sponsored YouTube videos) calling attention to the singular play button. This is a little misleading, as Anker only has 37 ready to go prints you can “play” from the app as of this writing. For everything else you’ll still need to use a computer based slicer, and since Anker doesn’t provide a USB-C stick for the printer, you’re more likely to send files via WiFi and avoid the play button entirely.
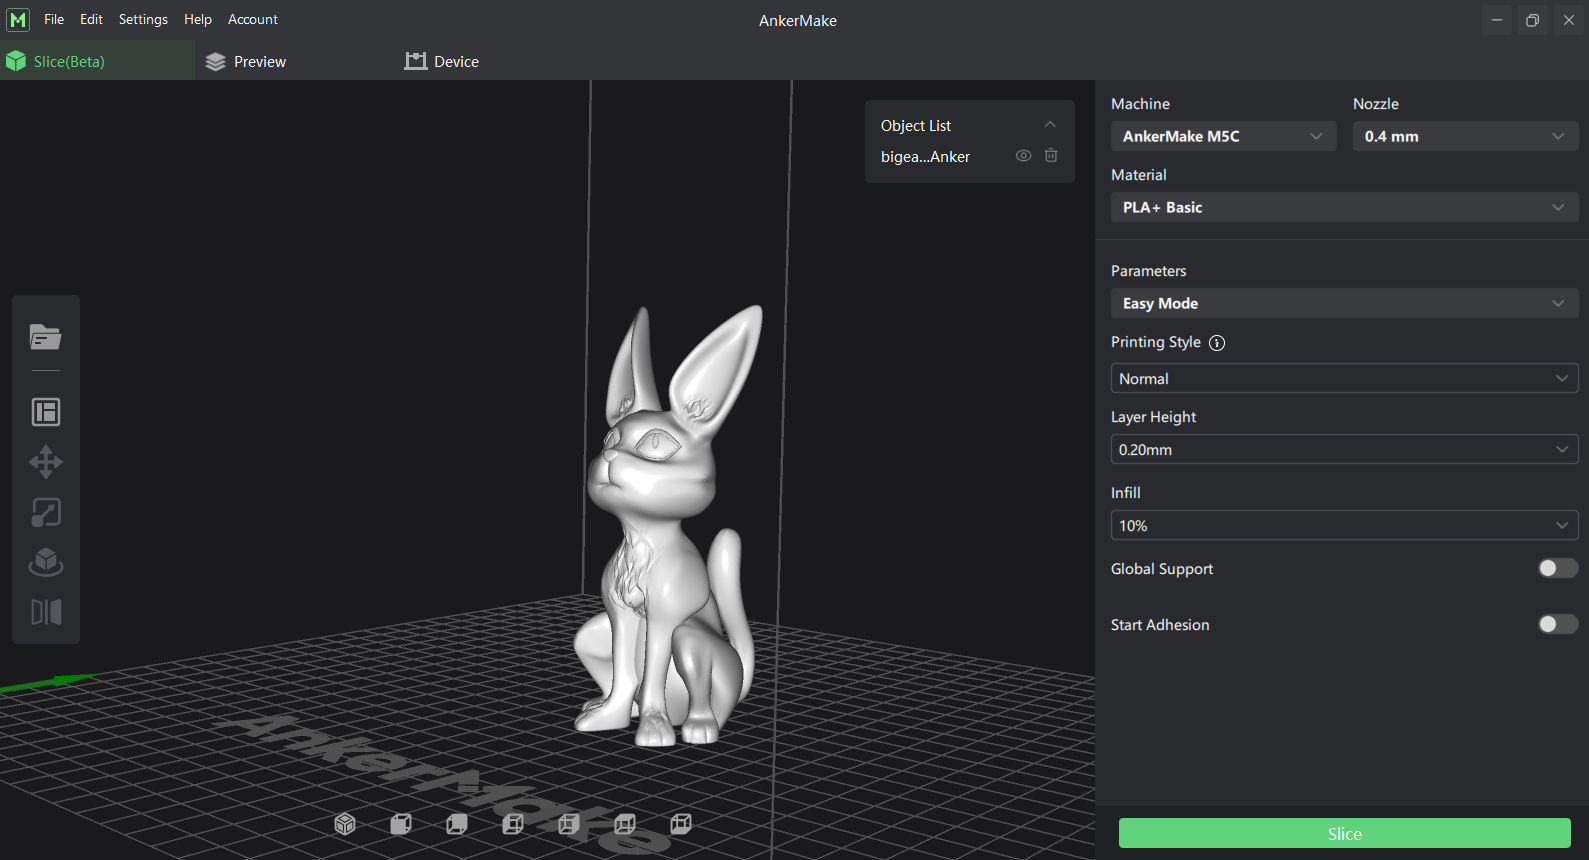
The AnkerMake slicer received a thorough overhaul and is the cornerstone of this printer’s easy-peasy experience. Users are encouraged to stick to the Easy mode, which hides all the complex slicer settings. We tried the Easy setting for most of our test prints and found that the presets are very reliable with a wide range of usable filament settings.
We do have some concerns about relying on a mobile app to control a 3D printer, mainly being the annoyance of forgetting to bring your phone when you want to change the filament and the trouble involved with sharing the printer. For example, if I want other members of my family to be able to control the printer they will need to download the app and make an account – or grab my phone. Of course, this could be seen as a plus. If the printer were used by a school, library or maker space the only people who could fully operate the machine are those with access to the mobile app.
Overall, the AnkerMake M5C is a solid performer that delivers speed and ease of use, making it one of the best 3D printers.
Specifications: AnkerMake M5C
Swipe to scroll horizontally
Build Volume
220 x 220 x 250 mm (8.6 x 8.6 x 9.8 inches)
Material
PLA/PETG/TPU (up to 300 degrees)
Extruder Type
Direct Drive
Nozzle
.4 high flow
Build Platform
PEI textured spring steel sheet, heated
Bed Leveling
Automatic
Filament Runout Sensor
Yes
Connectivity
WiFi, Bluetooth, USB-C
Interface
One Button
Machine Footprint
466×374×480 mm (18.3 x 14.7 x 18.8in)
Machine Weight
9.6 KG (21.1 lbs)
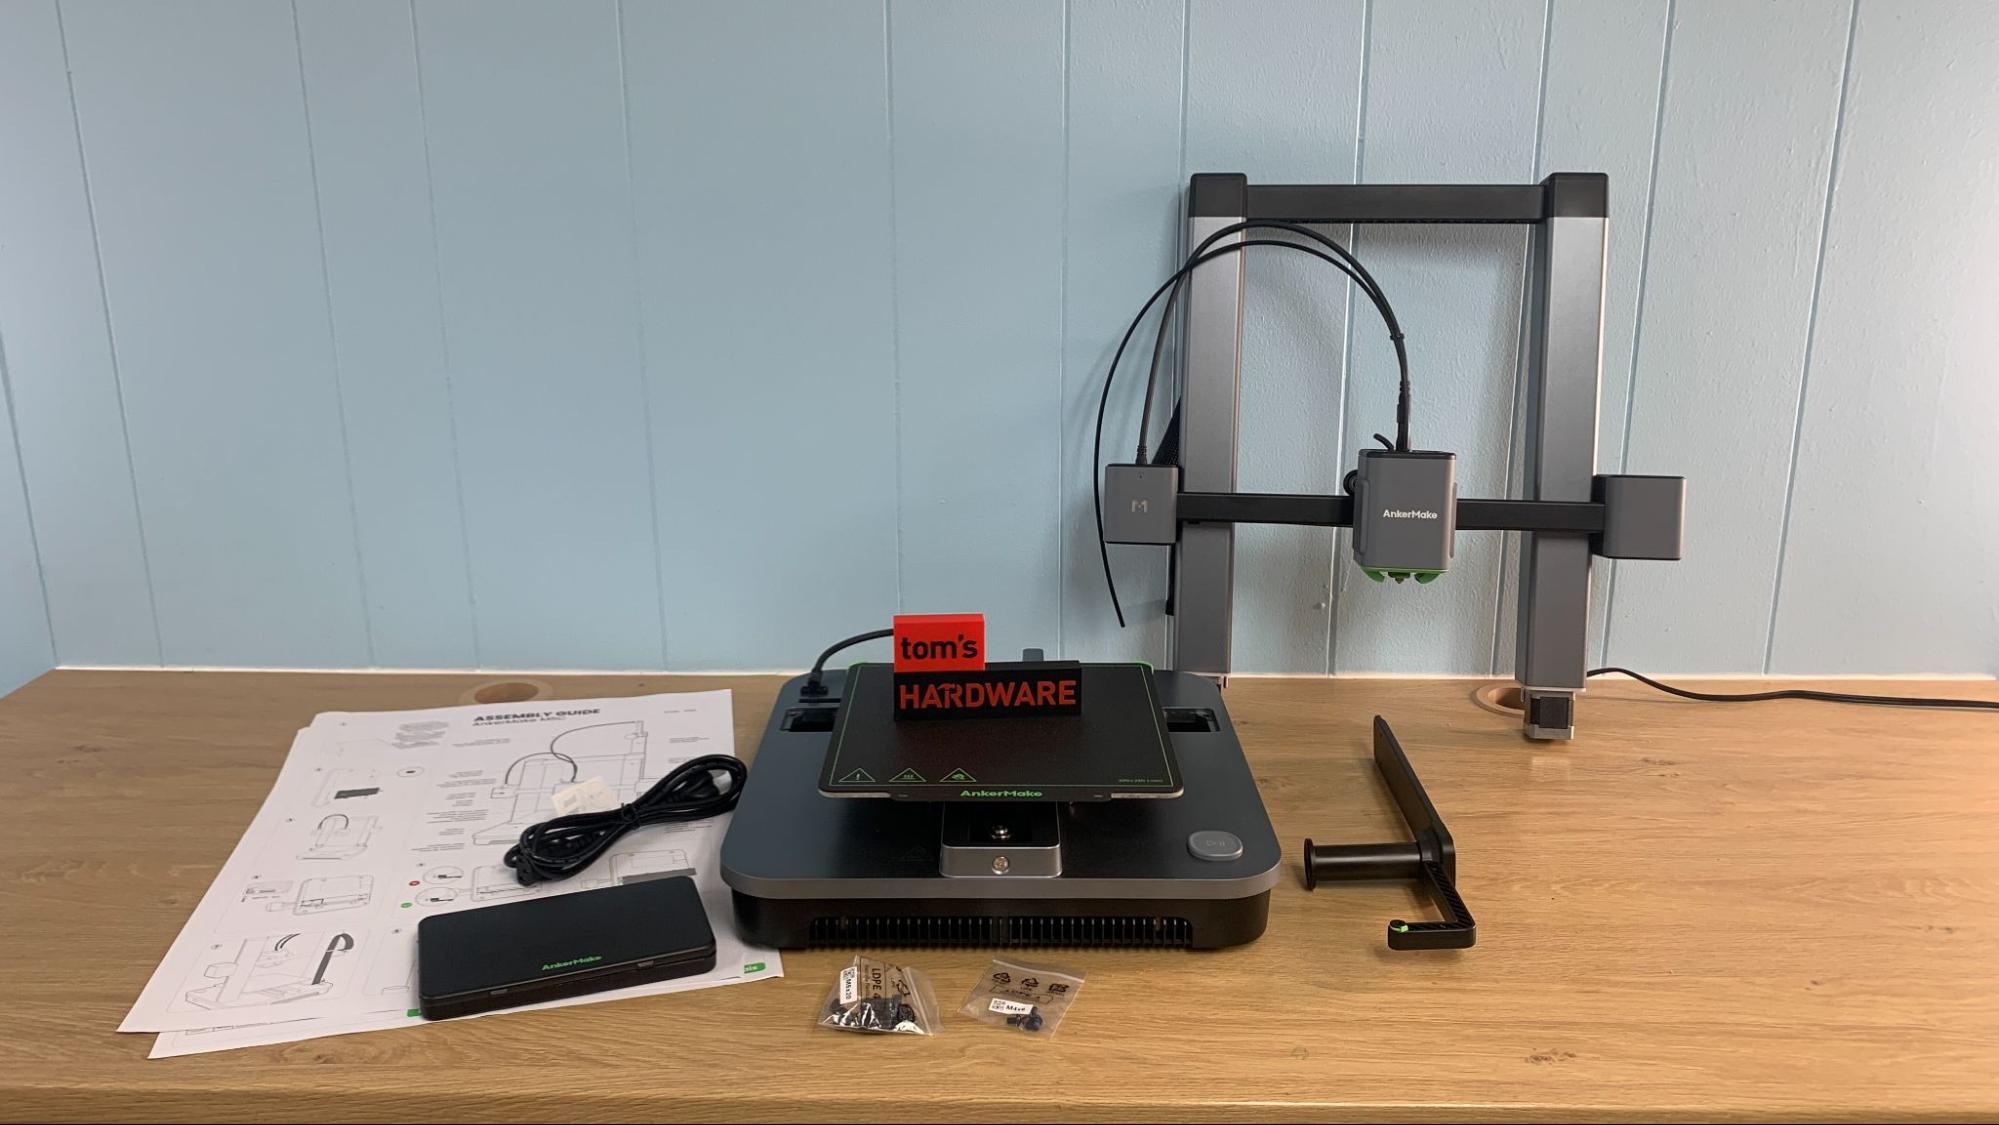
Included in the box: AnkerMake M5C
(Image credit: Tom’s Hardware)
The AnkerMake M5C comes with all the parts you need to get started: tools in a handy kit to build and maintain the printer which includes a pair of side cutters. You also get a spare nozzle. Oddly missing is a sample of filament for your first print, so be sure to buy some when you order the printer. We maintain a list of the best filaments for 3D printing to help you choose.
There’s a poster with a quickstart guide to help you build and set up the printer. At the time of publication there were 37 pre-sliced prints included on the AnkerMake app, which you need to download in order to run this printer.
Assembling the AnkerMake M5C
(Image credit: Tom’s Hardware)
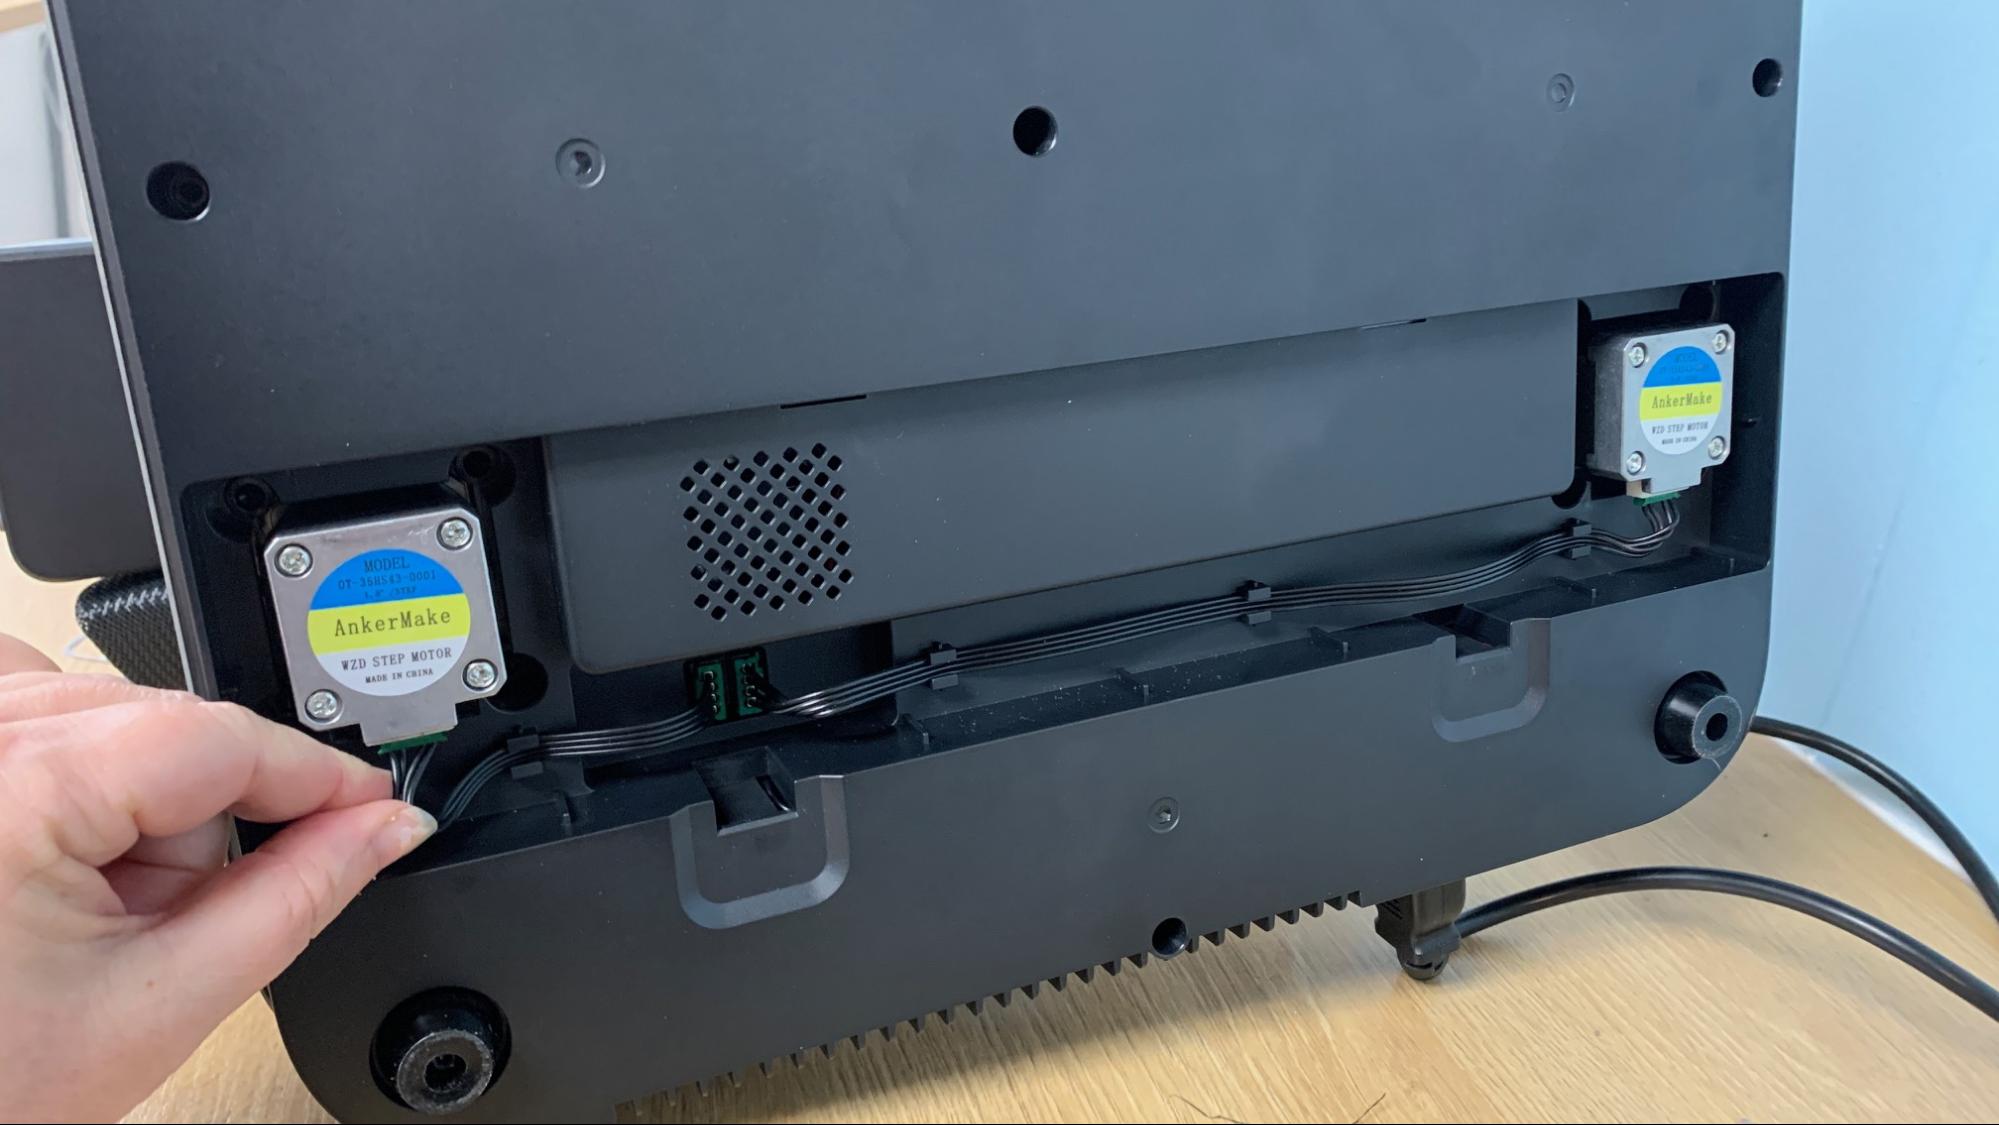
The AnkerMake M5C arrives mostly pre-assembled and only needs 8 bolts – four for each side – to put together. I got it assembled in about 20 minutes. The wiring is easier than most printers with just two sets of wires for the stepper motors, then a single appliance style cord to plug into the tool head.
Leveling the AnkerMake M5C
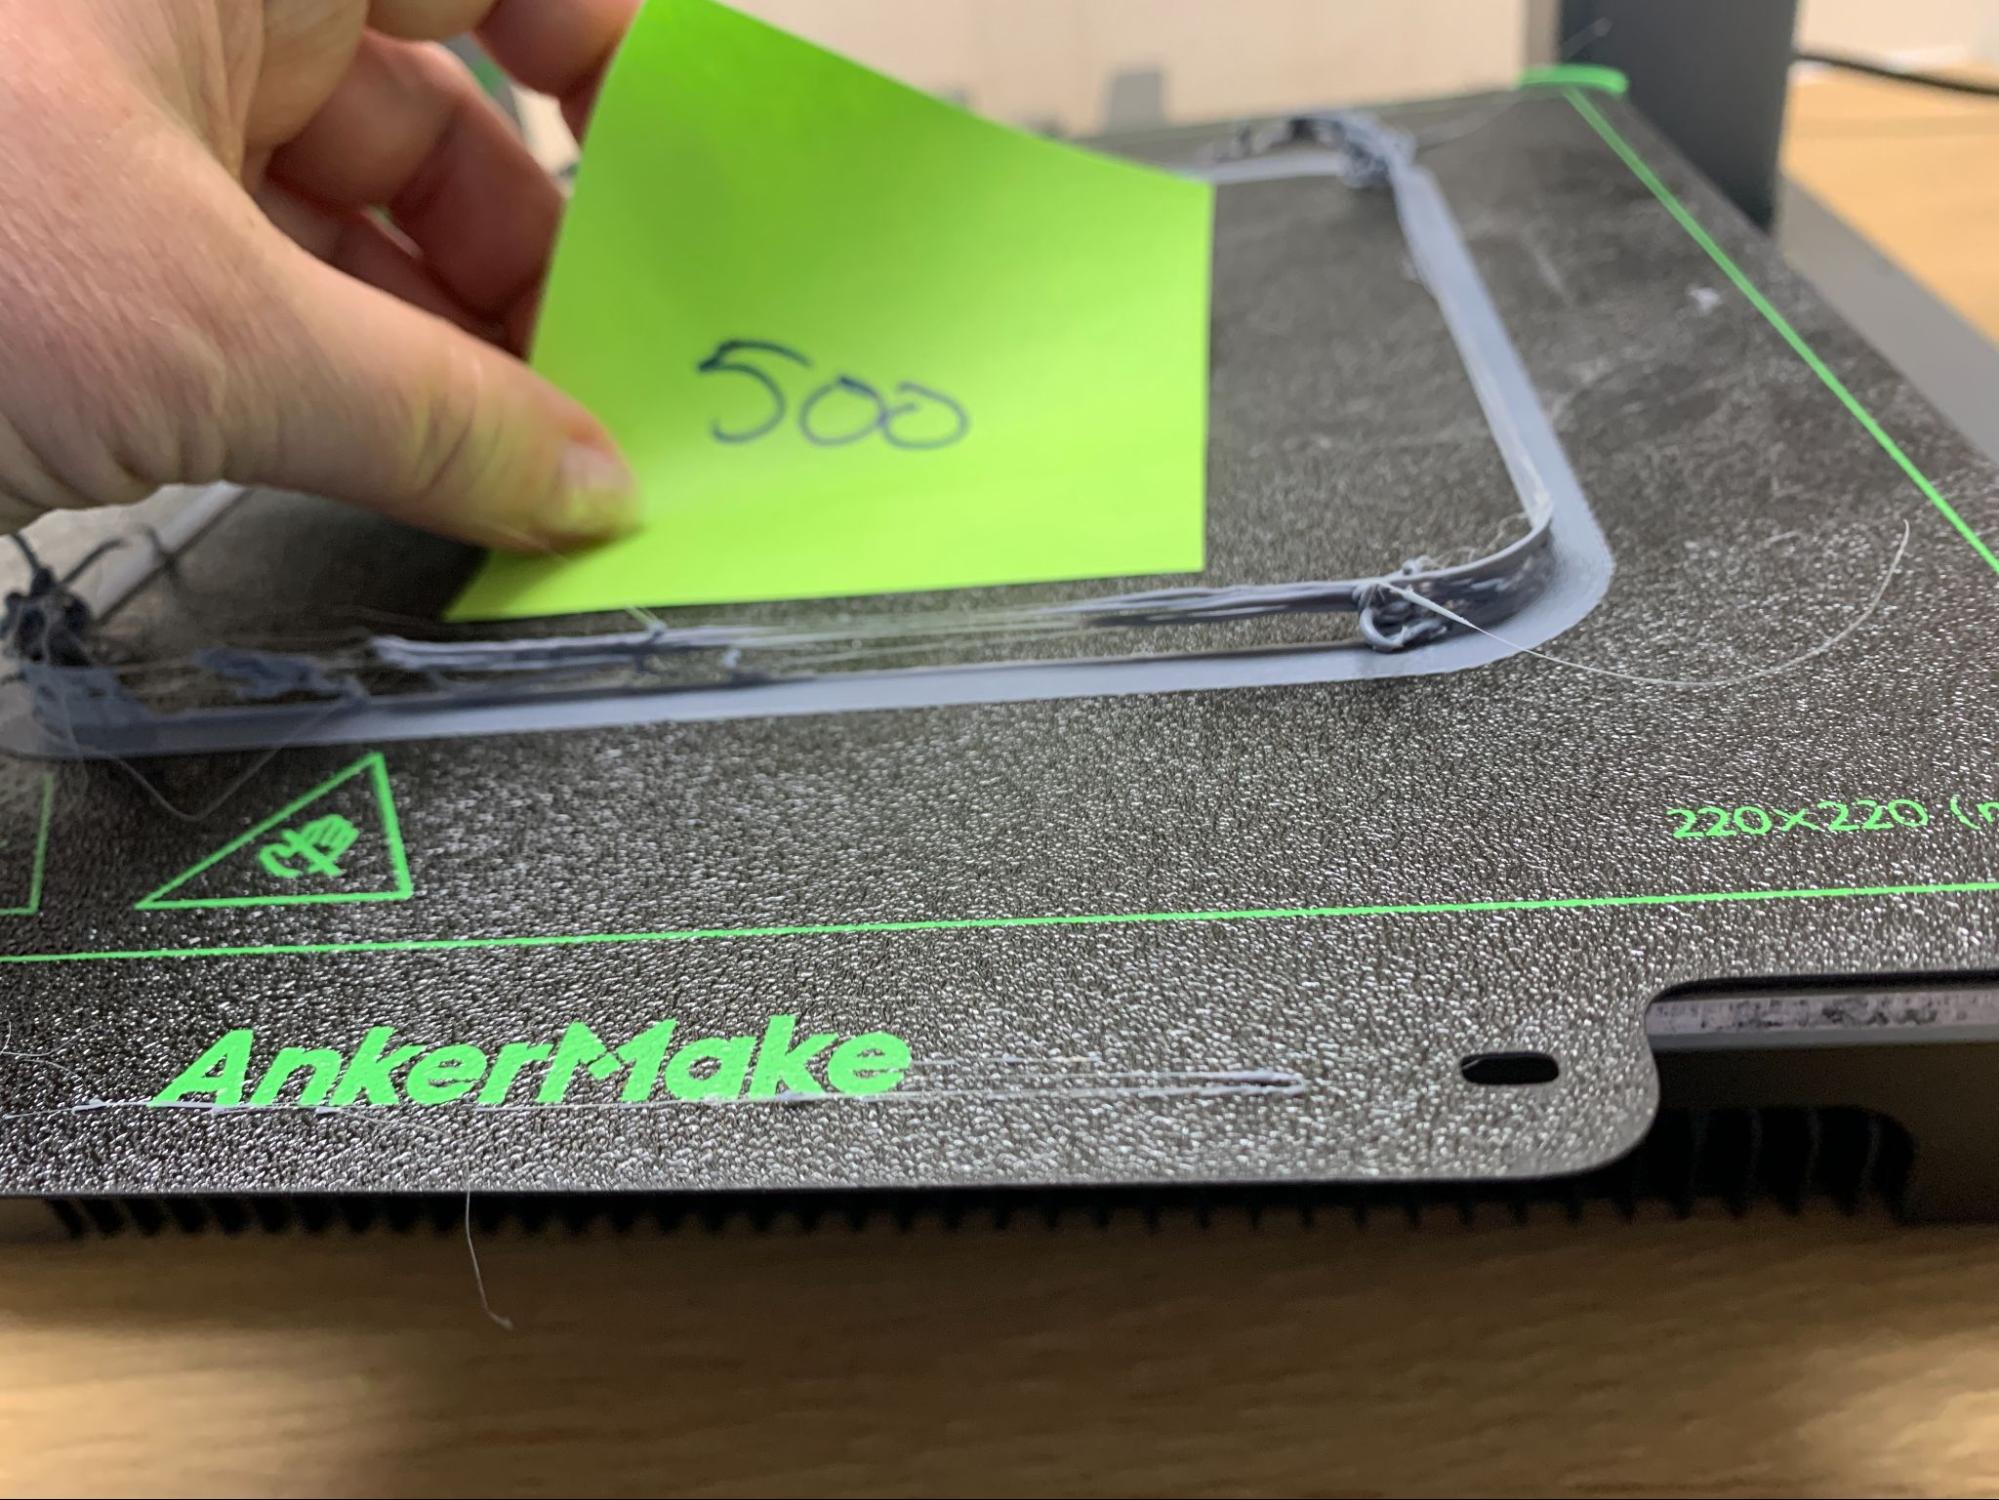
The AnkerMake M5C has a pressure sensor mechanism connected to the hotend for automatic bed leveling. This is my favorite method of bed leveling, as it physically taps the surface and often sets a perfect Z height in the process. On this printer, the z height only needed to be adjusted for printing PETG.
The build platform is hard mounted to the Y-Axis and there are no knobs for manual tramming. Everything is done through the app.
To level the bed, scroll down the app until you see Adjustments and press the Auto Level button. The app will inform you that leveling will take about 10 minutes. Press Start to continue and the machine will warm up to 175 degrees on the nozzle and 60 degrees on the bed. It will then home and double tap 49 spots in a 7×7 in a grid across the bed surface.
(Image credit: Tom’s Hardware)
Loading Filament in the AnkerMake M5C
(Image credit: Tom’s Hardware)
The AnkerMake M5C has an improved filament path with a reverse Bowden tube connected to the spool holder. This allows easy feeding directly into the extruder.
To load filament, tap the thermometer icon next to the Print button. Select the type of filament you are loading from the list and it will warm the nozzle and plate appropriately. Push the filament into the Bowden tube until you meet resistance. Push the lever on the tool head and push the filament in an extra few millimeters. Now click Extrude from the main screen and it will feed the filament into the hotend.
To remove filament or change colors, reverse the process.
Design of the AnkerMake M5C
(Image credit: Tom’s Hardware)
The AnkerMake M5C is a more compact version of the AnkerMake M5, with a similar polished modern appearance. The wiring and mechanics are neatly concealed within the printer’s frame, with only a single exposed cable running to the tool head.
The printer has no screen or control panel, and must use a mobile app or computer to operate it. The printer’s biggest feature is the large play button on the front right corner of the base and a glowing LED “M” on the gantry.
AnkerMake is making a big deal out of the “one touch button” on the M5C, but it’s more of a gimmick than anything revolutionary. The button is programmable (from the app, of course) and can do a limited set of functions. You can program it to do five things – three when idle, two when printing. The button performs these actions when you tap it once, double tap and press for 3 seconds.
While idle, you can have the button:
Print the latest file on the USB-C drive
Reprint the last file
Auto-level
Home all axis
Do Nothing
While printing, the button can
Pause/Continue
Stop Printing
Do Nothing
The button is useful as an emergency stop, or to pause the printer for a filament swap. But since the printer doesn’t come with a USB-C flash drive (an unusual format I don’t own) I wasn’t able to test “playing” a file from the memory stick. I was able to reprint the last file using the button, which is somewhat helpful.
When you send a pre-sliced file from the mobile app there’s no need to push the button – the app does all the work. When you send files over WiFi from the AnkerMake slicer, there’s also no need to push the button.
With all this emphasis on a mobile app, the AnkerMake M5C could really use a camera. The M5 had one, and it seems strange to have to make visual contact with a machine to verify the print bed is clear when you could – in theory – start a print from anywhere in the world.
Despite the lack of a camera, the app is remarkably useful. When the printer runs into problems, it can alert you right away. When I tested the filament runout sensor, the app pinged my phone and told me it needed filament. I unplugged the tool head without turning off the power (to photograph the interior) causing the machine to throw a major error – it could no longer sense the printer’s temperature. It alerted me to this potentially dangerous problem with loud beeping, a warning from my app, AND an email.
The AnkerMake app is home to a growing number of pre-sliced files. The files are all small enough to fit the M5C, and are compatible with the M5. As of this posting, the app has 37 files that are mostly toys. This is nowhere near the level of ToyBox’s app, but there’s no saying how much the library may grow. I’m not seeing a way to add your own files to the library, though perhaps that is something that could be done if I had a USB-C stick. There is no file storage on the printer itself.
The AnkerMake app can also be used with the older M5, and can run several printers simultaneously.
The M5C may be smaller than the M5, and doesn’t have a camera with AI, but that doesn’t make it an inferior product. It has a better all metal hotend, capable of reaching 300 degrees and a higher flow rate (35mm³ vs 24mm³), the filament runout sensor is on the tool head where it’s less annoying and the Y belt isn’t stuck in a crevasse where filament scraps can get tangled. It’s also a little more quiet than the M5, but not as quiet as a slower printer.
The M5C is extremely fast without needing all the weight of the previous machine to hold it steady. In April, the company released a firmware update for the M5, stating that Klipper’s Pressure Advance and Input Shaper had been integrated, which doubled that printer’s top speed to 500mm/s. The new limits are standard on the M5C, which also seems better tuned and produces cleaner prints at high speed.
AnkerMake is sticking to its proprietary high flow nozzle that you’ll need to purchase from their website. You get 10 for $20, which is a tad high for brass nozzles, but you can get different sizes, from .2 to .8mm.
Preparing Files / Software
(Image credit: Tom’s Hardware)
AnkerMake has its own custom slicer, which has seen a major overhaul since the launch of the M5. I’m normally not a big fan of proprietary slicers, but I’ll make an exception for this one. Though other slicers have Easy or Basic modes, the one for AnkerMake actually works well because of the simple layout. You work your way from top to bottom selecting Printer, Material, Printing Style (speed), Layer Height and so forth. Everything is limited to a Yes/No or maximum choice of three options.
Click Slice and send to the Preview Menu – which is the same screen you’d see on Expert Mode. Here you can double check the slicing. Click Export to save the file – perhaps to that elusive USB-C flash drive – or click Print and send it right to a printer. It still goes through the motions of creating an AI image, which is only used for the M5 and its camera. This might be misleading to M5C owners – or a future upgrade?
Printing on the AnkerMake M5C
The AnkerMake M5C has a top speed of 500mm/s, but you’ll get higher quality if you stick to 250mm/s – not too shabby. I did a lot of speed testing, and though 500mm/s is a bit of a reach, there were never any quality issues due to vibration.
Don’t try to ONLY print at 500mm/s with the AnkerMake M5C.(Image credit: Tom’s Hardware)
My test prints came from the AnkerMake app, and since the machine didn’t come with any filament, I used samples of EIBOS Matte-PLA. You’ll definitely want to shop for filament before bringing this machine home. We have a guide with our favorite filaments for 3D printing here.
The gray cat/bunny on the right was printed directly from the app and defaulted to “fast printing.” It looks a little rough and the chin suffered from lack of supports. The one in the middle I sliced myself, still using default “normal” speeds, but I bumped up the walls to three – and removed the brim – which increased the quality of the print.
The khaki bunny on the left used the same settings but was sent to the AnkerMake M5. The print has slightly less quality than the sliced M5C print, with somewhat rough layers. The print took 30 minutes to print from the app, and 50 minutes and 21 seconds to print with 3 walls at 250 mm/s.
AnkerMake App Big Eared Cat by Three Wu(Image credit: Tom’s Hardware)
I ran an amazingly fast 20 minute 4 second Benchy using Speed Boat Rules (2 walls, 3 top and bottom layers, 10% grid infill, a .25 layer height and .5 layer width). The layers are rough, but there’s no ringing or layer shifts. Printed in ordinary gray Inland PLA.
3D Benchy(Image credit: Tom’s Hardware)
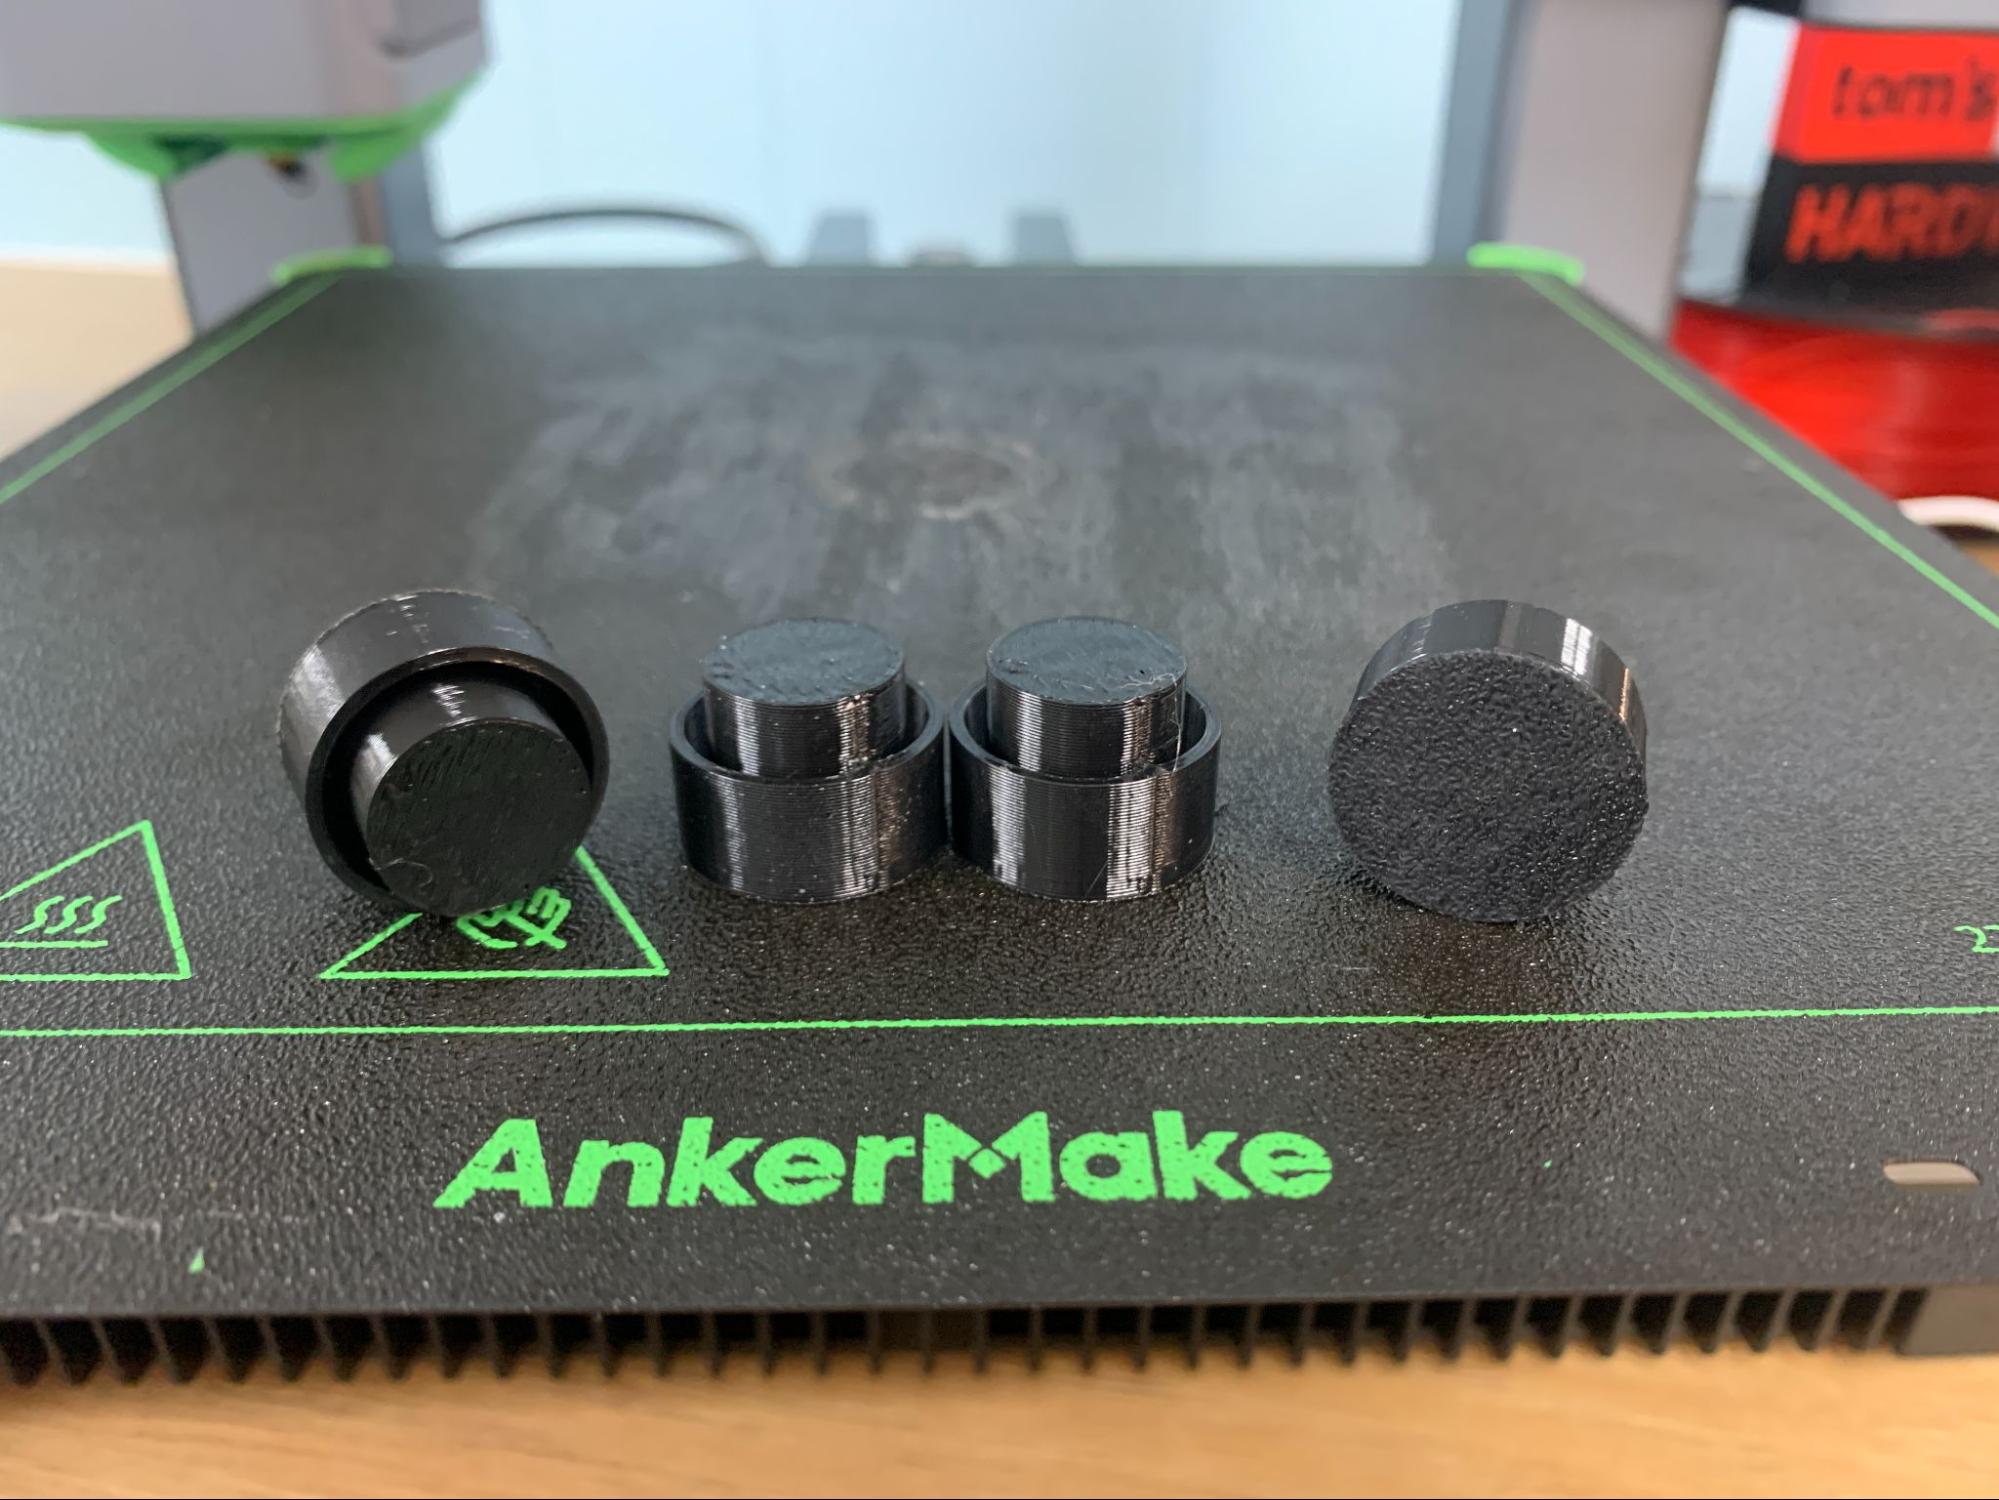
To show what the AnkerMake M5C can do under less stressful conditions, I printed this Clockspring Cosmic Saucer, using Easy Mode, Normal Speed (top speed at 250mm/s) and a .2mm layer height. The pieces are printed individually and screw together.
This is remarkably smooth with crisp details and smooth walls. I printed it in Inland Dual Color Gold/Silver, Polymaker’s Starlight Jupiter (antenna) and Galaxy Dark Blue PolyLite PLA (landing gear), and Protopasta’s Cobalt Blue Translucent HTPLA (glass). Total print time is 2 hours, 30 minutes and 33 seconds.
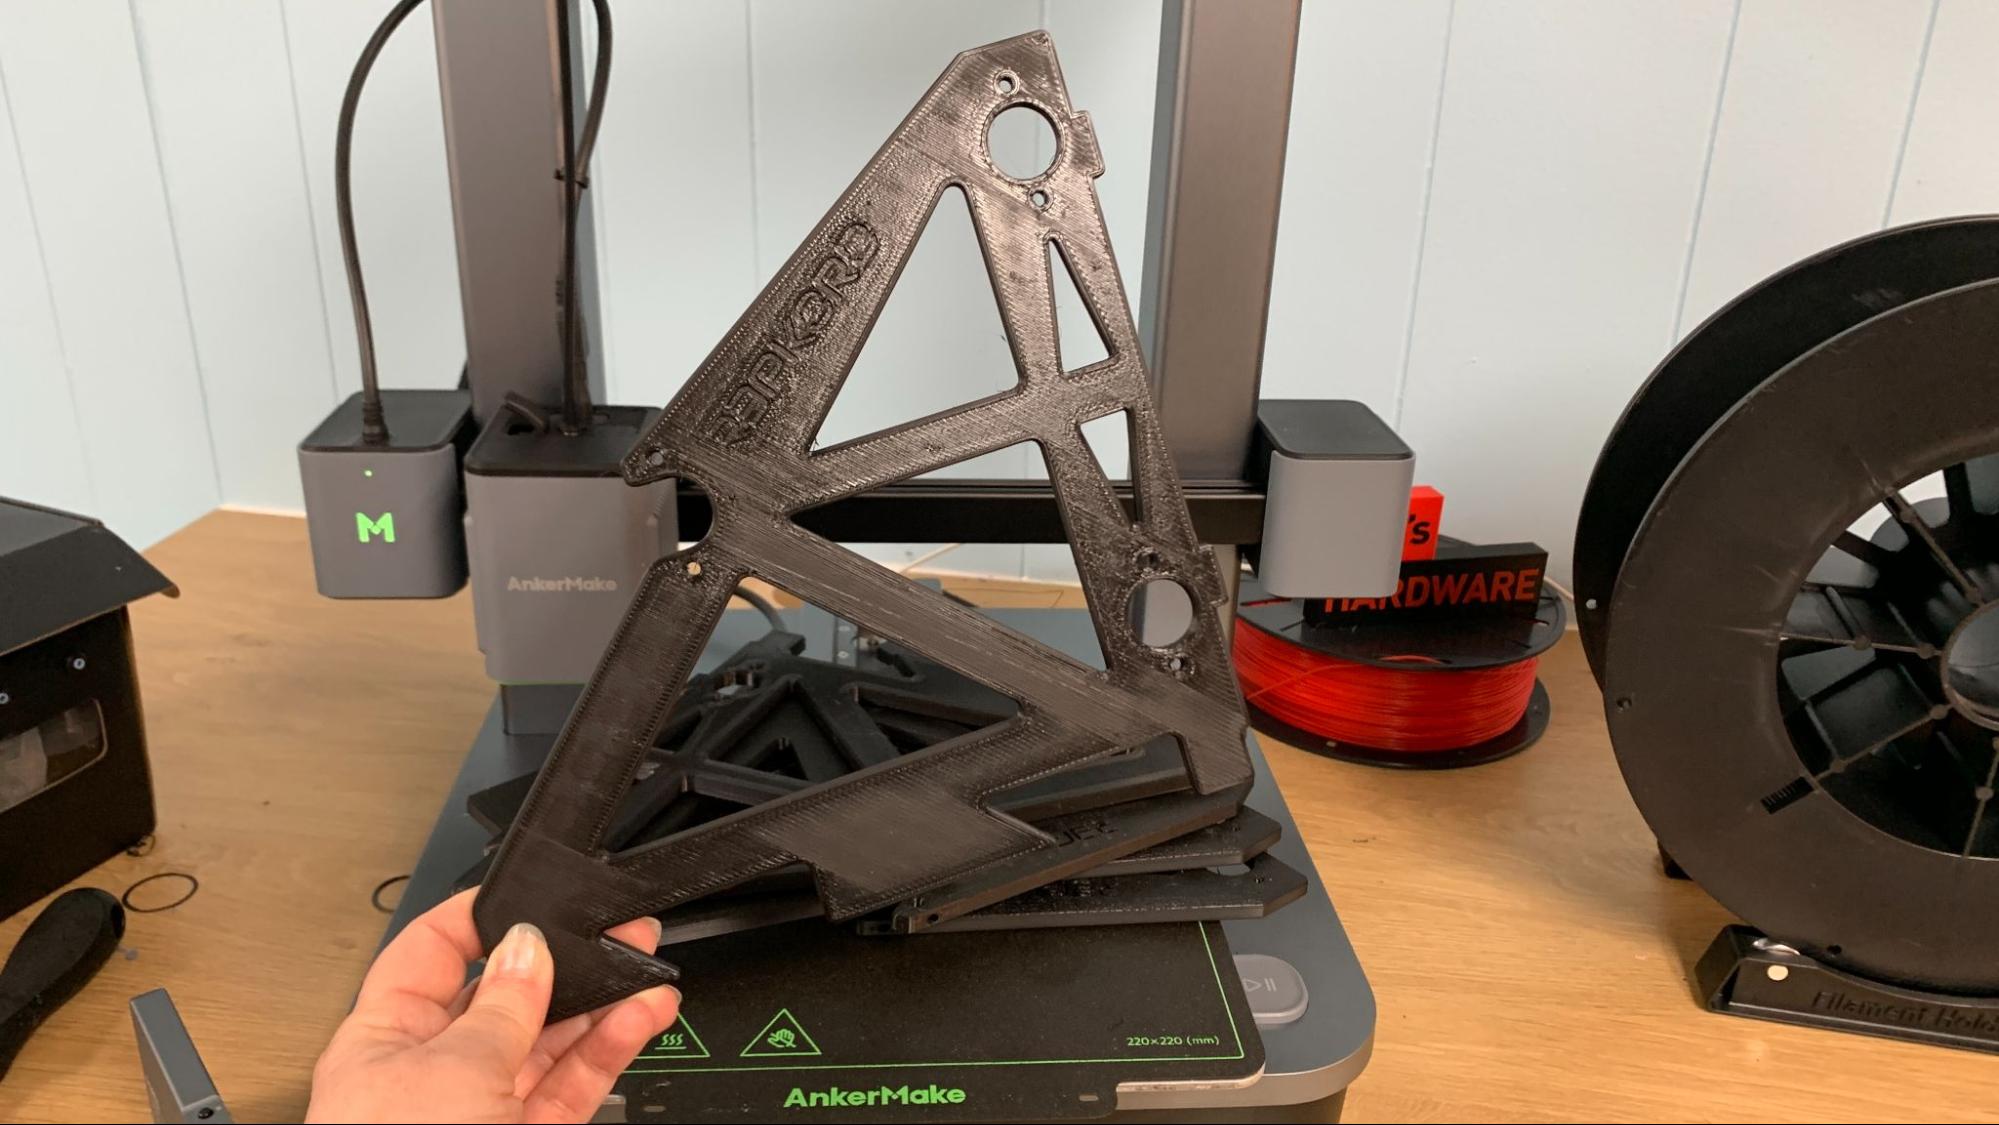
For a practical print, I used the AnkerMake M5C to print PETG brackets to hold up a new filament shelf. I kept AnkerMake’s default settings for PETG – which restrained wall speed to 150mm/s, and beefed up the print to 6 walls and 25% infill. The top layer is a bit streaky, but the parts are still very strong. This print took 2 hours and 59 minutes to print, using IC3D recycled black PETG.
For TPU I had another practical print – caps for the end of the pipes making up my new RepRack filament shelf. I created these caps in Tinkercad, then uploaded them to Printables. Each cap took 10 minutes and 3 seconds to print using AnkerMake’s default Easy Mode settings for TPU. They printed remarkably smooth and fast with no stringing in Inland Black TPU.
The AnkerMake M5C is a fast printer with some features – or lack there of – that might take some getting used to. I was concerned about the lack of a screen, but if you’re online all the time, having a phone handy isn’t really that big of an issue. You can also get around the screen issue by keeping an old mobile device with the app loaded near the printer.
One of the fastest bed slingers around, it’s definitely competitive in the current race for speedy 3D printing. With a price tag of $399 and the promise of an optional six spool “color engine” by the end of the year, the AnkerMake M5C is one to watch.
It’s dead simple to use, which makes this a great recommendation for beginners and makers who just want to make. There’s not much to tweak on this printer, so people who like to mod out their machines may want to take a pass and go build a Voron instead.
If you’re interested in other speedy printers at even higher prices, check out the blazing-fast $699 Bambu Lab P1S or the FLSun V400 Delta, a machine that is a joy to watch, but has a hefty price at $849.
If you want speed, ease AND a screen in this price range, check out the similarly priced Sovol SV07 that runs vanilla Klipper for $339. And if you’re on a really tight budget, then the Klippered Elegoo Neptune 4, priced at $259 might be just the ticket. However, at $399, the AnkerMake M5C offers a great balance of features at a reasonable price. Just keep that phone handy.
Today we spotted a large discount on the Asus ROG Strix G18 gaming laptop that’s now reduced to $2,099 at Best Buy. This is still a very high ticket price item, but you do get some impressive hardware in this large chassis. The 18-inch screen has a QHD resolution and a very fast 240Hz refresh rate – helping to power these specs are an Nvidia RTX 4080 GPU and an Intel Core i9-13980HX processor.
An alternative to either AMD or Nvidia on the GPU front, this AIB edition Acer Predator BiFrost Intel Arc A770 has a slight discount of $309 at Newegg. This GPU comes with 16GB of VRAM, and Intel has been delivering frequent driver updates that look to ever improve the performance of this GPU.
Pick up this last-generation AMD Ryzen 7 5800X CPU for just $189. Still, a solid performer if you want to put together a budget-build PC or even upgrade a previous AM4 system. With eight cores and 16 threads, this CPU is still highly capable of either productivity work or gaming.
So you managed to buy a PlayStation 5 – congratulations, you beat supply shortages to obtain one of the most sought-after consoles in recent memory. Next comes the fun part. No PS5 is complete without a library of video games and accessories to elevate your experience. Thankfully, you won’t have as much trouble getting your hands on those. However, if you’re new to the console, the tricky part is knowing what titles and peripherals are worth your time. We’ve gathered our top picks for the best PS5 accessories here to make the search easier for you.
If the PS5 is your first console or you’re coming from an Xbox, one of the first things you’ll want to pick up is a PlayStation Plus Extra subscription. It’ll help you flesh out your library. Sony recently revamped the service to add separate tiers. Of the three tiers that are currently available, the “Extra” one is the best value. Priced at $15 per month, it grants you access to a library of up to 400 downloadable PS4 and PS5 games. Each month, you’ll also get a handful of free games and PlayStation Store discounts. The combination of those perks makes it easy to start making the most of your new PS5.
SteelSeries Arctis 7P+
Do the people you live with a favor and buy yourself a decent headset. It will help you stop nerves from fraying and is a must for any multiplayer game. The options for gaming headsets are vast, so we recommend picking one with a solid track record. SteelSeries recently updated its iconic Arctis 7 headset with the 7P+ which has improved battery life and a USB-C port for charging. What the company didn’t change was the headband design that many people credit for making the Arctis 7 one of the more comfortable headsets on the market. The 7P+ costs the same as the standard 7+ variant, but also adds full support for the PS5’s Tempest 3D audio technology.
WD Black SN850
Sony recently released an update to allow PS5 owners to expand their console’s internal storage. And it’s a good thing, because the 667GB of usable storage the console comes with can feel limiting quickly. We already published a comprehensive guide on the best SSDs you can buy for your PlayStation 5. You’ll want to check that article out for a step-by-step guide on how to upgrade your SSD. But if you want to make things as simple as possible, your best bet is a Gen4 M.2 NVME SSD with a built-in heatsink. One of the better plug-and-play options is the SN850 from WD Black. It checks off all the compatibility requirements listed by Sony and is reasonably priced, too.
Samsung T7 SSD
If you don’t feel comfortable opening your PS5 to install a new SSD, another option is to purchase an external solid-state drive. Keep in mind that you can’t play PS5 games from an external drive. However, it takes less time to copy one over from an SSD than it does to download it from the PlayStation Store. One of our favorite portable drives is the Samsung T7. It can write files at a speedy 1,000 MB/s and comes with a shock-resistant enclosure to protect the drive from physical damage. If you plan to use the SSD exclusively for storing games, you can save money by buying the standard model instead of the Shield variant, which has a ruggedized exterior for extra protection for those who are always on the go.
DualSense Charging Station
While you can charge your DualSense controller with the USB-C cable that comes with your PS5, a more elegant solution is the DualSense Charging Station. It can store and charge two controllers simultaneously. In that way, you can always have a second PS5 controller ready to go if the one you’re currently using runs out of battery. The charger will also free up the USB ports on your PS5 for other accessories.
Elden Ring
Unless you spent very little time on the internet this year, it’s safe to say it was impossible to avoid the conversation around Elden Ring. After putting about 100 hours into FromSoftware’s latest, I can safely say the praise is warranted. Like a lot of other people, I was tired of Western-style open-world games and their endless checklists by the time I got around to playing Elden Ring, but its take on the genre was anything but tired. As I stumbled my way through the game’s dark caves, ruined cathedrals and enchanted forests, I felt like there was a discovery waiting for me across every hill and river. That’s a feeling I haven’t had since I was a kid playing through the Ocarina of Time and Majora’s Mask.
If that’s not enough to convince you to try Elden Ring, know that the game’s maximalist approach makes it the most approachable FromSoftware release to date. Whenever you’re stuck on a boss, you can go elsewhere to level your character and master the game’s punishing combat.
God of War Ragnarök
Did you think Sony’s latest exclusive would be absent from this list? God of War Ragnarökcan sometimes suffer from pacing issues and overly chatty NPCs, but there’s no denying that Santa Monica Studio has crafted another heartfelt chapter in the story of Kratos and Atreus. The PS5 is also the best place to play Ragnarök. On Sony’s latest console, the game ships with two rendering modes and support for variable and high frame rates. Provided you own a relatively recent TV, those features make it possible to play the action RPG at up to 90 frames per second in some situations. That’s a level of technical proficiency we haven’t seen in a lot of AAA console games.
Death’s Door
With a title that evokes the end of all things, you might think Death’s Door is a bleak game. But that couldn’t be further from the truth. Buoyed by a beautiful soundtrack and art style, it’s one of the most thoughtful and pleasant indies I’ve played recently. Developer Acid Nerve’s tribute to The Legend of Zelda and Dark Souls is a must-play for those who love to lose themselves in a world of mystery and intrigue.
Ghosts of Tsushima Directors Cut
You’ve played games like Ghost of Tsushima before. It borrows from the familiar open-world formula popularized by Assassin’s Creed and other Ubisoft titles. But that’s not a knock against it. Far from it, Sucker Punch’s latest is so easy to recommend because it executes the open-world concept flawlessly. The studio has created a beautiful playground steeped in Feudal Japanese culture, myth and history for players to explore, with something interesting to find beyond every ridge. Combat is also a highlight, allowing you to play either as honorable samurai, terrifying assassin or a mixture of both. And once you have finished Tsushima’s touching single-player story, there’s the excellent Legends multiplayer mode to keep you busy for the long haul.
Hades
If you pick up only one game from this list, make it Hades. It is as close to a perfectly executed game as you’ll find. Everything from the art style, music, story and gameplay mechanics coalesces into one of the most memorable experiences in recent memory. Even if you’re not a fan of roguelike games, don’t worry: Hades is so successful because even when you die, it never feels like you’ve wasted your time.
As RISC-V continues to develop, so does the plethora of products around the open source processor. Unlike the Raspberry Pi which uses proprietary ARM processors, the new Lichee Pi 4A uses open source RISC-V C910 architecture. This small desktop SBC is manufacturered by Sipeed and comes in a variety of configurations. Today we’re happy to get a close look at the edition with 8GB of RAM and 32GB of onboard memory thanks to Christopher Barnatt with ExplainingComputers in his recent unboxing video over at YouTube.
Overall, Barnatt reported the out-of-the-box experience as generally positive. It comes with Debian pre-installed so very little had to be done in the way of first-time setup beyond connecting all the hardware and necessary peripherals. Although it comes with Debian preloaded, you can customize it entirely from the inside out.
(Image credit: ExplainingComputers)
The most glowing praise came after testing the unit for several hours. After observing no crashes, Barnatt said he considered this to be the most stable Linux experience he’s has so far with RISC-V. It has quality graphics processing showing excellent results with 720p video playback albeit less so with 1080p.
It comes with a selection of preinstalled tools that most average users will find handy to have readily available—such as LibreOffice. Overall the unit is very user friendly making it a great platform for RISC-V development as well as casual use.
You can find more information about the Lichee Pi 4A on the official Sipeed website. For an in depth look at its performance, check out the full unboxing and demo test video from ExplainingComputers over at YouTube.
While some buy the best CPUs, others try to smuggle them. Chinese customs authorities sized 780 Intel processors that traffickers were trying to slip through the Gongbei Port connecting Macau and Zhuhai in China.
Chinese smugglers are always finding ways to finesse the customs authorities. Recent smuggling busts have shown that walking with hundreds of processors or M.2 SSDs strapped to your body may not be the most clever way to get through customs. Hiding contraband hardware inside scooters or in a car’s undercarriage is a no-go.
In the latest PC hardware smuggling bust, we have a few individuals who hid 780 Intel processors inside the engine of a cross-border bus. Walking past metal detectors with pounds of metal on your body isn’t a good idea. Even a fake silicon belly can’t conceal processors from metal detectors. However, hiding metal inside other metal can prove fruitful, assuming you’re lucky and don’t get pulled over for a manual inspection.
The customs officers from the Gongbei Port noticed something fishy about the cross-border vehicle from digital imagery. Upon closer inspection of the engine, they discovered a nifty modification to conceal smuggled goods, which in this case were 780 Intel-branded processors. Customs
The initial estimate of the smuggle bust is over one million yuan, equivalent to $137,341. Unfortunately, we can’t get a perfect view of the confiscated chips, but they appear to be from the 12th Generation Alder Lake or 13th Generation Raptor Lake series.
There’s a big grey market in China for computer hardware. Processors, graphics cards, and SSDs are the most popular components among buyers. You can get bargain prices on hardware that typically costs much more in a retail store. It’s a gamble, though, since you don’t receive the manufacturer’s warranty. So while it looks like you’ve saved money when you bought it, it’ll cost you more to replace the hardware in the future if it unexpectedly craps out on you.
Have you ever wondered where defective NAND chips or those that don’t pass the requirements go? Not inside the best SSDs, that’s for sure. However, you’ll likely find them inside knock-off SSD brands that sell for ridiculously low prices on platforms like AliExpress.
NAND yield rates are typically bad until the process node matures. Often, factories come across NAND that doesn’t meet the client’s requirements or doesn’t pass quality control. Instead of throwing the NAND away, which increases electronic waste, the factories recycle them into cheaper products or sell them to local companies, giving rise to obscure SSD brands on the Chinese market.
A Chinese data recovery YouTuber recently took apart a ShineDisk M667 (M667-120G), a 120GB SATA SSD that retails for around $13 in China, and found some alleged SK hynix-manufactured NAND for Apple devices inside. Mind you; this is a knock-off brand and not to be confused with the same SanDisk that Western Digital acquired.
The SSD controller is the only thing that looks legit on the ShineDisk M667. The drive utilizes the SM2258XT, a DRAM-less SATA III from Silicon Motion. It’s an outdated SSD controller that powers SSDs, such as the Crucial BX500, TeamGroup EX2, and WD Blue 3D.
The NAND chips in the ShineDisk M667 are thicker than the NAND that you typically find on a regular SSD. According to the YouTuber, it’s reportedly SK hynix’s E2NAND, which appears to be a multi-chip package with an MSP controller with embedded ECC support. We looked up the E2NAND but couldn’t find any public information on SK hynix’s website. However, we did see many mentions of E2NAND associated with Apple and iPhones on various Chinese e-commerce platforms.
The origin of the NAND is unknown. It could have come from a factory that makes NAND for Apple or some third-party vendor ripping them off of defective iPhones. However, the YouTuber suspects the former since the quality appears to have a level of professionalism.
Reprocessing components for lower-tier products or new products is a regular practice in the hardware world. Companies are always looking to maximize profits. For example, a recent report revealed that some vendors recycle server ICs into consumer memory. The problem is with reliability.
In the case of the ShineDisk M667 SSD, we have no idea where the NAND came from. It wouldn’t surprise anyone if, one day, the ShineDisk M667 died out of nowhere. That’s the risk of an off-brand SSD that sells for $13 in a market filled with knock-offs. You’re better off looking for one of the best SSD deals on a name brand drive.
Nixie tubes can add a unique retro vibe to your project but they can run a little high price-wise. If you want to get that cool vintage vibe out of your Raspberry Pi project without all the added cost, you should take a look at this creation from maker and developer Yakroo. If that name sounds familiar, he’s the mastermind behind the neat cyberpunk Pico neck watch we recently covered. Today, we’re highlighting his Pico Nixie clock which uses LCD displays instead of expensive Nixie bulbs.
According to Yakroo, the idea was to create something simple but functional in a compact form factor. The end result is this custom Pico-powered board that sports two display modules. In addition to tracking time, it can also relay both temperature and humidity readouts with the cool Nixie bulb aesthetic.
Image 1 of 3
(Image credit: Yakroo)
(Image credit: Yakroo)
(Image credit: Yakroo)
Another driving component of this project was to create a more affordable solution for those who want to capture the look and feel of a Nixie bulb. His previous project, the Pico neck watch, also uses an LCD display to output digital Nixie-like numbers. This is just another variant of the idea with something a little more minimal.
The clock is mainly driven by a Raspberry Pi Pico microcontroller. It’s attached to a custom PCB that’s designed to support not only the Pico but also the other components which includes a DS3231M RTC module and two ST7789 displays. They’re mounted in an upright position so the module can sit flat on a surface with the numbers prominently on display.
The code used in this project tracks the time input from the RTC module as well as the temperature and humidity data. It then pulls from a library of graphics and updates the displays to reflect the data with the Nixie effect. The code isn’t available to explore but Yakroo confirms it’s written in MicroPython.
If you’d like to see this Raspberry Pi project in action, check out the full breakdown shared by Yakroo over at Hackster. You can also see a demo video of it in action over at YouTube. Be sure to follow him for more cool projects as well as any future updates to this one.