
Why you can trust Tom’s Hardware
Our expert reviewers spend hours testing and comparing products and services so you can choose the best for you. Find out more about how we test.
It’s been a long time coming, but we finally have Asus’s flagship Crosshair X870E Extreme motherboard on the test bench. The E-ATX board is large, beautiful, and packed with high-end hardware. There’s little argument that it offers the best of what’s available for the platform. But all of that goodness comes at a price. In this case, it’s $999.99 from the Asus webstore (a week before publishing it was $899). But if you’re lucky enough to consider it, there’s a lot to love.
One of the first things that jumps out is the 5-inch full-color LCD screen, which can show hardware information, Asus animations, and your own customized images. The all-black theme is accented with a silver/chrome-like ROG symbol and “Extreme” branding on the large plate heatsink at the bottom. Along the edge, all except two USB-C front panel connections are hidden under a shroud that runs the length of the board. A plethora of buttons and switches along the bottom also lets you know that it’s not your average motherboard.
Do you want to really push the limits? There are buttons and switches designed to navigate the perils of extreme cooling, or you can use Asus’ AI Software suite to get the most out of your system. And as we’d expect from a flagship board, performance was solid throughout all our tests, whether gaming, rendering, encoding, or basic Office functions.
Below, we’ll examine the board’s details, and showcase our benchmark results, which earn the board a spot on our Best Motherboards list. But before we get to all that, here is the extensive list of the board’s specifications from Asus’ website.
Specifications of the Asus Crosshair X870E Extreme
|
Socket |
AM5 (LGA 1718) |
|
Chipset |
X870E |
|
Form Factor |
E-ATX |
|
Voltage Regulator |
24 Phase (20x 110A SPS MOSFETs for Vcore) |
|
Video Ports |
(2) USB 4 Type-C |
|
USB Ports |
(1) USB 4 (40 Gbps) Type-C |
|
Network Jacks |
(1) 5 GbE |
|
Audio Jacks |
(3) Analog + SPDIF |
|
Legacy Ports/Jacks |
✗ |
|
Other Ports/Jack |
✗ |
|
PCIe x16 |
(1) v5.0 (x16, x8/x8) |
|
PCIe x8 |
✗ |
|
PCIe x4 |
✗ |
|
PCIe x1 |
✗ |
|
CrossFire/SLI |
✗ |
|
DIMM Slots |
(2) DDR5-8200+(OC)*, 128GB Capacity |
|
M.2 Sockets |
(2) PCIe 5.0 x4 (128 Gbps) / PCIe (up to 80mm) |
|
SATA Ports |
(4) SATA3 6 Gbps |
|
USB Headers |
(1) USB v3.2 Gen 2×2 (20 Gbps) Type-C (60W max PD/QC4+) |
|
Fan/Pump Headers |
(9) 4-Pin (CPU, CPU_OPT, Chassis, Radiator, W_Pump, VRM HS/F) |
|
RGB Headers |
(1) ARGB Gen 2 (6-pin, 2x ARGB) |
|
Diagnostics Panel |
(1) Q-LEDs |
|
Internal Button/Switch |
Start, Flexkey, Safe Boot, Retry, Alt PCIe Mode, BIOS, Slow Mode, Pause LED |
|
SATA Controllers |
✗ |
|
Ethernet Controller(s) |
Realtek RTL8126 (5 GbE) |
|
Wi-Fi / Bluetooth |
Mediatek MT7927 Wi-Fi 7 (6.5 Gbps) 2×2, 320 MHz, 6 GHz, BT 5.4 |
|
USB Controllers |
ASMedia ASM4242 (USB4) |
|
HD Audio Codec |
Realtek ALC40802 w/ESS ES9219 Quad DAC |
|
DDL/DTS/Atmos |
✗ / ✗ / Atmos (software) |
|
Warranty |
3 Years |
Inside the Box of the Asus ROG Crosshair X870E Extreme
With the Extreme, Asus includes a plethora of accessories designed to enhance connectivity and improve the initial build experience. You get all the basics, from SATA cables to Wi-Fi antennas, thermal pads, thermistors, a VRM fan, and, of course, the Q-DIMM.2 add-in card. There’s plenty to get you going. Below is the long list of all the included extras – including the important RoG bottle opener.
- 1-to-3 ARGB splitter cable
- 1-to-2 ARGB splitter cable
- (2) 1-to-4 fan splitter cable
- (2) ROG weave SATA 6G cable packages
- 3-in-1 Thermistor cables pack
- M.2 pad package for ROG Q-DIMM.2
- (2) thermal pad for ROG Q-DIMM.2
- (2) thermal pad for M.2 22110
- DDR5 Fan holder
- ROG Fan Kit
- ASUS WiFi Q-Antenna
- Q-connector
- ROG logo plate sticker
- ROG screwdriver
- ROG stickers
- ROG VIP card
- M.2 Q-Slide package
- M.2 backplate rubber packages
- ROG Bottle Opener
- USB drive with utilities and drivers
- Quick start guide
Design of the Crosshair X870E Extreme
Image 1 of 3


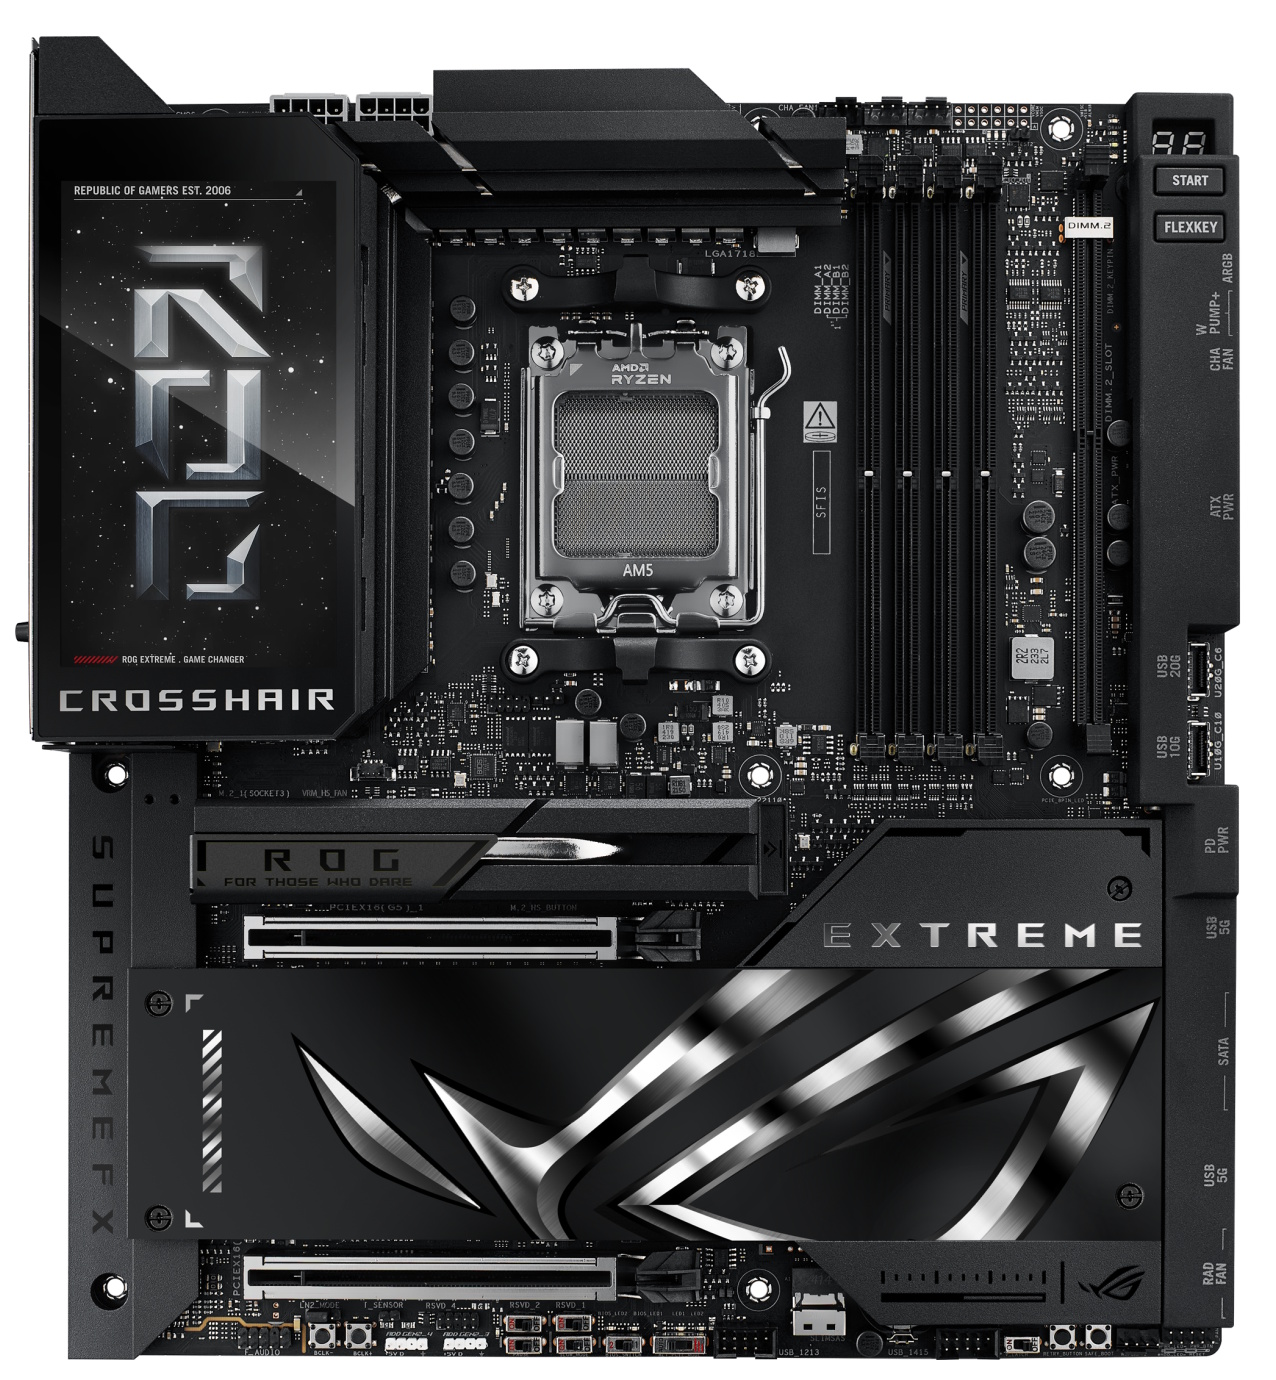
The Crosshair Extreme’s design exudes premium vibes. It sports an all-black look (matte-black PCB) with silver/chrome reflective accents. It’s relatively conservative for a flagship-class board, but still looks great. Standing out from the other boards is the large 5-inch full-color LCD screen integrated into the VRM heatsink. MSI’s X870E Godlike has a smaller 4-inch display, despite costing more. Overall, the Crosshair Extreme’s stealthy black appearance suits the high-end positioning and is sure to complement most build themes.
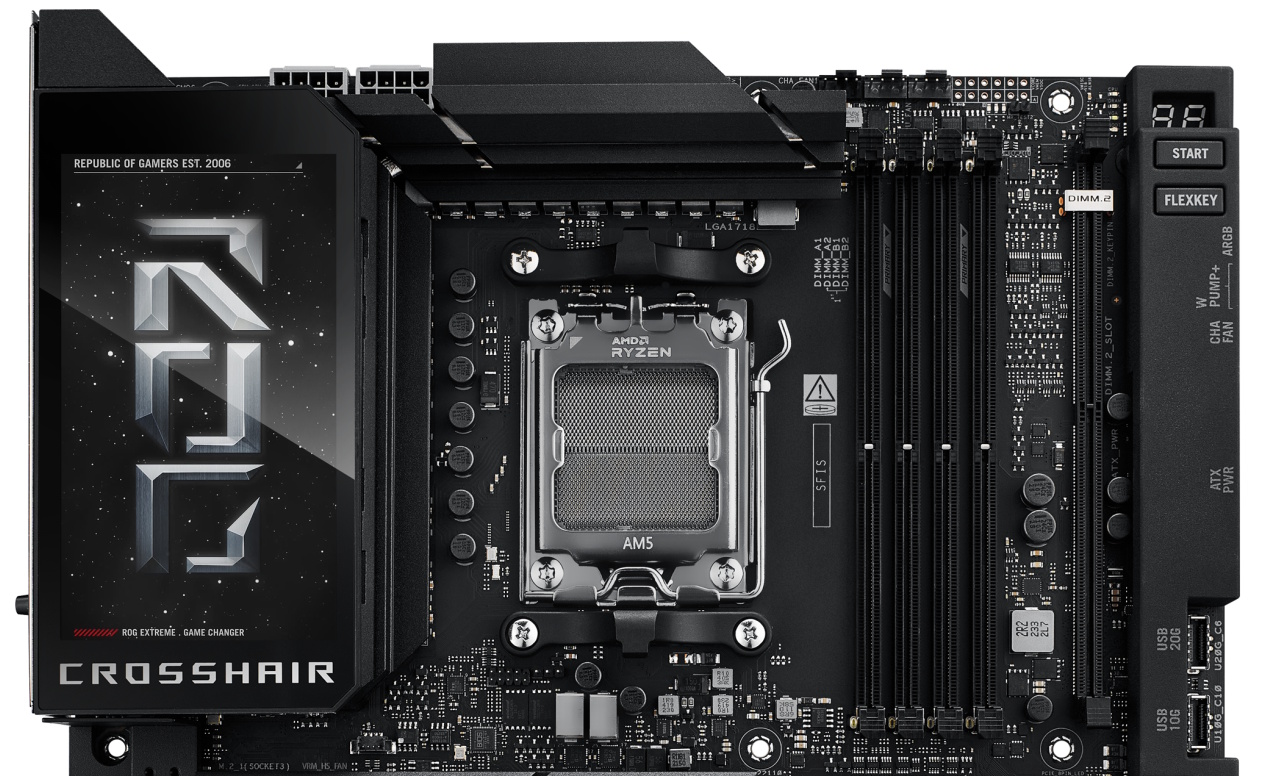

On the top left, we get a better look at the 5-inch LCD panel, which can slide to the right for increased rear fan compatibility. You can configure the LCD to display system information, use one of Asus’ included backgrounds, or add your own custom JPG. All of this is configurable in Armoury Crate. The VRM heatsink spans across the top, sharing the load with U-shaped heat pipes connecting the two parts. Above the heatsink are two ProCool II-enabled 8-pin EPS power connectors for the processor.
One of the next items we encounter is the first three (of nine) 4-pin fan/pump headers, one of which is specifically for the included, but optional, VRM fan. Per usual, the board controls PWM- and DC-controlled devices through the headers and the Armoury Crate and Fan Expert 4 software. The CPU, Chassis, Rad, and VRM headers output up to 1A/12W, while the pump headers are both good for 3A/36W each. There should be plenty of headers and power available for your cooling needs.
Next to the fan header is the ROG Probelt, with 12 holes in the motherboard for measuring your system voltage using a multimeter. It covers all kinds of voltages, including VCore/Mem/SOC/Misc, and more. These are cool, but novel additions unless you’re an extreme overclocker, where knowing the actual voltage (without software that can be inaccurate) is key.
Below those two features are four NitroPath-enabled DRAM slots with an easily accessible single locking mechanism located at the top. Asus lists support up to DDR5-8200 for desktop processors (9000 series), but even faster for 8000 series APUs (to 9200 MT/s). If you have PMIC-restricted modules (i.e., no profiles), the AEMP feature should be helpful, as will the flexibility provided by DIMM FIT Pro for increased memory optimization. All that said, if you’re breaking records for memory only, the two-slot boards like the Apex (or ITX boards) are where you’ll probably want to look first. Still, you’ll get plenty of memory speed out of the Extreme, and if you need four stick capacity (up to 256GB), you have the option.
Next is the socket for the included Q-DIMM.2 add-in card, which adds two PCIe 4.0 x4-capable M.2 sockets (up to 110mm). I’m a big fan of this solution for additional M.2 sockets, as its larger heatsinks can help manage thermals better than those sharing a plate-style heatsink with the chipset on the board itself
In the upper right corner are a couple of diagnostic tools in the Q-LEDs and Q-CODE LED. The former is the simpler 4-LED system (CPU, DRAM, BOOT, VGA), while the latter shares a bit more detail in the 2-character display. Hidden under a black shroud with labels on top are the start and Flexkey buttons. Below that, sticking out horizontally, is the first 3-pin ARGB header, followed by two 4-pin headers (W_PUMP1 and CHA_FAN2). Below that is the 24-pin ATX header, which supplies power to the board. Sitting vertically are the two front panel USB-C headers (20 and 10 Gbps, respectively).
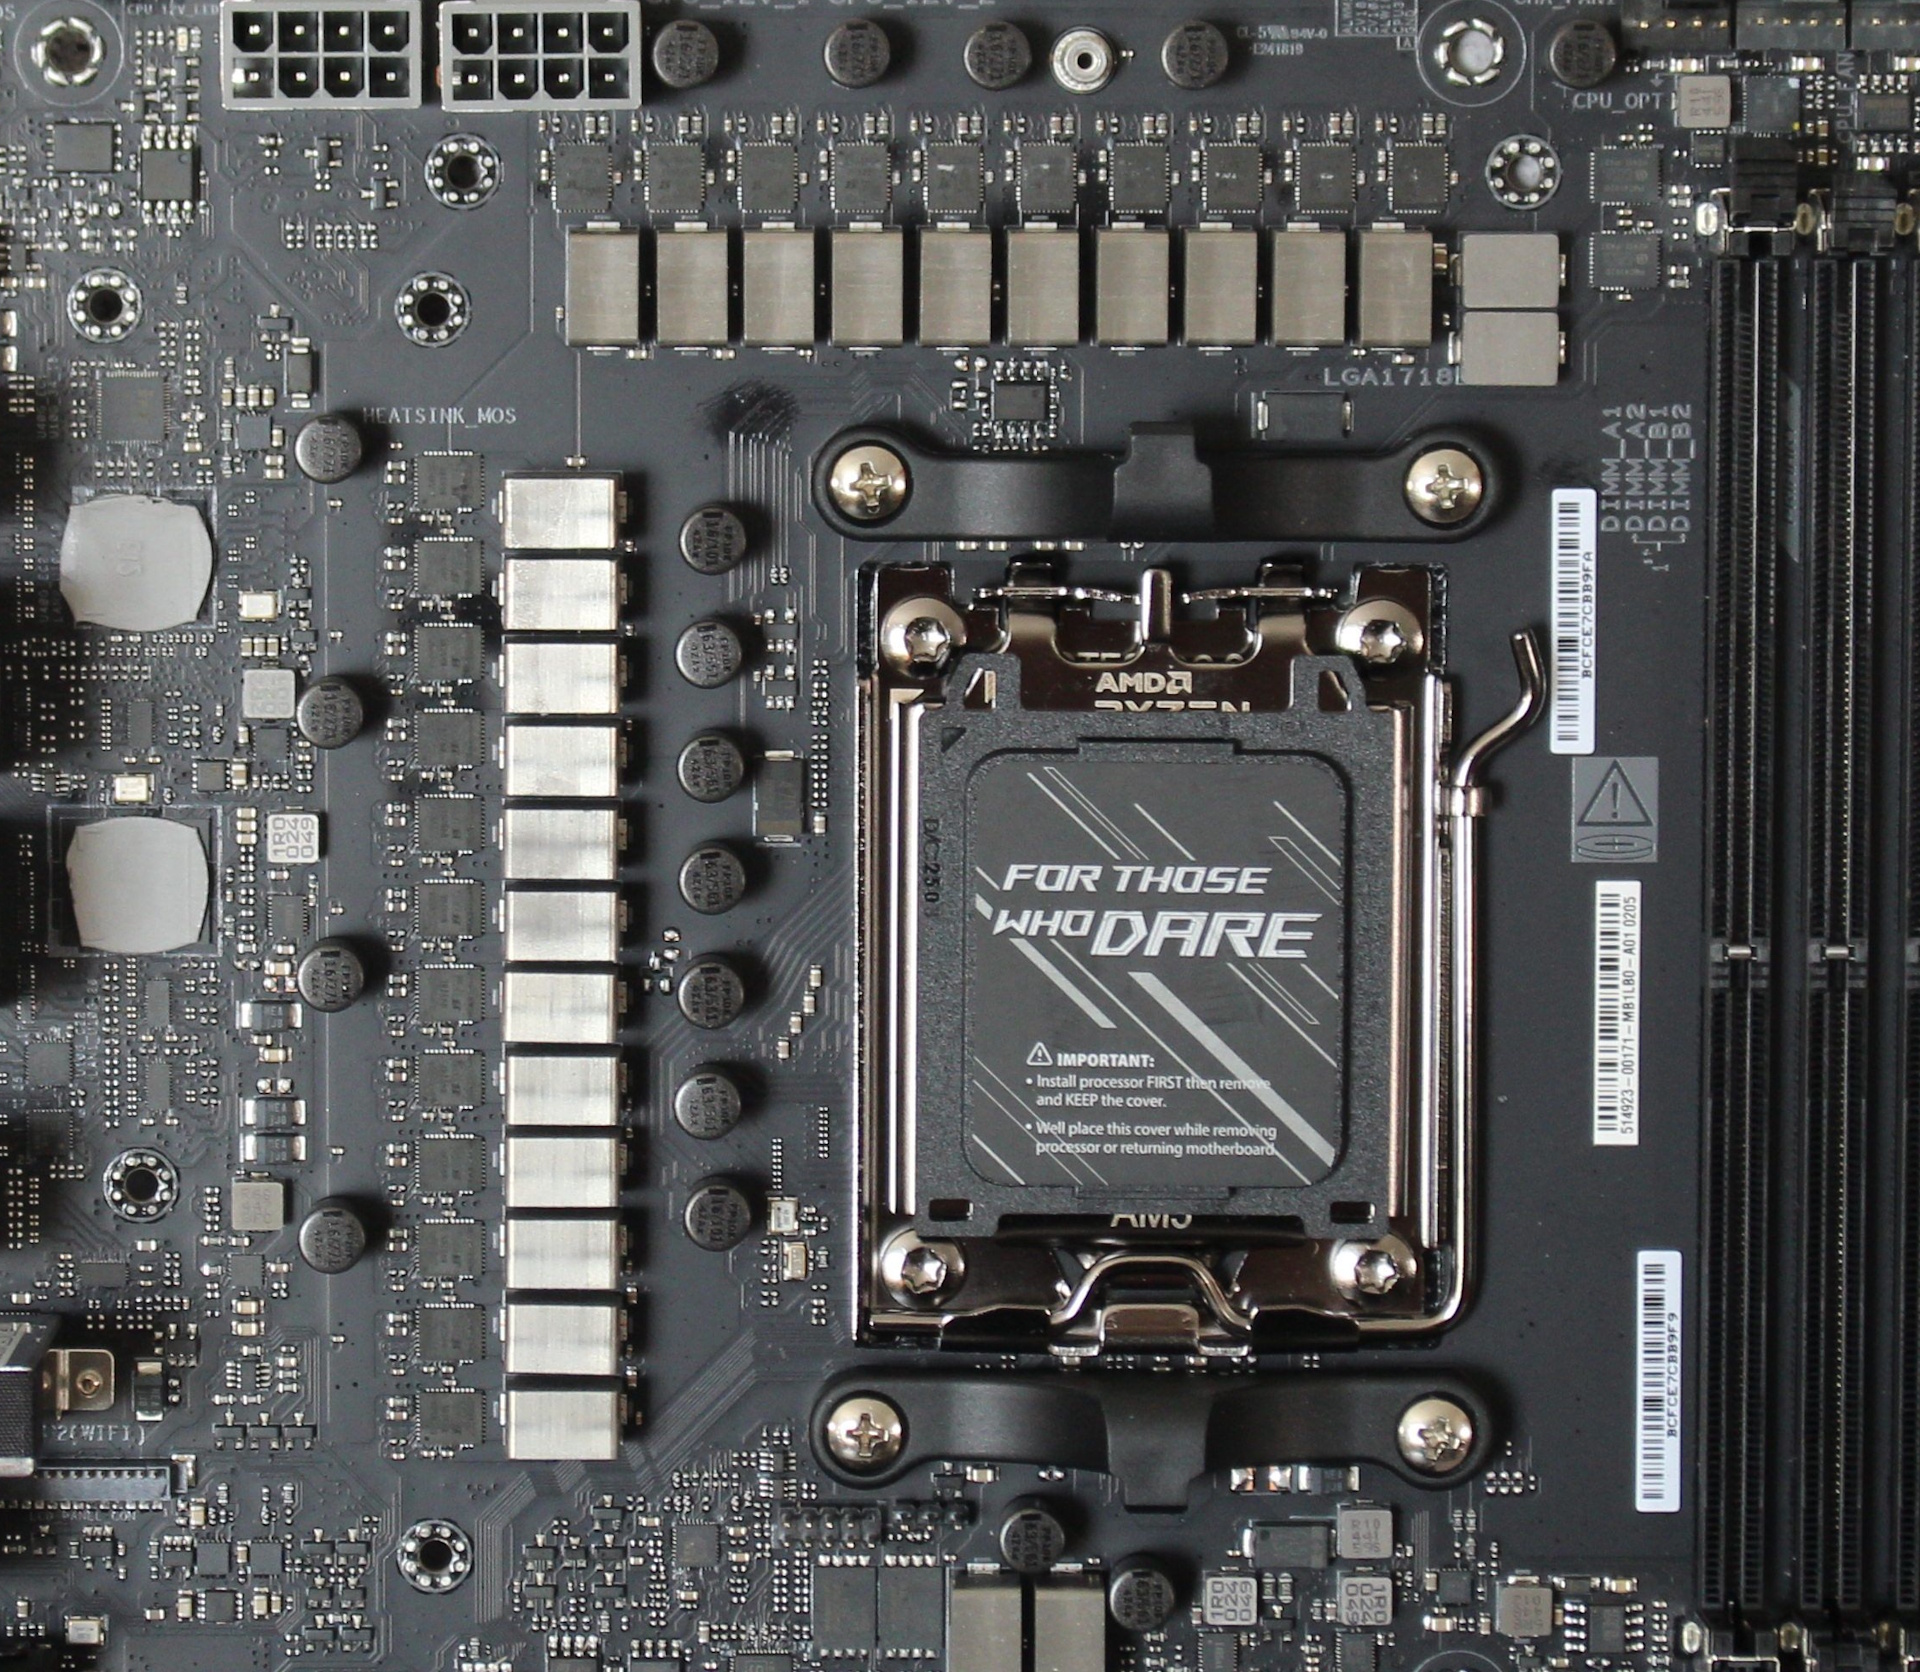

Power heads from the 8-pin EPS connectors onto the Asus Digi+ EPU (ASP2205) controller. From there, it reaches the 20 vCore stages (and 2x SOC), utilizing 110A Vishay SiC850A SPS MOSFETs. The MISC gets different Infineon PMC41420 80A MOSFETs. The 2,200A is enough to handle the most extreme conditions. Power delivery won’t get in the way of any overclocking, no matter how hard you push the board.
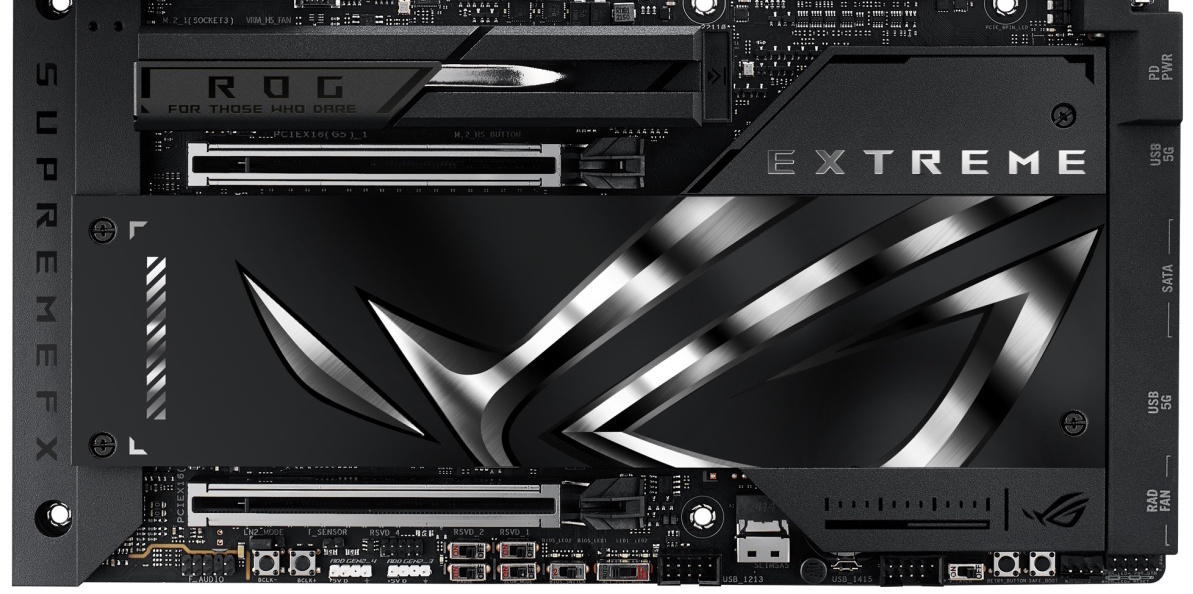

At the bottom of the board, starting from the left and hidden under heatsinks and shrouds, is the audio solution. Here we spy the flagship Realtek ALC4082 codec, some dedicated audio capacitors, and an ESS ES9219 Quad DAC/Amp. It’s arguably the best integrated solution for this generation and chipset.
In the middle of the board are two full-length PCIe slots, each of which connects directly to the CPU. The top slot, using the updated PCIe SLot Q-Release function, supports speeds of up to PCIe 5.0 x16, while the bottom slot has a maximum speed of PCIe 5.0 x8. There is considerable lane sharing between the PCIe slots and M.2 sockets, though.
When M.2_2 is enabled and M.2_3 is disabled, PCIEX16_1 will run in x8 mode, and PCIEX16_2 will be disabled. When M.2_3 is enabled but M.2_2 is not in use, PCIEX16_1 will operate in x8 mode, and PCIEX16_2 will operate in x4 mode. If both M.2_2/3 are enabled, PCIEX16_1 will run at x8 mode and PCIEX16_2 will be disabled. In other words, if you plan on using the second and third PCIe 5.0 M. 2s, you will sacrifice PCIe slot bandwidth. We would have liked to see the M.2 Q-Release feature on this heatsink as well. As it stands, you have to use tools to access M.2_2/3 (and remove the GPU).
Speaking of M.2 sockets, we find three in the middle of the board: one above the top PCIe slot, under the large heatsink, and the others under the large plate heatsink. The topmost slot, M.2_1, connects directly to the CPU and is the only PCIe 5.0 x4 (128 Gbps) socket that will not affect any other components. It supports devices up to 110mm in size (as does M.2_3). M.2_2 holds 80mm modules. Asus lists RAID 0/1/5/10 support with 9000 series processors.
At the right edge, again hidden under shrouds and connected horizontally, is an 8-pin supplemental board power, a 19-pin USB 3.2 Gen 1 (5 Gbps) header, four SATA ports, another 19-pin USB 3.2 Gen 1 connector, and finally, two more 4-pin fan headers (rad fan).
Along the bottom edge is a range of connectivity and functionality, some of which you don’t usually see. From left to right are the front panel audio BCLK +/- buttons, LN2 Mode jumper, 2-pin thermistor header, and two 3-pin ARGB headers. Next to that are several switches helpful for extreme overclocking, including Pause, Slow Mode, a BIOS Switch, and a PCIe Mode switch. The latter two also have LEDs to display the current mode/BIOS. Next to that is a USB 2.0 header, the SlimSAS connector, the CMOS battery, and another USB 2.0 header. Then there’s the V-Latch switch, Retry and Safe Boot buttons, 4-pin water pump header, and finally, the front panel header.
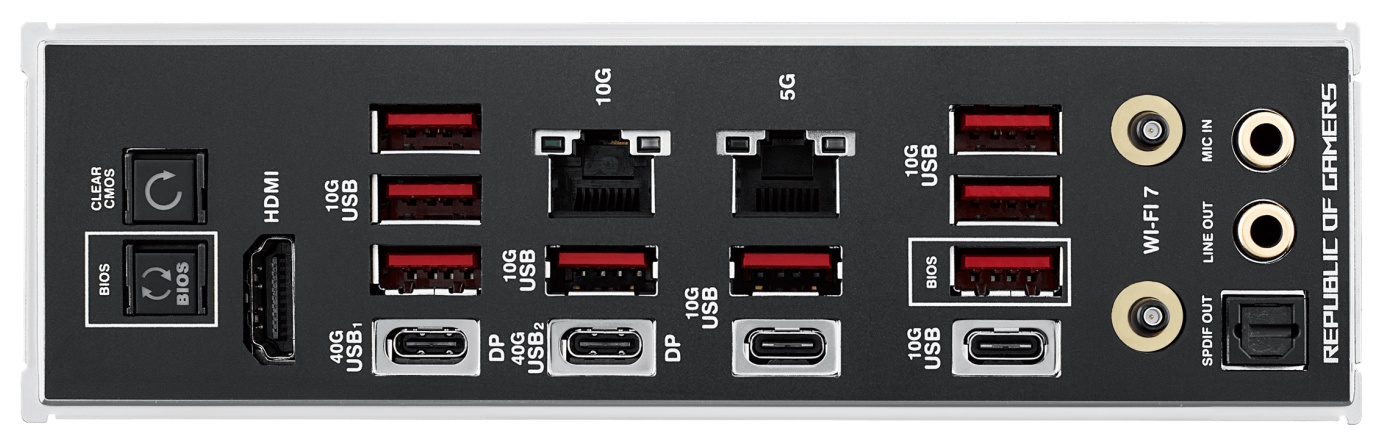

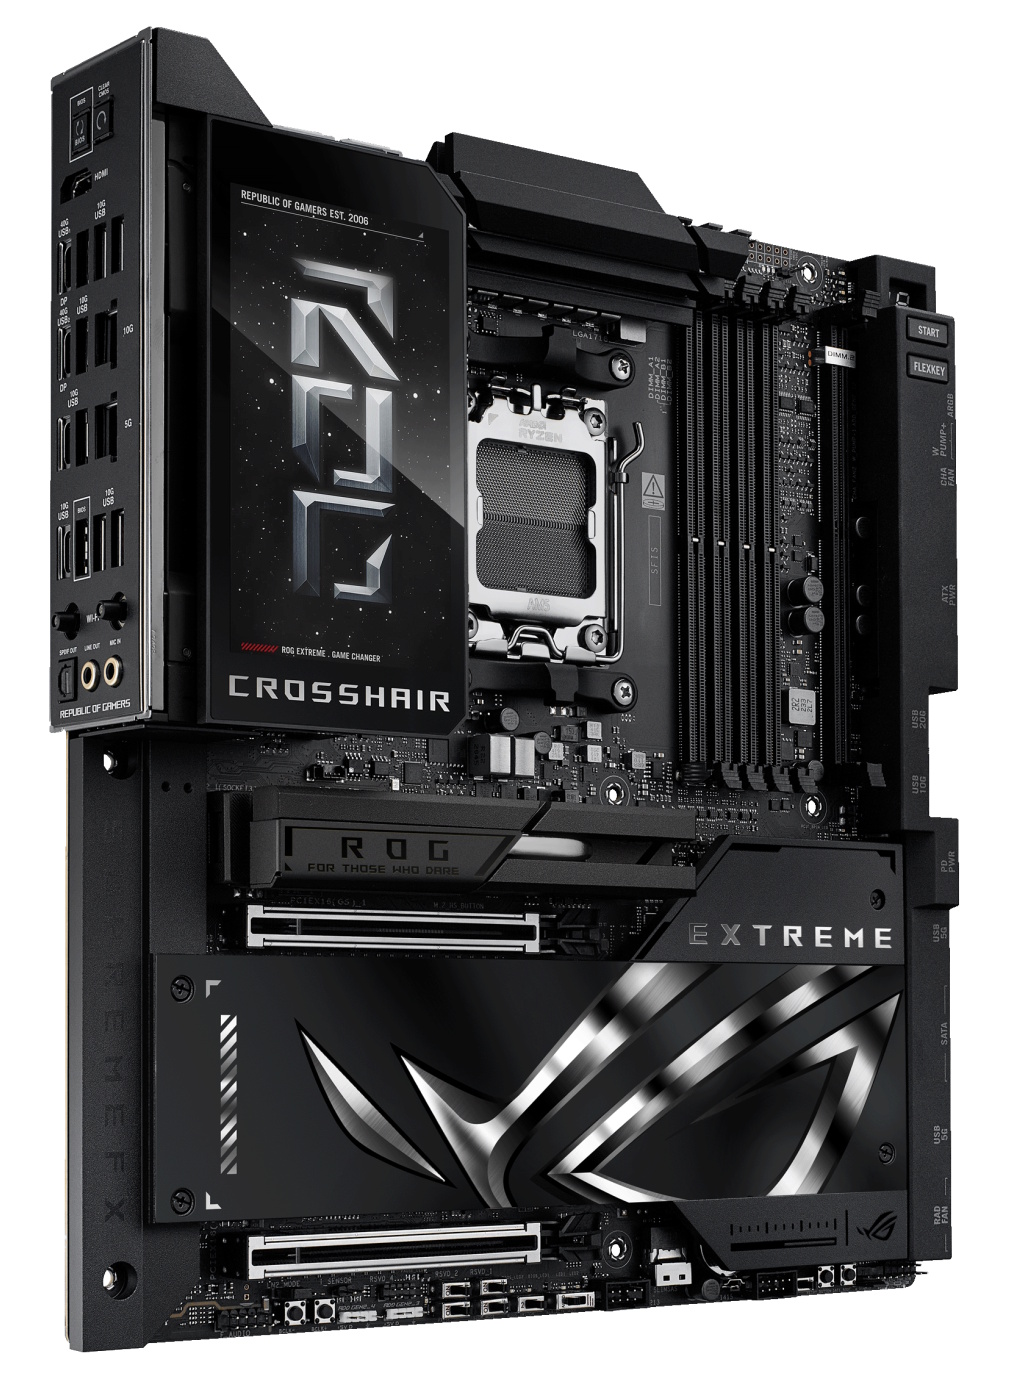
The rear IO features a substantial amount of connectivity, including eight USB Type-A ports (all supporting 10 Gbps) and four USB Type-C ports (two 40 Gbps and two 10 Gbps), which should be enough for most users (especially those with Type-C devices). Among those are the Marvell 10 GbE and Intel 5 GbE ports. On the left are the Clear CMOS and BIOS Flashback buttons. The HDMI port or the USB4 ports handle video output (requires integrated graphics). On the right are the quick-connect Wi-Fi 7 antenna connections. Finally, the audio stack features a mic-in and line-out (3.5mm) ports, as well as an optical SPDIF output.
MORE: Best Motherboards
MORE: How To Choose A Motherboard
MORE: All Motherboard Content